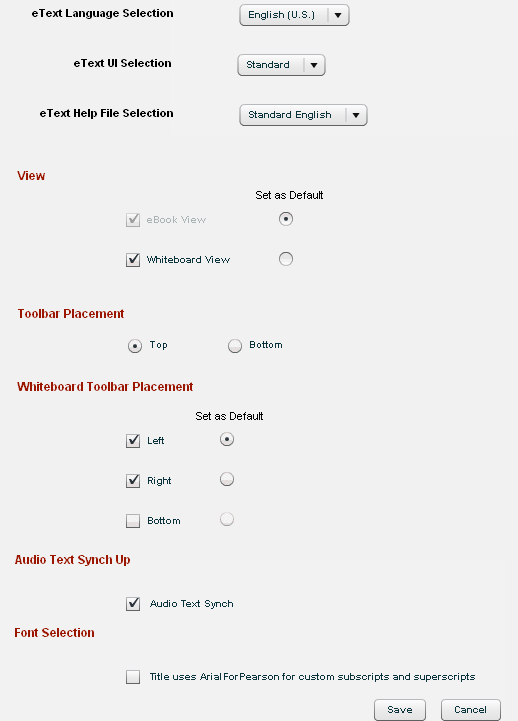
To open eText Theme Information page:

To select a language for eText Viewer user interface:
Select the language you want to assign from the eText Language selection menu.
Note: The language selected here is the default language for the eText in the eText Viewer. All user interface elements such as, buttons, labels, drop-downs, and alert messages will appear in the language selected but all the content of the eText will appear in its original language. Default language for an eText can be changed only from the eText Authoring platform.
To select user interface skin for the eText:
Select the required user interface skin from the eText UI Selection menu. For example if the eText is a Higher Education or secondary school (grades 6 to 12) title, select Standard from the drop-down menu. The available options in the drop-down menu are:
Note: The user interface skin selected here determines the user interface displayed in the eText Viewer for the eText.
To select the Help file for the eText:
Select the required Help files from the eText Help File Selection menu. For example if the eText is a Higher Education title in English, select the Standard English from the drop-down menu.
Note: The Help file selected here determines the Help file displayed for the eText in the eText Viewer platform.
To select the View:
Select Whiteboard View to enable Whiteboard view in the Viewer.
Notes:
To select the Browse Toolbar placement:
Do one of the following steps
To select Whiteboard Toolbar placement:
Notes:
To select Audio Text Synch:
To select a font for the eText:
If your eTextincludes custom superscripts or subscripts, select the Title uses ArialForPearson for custom subscription and superscripts check box.
By default, legacy eTexts automatically use the ArialForPearson font. If theeText you are authoring does not use superscript or subscripts, clear the check box to use the more general purpose Arial Unicode font. Also clear the check box when:
To designate this task as complete in the Proofing Tasks list in the Authoring menu:
Click the Task Complete button in the upper-right side of the page. The task status is displayed as Complete in the Authoring Menu page.
Note: Once the task is marked as complete, the Task Completed button in the upper right of the page changes to Revert - Task Complete.
To revert and designate this completed task as incomplete:
Click the Revert - Task Complete button in the upper-right of the page. The task status column becomes blank in the Authoring Menu page.