Add a Learning Catalytics module
As soon as you cross over from your Pearson course to Learning Catalytics, the corresponding Learning Catalytics course is ready for you to start adding modules.
Modules and sessions
Each module is set up in advance and has a module name that you supply and can edit.
A session is the delivery of one module. Each session has a unique numeric session ID, assigned by the system when the session starts.
When you add a module, you select one of five available response types. Students experience each response type differently, and you deliver these modules in different ways.
| Response Type | Students answer questions | You start & stop the session, and more |
|---|---|---|
| Instructor-Led Synchronous |
|
|
|
Automated Synchronous |
|
|
| Self-Paced |
|
|
| Self-Test |
|
|
| Team-Based |
|
|
Module setup
- Open the course and click Create module.
-
On the Create Module page, enter a module Name (students will see) and Date (used to sort modules in the list you see).
This date doesn't affect when you deliver the module or when it's due.
- Select the Response Type for this module (described above).
- Click Save and Continue.
You can add questions and customize the module now, or you can return later to edit the module.
You can always copy a module to deliver the same content multiple times in separate sessions, each with a new session ID. You might use the same module content for different courses, or even in a later term.
Procedure:
- Open the course into which you want to add a copied module.
-
Do one of the following:
- Click
 to select a module from another course. Then select the module to copy from the drop-down list, and click OK.
 - Click the gear icon
 for a module in this course, and then click
  Copy module from the menu.
The copied module is added at the bottom of the list of modules in this course.
- Click
-
Edit the module name and customize it in other ways, if necessary (see the next section).
If you copy the module within the same course, you'll want to remove "Copy of" and give the module a distinctive name.
Immediately after you create or copy a module, or if you open a module later to edit it, you can change the Name, Date, and Response Type that you specified for the module.
On the Add Questions and Customize Module page, you also set other options specific to each response type. When you are done, be sure to click Save and Finish.
Scores for any Learning Catalytics module session can be automatically transferred to your Pearson course gradebook. You set up the transfer as part of customizing the module, as follows:
- Under Gradebook Transfer, select the option to send grade data.
- [Optional] If you want your selection to be the default value for new modules you create, select the option to do so.
For more information, see Transfer Learning Catalytics scores.
If you select both Grade Transfer and Hide sessions for this module from students, Learning Catalytics will transfer grades to the MyLab Gradebook when you stop the module's session.
Immediately after you create or copy a module, or if you open a module later to edit it, you can add questions to the module. At the bottom of the Add Questions and Customize Module page, click either link:

For further instructions, see Create a new question for Learning Catalytics and Find Learning Catalytics questions.
As you are adding questions and allotting points for each question, you should also be aware of the implications of Learning Catalytics automatic and manual scoring.
Questions that you add are listed at the bottom of the page, where you can do all of the following:
- Click and drag a question to change the order of the list.
- Point to the question to see a preview.
- Assign points for answering the question, or for answering correctly, depending on whether you selected participation or correctness as the basis for scoring in this module.
For students to get a participation score, they need to answer the question. If they simply join the Learning Catayltics session, they will not get a mark for participation.
-
Click
and select  Edit to edit the question (allowed only for community-contributed content).
 - Click and select x Remove to remove the question from this module. (It remains in the question library.)
- Click and select Copy this question to add a copy to the bottom of the list of questions (allowed only for community-contributed content). From there you can edit the copy to create a similar question.
When you copy questions, the original questions remain in the original module. When you move questions, the original questions are deleted from the original module.
- Enter the Learning Catalytics course that has the module with the questions you want to copy or move.
- Select the module with the questions you want to copy or move.
- Select Edit.
- Scroll down the page to the Questions.
- Do one of the following to select the questions you want to copy or move:
- To copy or move one question at a time, click the question's and select Move or copy to another module.
- To copy or move multiple questions at once, select the questions. Then select Copy or move checked questions below the question list.
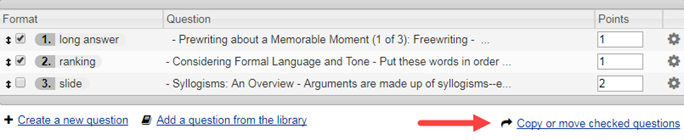
- To copy or move one question at a time, click the question's
- Select the Destination module you want to copy or move the question(s) to from the drop-down list.
The drop-down lists the modules by course; select the course and module.
- Select either Copy question or Move question. (Selecting Move question removes the question from the current module.)
- Click OK.
Learning Catalytics copies or moves the selected questions and returns to the Add Questions and Customize Module page for the module you entered at the beginning of this procedure.
Do one of the following:
- In the list of modules for the course, click for the module, and then select Edit from the menu.
- If the module is open, click Edit from the actions bar.
- In the list of modules for the course, click for the module, and then select x Delete module from the menu.
- If the module is open, click x Delete module from the actions bar.
Note: If a session for the module is in progress, you cannot delete the module.
Module delivery
Tip: Whenever you start a session, check the breadcrumbs at the top of the page to confirm that you are delivering the module from the correct course.
See helpful details for different response types:
Use a module in class (Instructor-Led Synchronous)
Provide a module for asynchronous online students (Automated Synchronous)
Assign a module outside of class, or in class as a quiz or worksheet (Self-Paced or Self-Test)
Deliver an individual-and-team module (Team-Based)
To deliver a session using a mobile device, see:
When a session is stopped, either manually or because the End time has arrived, it cannot be restarted. You can, however, start another session to redeliver the same module or a copy of the module.
Note: If you want to preserve the graphical display of results for each session, consider copying the module. See the next section for details.
Session results
When you stop a session, you return to the list of modules, with pie-chart icons that give a quick look at results for the module session you just delivered, along with other modules in the same course.
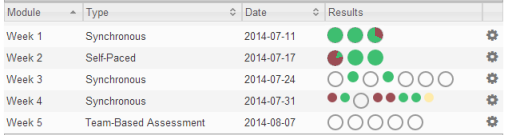
Each pie represents a question in the module, with responses coded by color and size. For details, see Review session results.
Your module list always shows pie charts for the most recently delivered session for each module. If you prefer to see graphical results for all sessions based on the same module content, consider copying the module and delivering each session with a separate copy of the module.
For example, by copying the Week 6 module listed below, you can deliver the same set of questions multiple times in the same course without replacing the results graphs with each new session. Notice that each copy has been given a distinctive name, and that you still see results for Week 6 Tuesday 8:00, even though Week 6 Tuesday 9:30 has also been delivered.

In this image, the pie charts represent the proportion of correct and incorrect answers per question that was delivered in each session. Note that the second delivery results didn't overwrite the first results because two separate but identical modules were delivered. When the Week 6 Thursday module is delivered, all of the graphs will show results in a way that allows them to be compared easily.
If you do deliver the same module more than once (without delivering copies of the module), the overwritten results images have no effect on:
- Your ability to see detailed results for earlier sessions, as described in Review session results.
- Scores that appear in the Learning Catalytics Gradebook for each session.
You can also click ![]() and select
and select ![]() Review results to see student-by-student responses for each question. For details about viewing results, see Review session results and Review a student's performance across multiple sessions.
Review results to see student-by-student responses for each question. For details about viewing results, see Review session results and Review a student's performance across multiple sessions.