Mohr’s circle: Analysis
Use the solutionAppletFlash answer type to create Mohr's circle analysis items. Mohr’s circle is a two-dimensional graphical representation of the state of stress at a point. Consider using the Mohr’s circle analysis authoring feature to:
- Create a single-Part item that asks students to add a point on the circumference of a circle and to draw radial lines.
For example, you can ask students to mark the maximum in-plane shear stress and to draw a line showing stress at 30 degrees element.
- Create the second Part of an item when Part A of the item is authored using the Mohr’s circle Construction authoring feature.
Requirements
To work with the Mohr’s circle analysis feature, you need the Adobe® Flash® Player.
How students work an analysis
Students see a Mohr’s circle with menu options to add points on the circle. In the example below, each student is asked to add point P (if P represents average normal stress) and the radial line CQ (if CQ represents the stress on 30 degrees element).
The student places points P and CQ on the circle by selecting options from the Add Points menu. The points can only appear along the circumference of the circle.
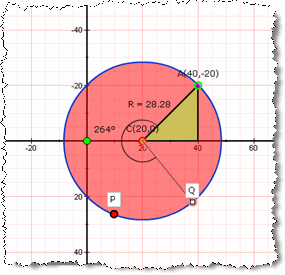
Analysis aids are available to help with more complicated questions. Students can place any number of these aids as broken lines within the circle. These lines are not scored by Mastering. Students can also delete lines or reset their workspace.
Create a Mohr’s circle analysis question
In the Item Editor window
- Select Edit in Browser from the Edit Action menu in the upper right.
- Remove the default item.
- Under Answer Instructions, select solutionAppletFlash.
- In the input fields, add the following:
- For Applet Name, enter mohrs_circle.swf
- For Parameters, enter authoring=1&analysis=1.
- Set Width to 1000 and Height to 500.
- Click Validate Field and then Preview Item.
You will see the applet in authoring mode.
In the Item View window
- Provide the correct answer in the form of a Mohr’s circle diagram in the graph area.
Move the provided points A and C to set up the Mohr’s circle you want to draw.
To move a point: Select the point, then drag and release your cursor.
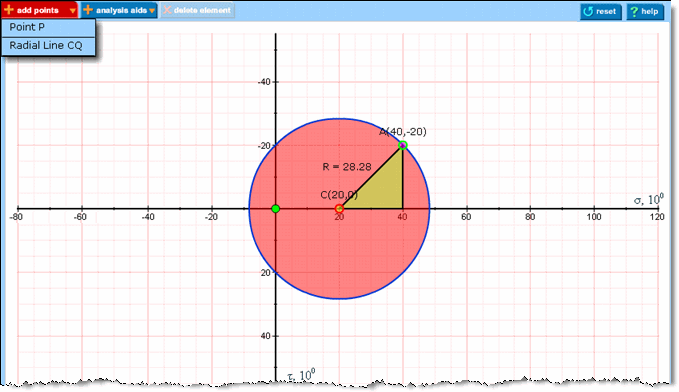
- Mark and label any number of the points and radial lines along the circumference that students need to add for the correct answer.
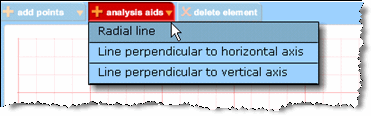
Select
 Add Points and then choose either Point along the circumference or Radial line to add one or more of these. By default, these points are labeled P and Q.
 To change these labels: Assign a different ID by typing into the box in which you see the ID. The new ID label can be any single uppercase letter (B-Z) that has not already been assigned to an element. For example, you cannot assign A or C, since those are already used in the provided circle.
- Below the Mohr’s circle, add the values for the coordinate tolerance (in units) and angle tolerance (in degrees).

Add wrong answer conditions and save your configuration file
- Click Add in the Wrong Answer area.
You will see a number of checkboxes on the left for wrong answer conditions.
- Click in checkboxes to indicate applicable conditions for the wrong answer ID. The available operators in the dropdown menus are: > (greater than), < (less than), = (equal to) or ≠ (not equal to). Note that "anti-clockwise" is the same as "counterclockwise".
Use the available icons to work with your list of wrong answer conditions.
 = Move up through list of wrong answer conditions
 = Move down through list of wrong answer conditions
 = Edit
  = Delete
  =Copy
=Copy - Continue adding wrong answer IDs until you have finished.
- In the Altova editor, enter the wrong answer IDs under "Value" and enter wrong answer responses under "Response".
- Click Save to save the configuration file to your desktop. Then upload it, by selecting Manage Assets from the Edit Action menu.
A window appears with the answerString and flashVars strings.
The configuration file contains information about the correct answer and the wrong answer.
If you ever change the correct answer or the wrong answer, you should save and upload the file again. The wrong answer response you write in the Altova editor next to each wrong answer ID is independent of the configuration file, but the wrong answer itself needs to go into the configuration file.
- Copy and paste the answerString string into the Correct Answer(s) field, then copy and paste the flashVars string into the Parameters field. Click OK.
- Before you commit your changes:
- Change the authoring parameter from 1 to 0 to switch to student view.
- Adjust the size to 600 by 600, so that the workspace will be a more manageable size.