solutionAppletRanking
Use this answer type when you want students to rank items by size or magnitude, whether individually or in equivalent sets. Students drag item tiles into an answer bin.
- Items to be ranked: The items can be text or images, and you can use both in the same question. For example, you might want to provide both image and text items to be ranked equally within a sequential process.
- Answer bin: This appears as a blue box unless you choose to add a background image. Any Pre-Text or Post-Text you add appears as a label in the top left or top right of the answer bin to guide students.
Tip: Right-click on the applet to view the version number so you can remove it from the ranking question in Production.
Student view
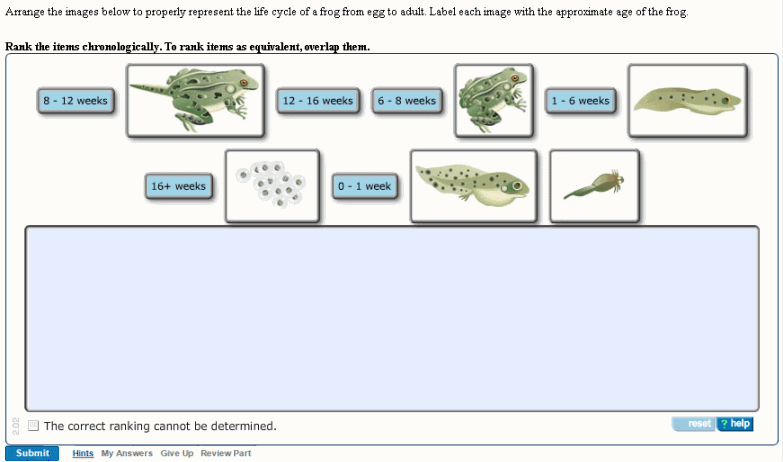
Answer box for this example
To create a solutionAppletRanking item:
- In the Item Editor, under Answer Instructions, click the add box and select solutionAppletRanking.
For new items, the solutionMultipleChoiceRadio answer box displays in Part A by default. To change this or any other answer type, right-click in the box and select Remove > answer type to see the add box.
- Enter information in the answer box, as described below.
Note: If some items are equivalent, as in the example above, include instructions to drag equivalent items to the same position.
Applet Size, Hide "Ranking cannot be determined", Randomize, and Avoid Overlap settings
These settings work for most items:
-
Applet Size: This dimension includes both the items to be ranked and the bin into which students drag the items.
- Standard (850px width x 425px height): Displays in a single-column layout. This is the default for newly created ranking items. (If you copy an item, it will reflect the size of the item you copied.
- Small (475px width x 425 height): Choose Small if the items to be ranked are a few small text or image tiles that don’t take much horizontal space. Or, use this setting when the item displays in a 2-column layout to display two ranking bins. Note that the column layout is dependent on the maximum width of ALL assets in the item.
- User-defined: Specify a custom size in pixels for Width and Height. When setting a custom size, be sure to preview the item to ensure that the ranking question appears as you intended.
- Hide "Ranking order cannot be determined" – Don't check, so the "Correct ranking cannot be determined" checkbox appears as a possible correct answer to students.
- Randomize item order – Check, unless answers are a series of numbers or other elements that make more sense in a specific order
- Avoid Text/Image Overlap – Check, so that images and text are visually distinct.
Pre-Text and Post-Text
You can include Pre-Text and Post-Text to indicate the order in which students should rank items.
- Any Pre-Text or Post-Text you add appears as a label in the top left or top right of the answer bin. For example, you might want to add the labels “Slowest” and “Fastest” to indicate the ranking progression.
- To identify a ranking subject, consider adding just a pre-text label such as “Phases of the moon”.
Items to be ranked and the answer bin
Students drag the items that correctly answer the question to the answer box, which is blue by default. When coding, it's easiest to order items from largest to smallest.
Note: Items can contain images, but all images must be assets. See Adding images.
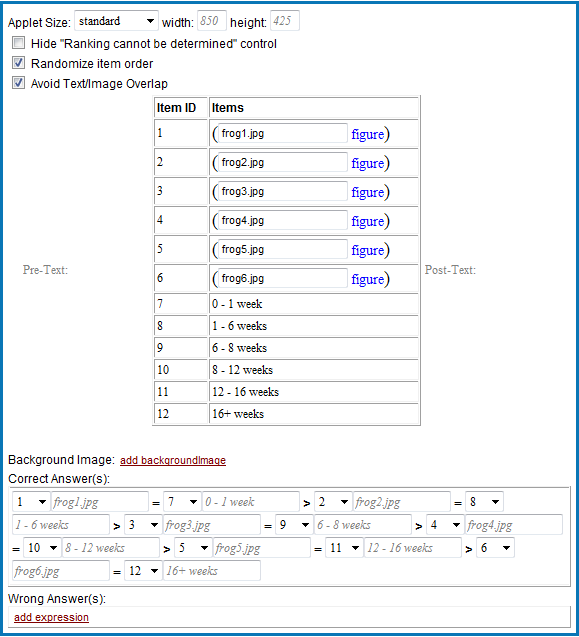
- For each item, enter a number in the Item ID column.
-
In the Item column, click add and select either:
- htmlText to create a text tile (0-1 week, 1-6 weeks, etc. in the example).
Optionally, choose a formatting option, such as for bold, subscript/superscript, TeX, or a variable. You apply extended formatting to HTML items in the same way that you apply formatting to other text items, such as to add <br> for a break. - img to enter the name of an image to display as a ranking tile.
- htmlText to create a text tile (0-1 week, 1-6 weeks, etc. in the example).
-
To add more items:
- Right-click in the Item table and select Insert before>item>item or Insert after>item>item.
- To add an item after the last one, you can also place the cursor in the last row and press the Tab key.
- [Optional] You can replace the default blue answer box with an image by clicking add backgroundImage and entering an image file name.
Tip: If you include a background image, make sure it isn't visually distracting, especially if correct answers are graphics.
Correct answers
If the correct answer is Ranking order cannot be determined:
- Click add indeterminate. Make sure the Hide "Ranking order cannot be determined" checkbox is not selected, so students can see the Ranking order checkbox.
If the correct answer is one or more items:
- Click add value.
-
Select the Item ID, click add, and select either:
- equalToItemRef if the item is equal in value to the next item ID you enter after clicking add.
- GreaterThanItemRef if the item is greater in value or chronologically precedes the next item ID you enter after clicking add.
In the example below, frog1.jpg shows eggs at 0-1 week. For a correct answer, students drag BOTH the frog1.jpg image tile and the 0-1 week text tile to the SAME left-most position in the answer box. The frog2.jpg image tile and the 1-6 weeks text tile follow together chronologically (tadpoles), as indicated by the greater than sign (>) between the first and second image/text tile set.

[Optional] Wrong answer responses
Note: Though not required, it's recommended that you include wrong answer feedback responses.
To code a wrong answer for Ranking order cannot be determined:
- Click add indeterminate.
Make sure the Hide "Ranking order cannot be determined" checkbox is NOT selected, so the Ranking order cannot be determined checkbox will appear to students.
To code wrong answer responses:
- Click add value.
-
Select the Item ID, click add, and select either:
- equalToItemRef if the item is equal in value to the next item ID you enter after clicking add.
- GreaterThanItemRef if the item is greater in value or chronologically precedes the next item ID you enter after clicking add.
-
To include a Wrong Answer Response (WAR), click add response and enter text.
To add another response, right-click and select Insert before>expression>expression or Insert after>expression>expression.To add a response after the last one, you can also press the Tab key.
To add an "inverse" wrong answer, click the NOT checkbox. If the item specified does not fulfill the criteria, students see the associated WAR.
You can also use wildcards for the first or last items in wrong answers:
- item ID > *
- * > item ID
You don't have to specify complete wrong answers; a response displays if any portion of the wrong answer response is true. For example, for a wrong answer response coded as B=C, students see the wrong answer response for any of the following:
- A>B=C>D
- B=C>A>D
- A>D>B=C
See also: