solutionTutorial
This answer type is reserved for Pearson Mastering team authors only. Use the solutionTutorial answer type with Flash or HTML5 animations that have been programmed to send the grade to Mastering. (The solutionTutorial answer type replaces the former solutionAppletTutorial answer type, which was originally created to support the Pearson Astronomy Place tutorials.)
 Window handling for solutionTutorial animations
You can specify the browser window size for the animation and whether the animation opens in a new window or not. (Instructions provided in section below.)
- Some animations, like the HTML5 Concept Maps, require the animation to open in a new window to optimize the student experience. The new window will open at a predetermined size, but is resizable by the student.
- When a student is done working through the animation and clicks Save, the grade is reported to Mastering. Whether the window stays open or not depends on whether the animation is set to open in a new window (window stays open) or open inline (window closes when student clicks Save so that the Mastering window can be reopened).
You must have a Flash file (.swf) or HTML5 file that meets the following requirements:
- For Flash files: Regardless of the file size, you can store the file on a remote server (such as the Pearson Media Server) and link to it from the answer type's Tutorial field. For Flash files less than 1 MB, you can upload the file to the asset manager.
- For HTML5 animations: You must store the file on a remote server (such as the Pearson Media Server) and provide a URL with specific tokens. The tokens first tell the system the Format type and the Tutorial type, followed by the configuration URL. When coding HTML5 tutorials, you must have a URL with the following parts:

Format type is always "html":"
This specifies that the animation is an HTML5 animation. Use this token for any HTML5 animations designed for integrating with Mastering using the solutionTutorial answer type.
Tutorial type is "nameName?". (Name not literal here.)
This identifies the specific content of the HTML5 animation, such as "conceptMap?" in the above example. All HTML5 Concept Map animations, regardless of specific instructional material, must have the Format type and Tutorial type tokens before the configuration URL token.
"Configuration url" is the URL that provides a direct path to the specific instructional material. This will be different for each item you code.
- General requirements: The output file from the animation must be configured to send grade data to Mastering using the solutionTutorial API, which supports the “graded” (getResponse =0 or 1) and setResponseValue (=aResponse).
Information on how to develop an external animation to report grade data to Mastering can be found in the Mastering Twiki document. (If you don't have access privileges to this Twiki page, contact your manager). The tokens required to successfully launch an HTML5 tutorial are also described in this Twiki document. Important: Integrating external animations to report grade data to Masteiring is NOT a trivial task and should be considered a significant development task following agile principles.
In the case of HTML5 Concept Maps, the output file is a JSON file which is stored on the Pearson Media Server. The answer type is coded with a URL to the Media Server that launches the animation from within Mastering.
- In the Item Editor, under Answer Instructions, click the add box and select solutionTutorial.
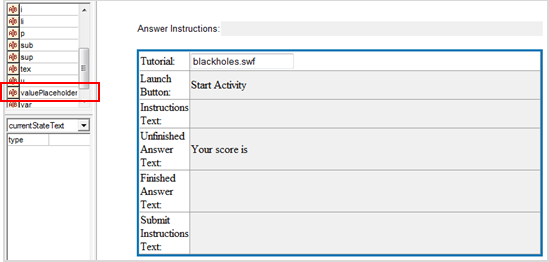
- In the Tutorial field, enter the name of the .swf file or the URL to the HTML5 file.
For new items, the solutionMultipleChoiceRadio answer box displays in part A by default. To change this or any other answer type, right-click in the box and select Remove > answer type to see the add box.
Note: When coding an HTML5 Concept Map item, enter the three-part URL of the JSON file. The JSON file is stored on the Media Server. If any one of the three tokens in the URL is missing or misrepresented (for example, missing a “:” or a “?”) then the animation will not open from Mastering.
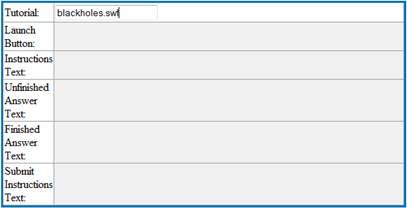
Flash animation in Tutorial field
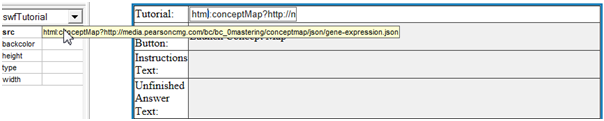
HTML5 URL in Tutorial field
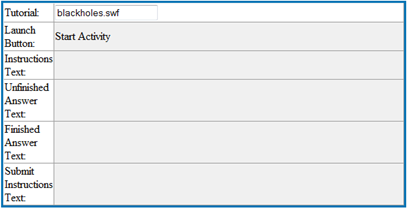
- In the Launch Button field, enter text that you want to appear on the launch button, such as “Start Activity”. The length of the button name must be less than 25 characters, including spaces.
- Click Preview to review your changes.
Default text is shown to students for each of the following states. At your option, you can change the default text. (Instructions provided below.)
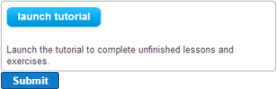
- Initial state: Referred to in the Altova Editor as “Instructions Text,” the initial state occurs before a student starts the animation. This shows before the student opens the animation to work through the information. Below is an example of the initial state with its default text:
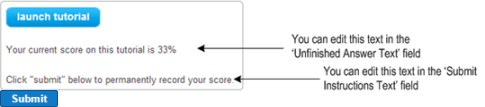
- Intermediate state: Referred to in the Altova Editor as “Unfinished Answer Text” and the “Submit Instructions Text” fields. Intermediate state occurs when the student has started the work and has clicked Save in the animation. The score for the work is reported to Mastering. Below is an example of the intermediate state with its default text:
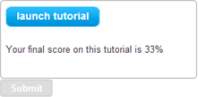
- Complete state: Referred to in the Altova Editor as “Finished Answer Text,” the complete state occurs after the student has clicked Submit. Below is an example of the complete state with its default text:
To enter or edit the State text:
- In the Instructions Text field, enter the text you want to appear before students start the animation.
- In the Unfinished Answer Text field, enter the text you want to appear after the student clicks Submit or Save in the animation.
- Place your cursor in the text field where you want the score to appear.
- In the entity window, click the valuePlaceholder icon. Asterisks appear where the score will display to the student.
- Add a % symbol if the grade calculation is reported in percent.
Tip: You can continue to add text after the asterisks. If the score completes the sentence, then add a period and type your next sentence - In the Finished Answer Text field, enter the text you want to appear after the student has clicked Submit.
- Click Preview to review your changes.
- Verify the value placeholders: Start the activity and complete enough questions to generate a score. Click Save. You will see the score in place of the asterisks that were displayed in author mode.
Important: Because this text contains the score that is reported to Mastering when the student clicks Save, you must add a value placeholder where you want the score to appear:
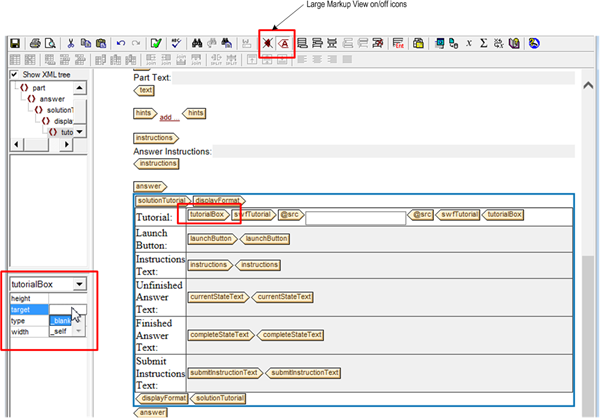
The easiest way to do this is to show the large mark-up view.
- Click the Show Large Markup View button on the toolbar.
- Select the tutorialBox tag.
- In the attribute window, click in the target field, and select _blank.
Note: For the HTML5 Concept Maps, the student experience is designed for the content to open in a new window and to stay open after completing the map. - Click Preview.
- Start the animation and make sure it opens in a new window.