Element settings (for vectors and moments)
Select the element settings tab to adjust vector settings (such as label, color, and width) or to add a moment.
You can control whether students can initially see and manipulate any vector that you place in the background. You can also set which vectors should be added to the vector sum and control whether students can see the sum vector.

Note: If you have either a vector or a start/end point selected on the left and try to edit anything on the right using the arrow keys, you will also adjust the location of your selection. To avoid this, you can just click in a free space in the left window so your selection becomes inactive. Then, you can use arrow keys in the right section of the window without moving the vector or start/end point.
Vector settings
| To do this... | Take this action... |
|---|---|
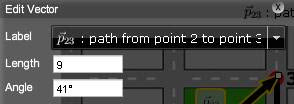
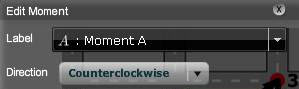
| View information for a vector (label, length, and angle) or a moment (label or direction). | Click the Attributes button.  The attribute information displays as shown below, depending whether you selected a vector or a moment. Students can also see this same information. Vector attributes Moment attributes
|
| Set the number of decimal points that display the length and angle of a vector |
Adjust the Length/Angle D” setting
. This impacts the display of the length/angle in the Edit Vector window. |
| Set the number of decimal points that display the start and end point of a vector |
Adjust resolution of the x and y axes in the diagram settings tab.
|
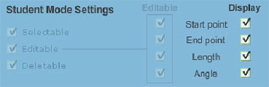
| Hide the display of the start/end points or length/angle |
Remove the checkmarks for the applicable settings in the Student Mode Settings/Display box of the Element Settings tab.
|
| Manually adjust a vector by editing its start/end point or length/angle |
Note that you are limited by the resolution of the axes so you may not be able to get the exact length and angle that you want. |
| Determine whether students see the sum vector |
Click the arrow next to Vector sum to select optional, on, or off.
Only vectors set to Add to Sum, are added—all others are excluded. If you are allowing students to see the vector sum, all vectors should be added to the sum. |
| Display the (x,y) coordinates of the vector start and end points |
Check the Show coordinates box .
These coordinates display in the work area next to the select start or end point. |
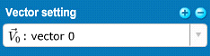
| Add a new or delete an existing Vector setting |
Use the plus/minus buttons.
|
| Delete an existing vector | Delete the Vector setting and delete the vector from the vector drawing area. |
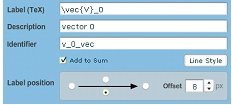
| Change the label, description, identifier, style, or label position of a vector, or remove the vector in the vector sum |
Select the vector whose properties you want to edit using the Vector setting drop-down list.
Then make the appropriate changes to the settings:
Note: The label must be coded in TeX. The description must be in plain text (no HTML formatting) and the identifier must be the var-coded equivalent of the label. This identifier gets used in the correct answer string. |
| Switch between initial and final states or to see the item as a student |
Use the State and Mode buttons.
|
| Copy a vector from the final state into the initial state or vice versa |
Manually copy it by switching to that other state and clicking on the grayed out vector.
In other words, if you create a vector You only have to copy vectors that you create in one state if they are not automatically forced into existence in the other state by the Selectable and Editable rules. |


 in the final state that should be present in the initial state, switch your view to the initial state and make certain the Show background state box is checked. You should see
See also: