Work with Pearson eText
Updated 03 Jul 2021
Instructors, students, and section instructors can work with highlights, notes, bookmarks, and study activities in the eText. Instructors can also share their notes with the class and customize the eText table of contents for the course. How to open and navigate the eText
If you copy a course using the same edition book, your eText highlights, notes, bookmarks, and any customized table of contents will appear in the eText of the new course. (Does not apply to PDF eTexts.)
Instructors, students, and section instructors can customize their personal view of the eText by adding highlights and notes. Use the Notebook to add notes independent of a highlight and to tag, filter, or export your notes.
- From the open book, drag to select the passage you want to highlight. In select eTexts, you can also highlight an image (includes figures and tables) or video.
- Select a highlight color, whether green, yellow, or pink.
- Add a note if you want. You can also share your note with the class.
- Add a note: Enter your note in the box that appears. Or, you may need to select
 to enter your note.
 - Share the note: Select the Share Note control in the note box. Or, you may need to select
 to share the note. (The sharing option appears only to the course owner.)
A note marker appears in the right margin of the book page. Shared instructor notes appear with a blue highlight in the eText for all course participants.
- Add a note: Enter your note in the box that appears. Or, you may need to select
- Show/hide highlights in your personal view of the eText — Select
 (top right) and then select the Show highlights control. Any note markers remain in the margin.
 - Review a list of your book-based notes — Select
 then Notebook. See the next section for details about working with the Notebook.
Use the Notebook to organize and work with your notes. Your Notebook contains all of your notes, whether associated with a highlight or not.
The Notebook for your eText may provide some or all of the features described below.
Select then  .
.
- From the Notebook, select
 or
or  to add notes not associated with a book highlight.
 - To share your note with the class, select the Share note control. (The sharing option appears only to the course owner.) indicates instructor shared notes in your Notebook, whether associated with a highlight or not.
To add a link to a resource outside of the eText, enter the URL beginning with www. When this feature is available, the URL becomes active and turns blue.
- Select the notes you want to tag from the Notebook, either by selecting the lower left of individual notes or by filtering your notes view (described in the next section).
- Select
 and assign a hashtag, such as #review_questions. You can tag notes with multiple hashtags, like to identify if the note is for a video (in select eTexts).
- Select
 Filter from the Notebook.
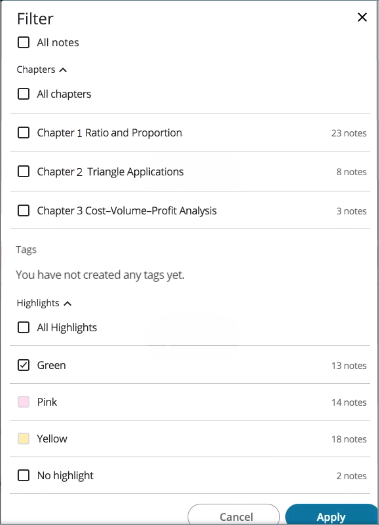
 - Make selections to filter your notes view by chapter (all or specific ones) or highlight (green, pink, yellow, or no highlight). To show only your custom notes, select No highlight.
- Filter to select the set of notes that you want to export. For filter instructions, see the section above.
- Select
 and identify where you want to send your notes. Notes exported in PDF format show the colored highlights.
If you’ve spent time adding eText highlights and notes to share with your students, you may want to get your notes into another course that uses the same eText.
Either transfer the eText notes by copying the course (easiest, usually done before the start of the course term) or copy the notes from an eText into other eTexts, which can be done at any time. Either way, the eText book edition must be the same.
Copy a course using the same edition book. Either an instructor or a section instructor can copy the course. The eText highlights, notes, and bookmarks and any customizations to the table of content from the original course will appear in the eText of the new course. Do this before the start of the next school term.
This feature doesn’t apply to PDF eTexts. (PDF eTexts have the print page number at the top center and the eText pages match the print book exactly.) If you have a PDF eText, see instead the next section “Copy instructor notes from one eText into another.”
- Open the eText from each course at least once. (This allows the eText copy notes process to locate your courses.)
Important: You must be the owner of each of the courses you want to copy eText notes to or from. (If you’re coordinating a course group and other instructors have created their own member sections, you’ll be unable to copy eText notes into their courses.)
- Open either the eText that contains the notes or the one into which you want to copy the notes.
- Select (top left) so the Contents pane appears.
- Select Notebook, then choose
 .
.
Don’t see the “Copy notes” button? This means you don’t have to copy any notes. All of your eText notes for the current book are available to you, no matter which course you launched your eText from.
- Choose whether to copy the eText notes TO or FROM another course. Only courses that contain copyable notes appear in the list.
- To copy notes from the eText of another course into the current eText:
Accept the prefilled TO and select the course name with course ID that you want to copy the notes FROM. Only courses with copyable eText notes are provided in the checkbox list. - To copy your notes from the current eText into the eText of another course:
Select to reverse the copy direction. Then select the course TO which you want to copy your eText notes.
- To copy notes from the eText of another course into the current eText:
- Select .
Any instructor shared notes are viewable by all course participants.You can’t undo this action. If you copy notes you don't want, you can delete them individually later.
Add bookmarks in your eText to refer back to a number of areas in the book. Students may find bookmarks handy for studying.
Note that when you reopen an eText, it shows the last content you had open. This applies even if you switch between using the eText in a web browser or in the Pearson eText app.
Select  (top right) to bookmark the current page.
- Select then
 . Your bookmarks are listed in book order below the "Recently visited" section.
 - To show the bookmarks at maximum width, select
 .
. - Select a bookmark to go to its section or page.
- Select then .
- Select
 .
.
Instructor course owners can edit the table of contents in the eText so students can focus on the content covered in the course. This feature is available for your eText only if the Customize option appears above the chapters in the Contents pane. (This option is not available for PDF eTexts.)
The eText in copied courses can pick up an edited table of contents at the time of the copy, provided the instructor or section instructor copies the course to the same edition book.
- Select to open the Contents.
- Select
 or for select eTexts, the Customize link.
 -
Select a chapter or subsection to move it using one of the following controls. Chapter subsections can be moved only within their chapter.
-
 Drag the chapter or section, especially if moving a distance.
 -
 Select to move a chapter or section one row at a time.
 -
 (on the right)
Chapters you move to Optional materials appear at the end of the Contents. Anyone in the course can still view this material.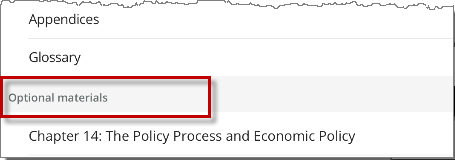 .
.
-
- When you finish rearranging chapters and sections, select
 to share the revised table of contents with course participants.
To reset the Contents to their original state, select  (top right).
Any student practice work using the Study Guide is not reported to the course gradebook.
- Select then
 .
.The Study Guide is unavailable in PDF eTexts or books without a glossary.
- Select Key terms or Multimedia, if available. (These options appear in select eTexts only.)
- Key terms — Practice all glossary terms or choose only your favorites. Students can quiz themselves by doing flashcards, matching, or practice (multiple choice) questions.
- Multimedia — Choose from figures or play interactive media, organized by chapter. Open the media in the book context or in full screen mode.
Select  (top right) then Print page to print a page at a time. (Not all books provide the print option.)