Mohr's circle questions
Updated 29 Aug 2024
You can complete Mohr's circle answer questions on a computer. Mohr's circle questions are keyboard accessible. Select  Toggle Helper to show/hide keyboard instructions below the canvas.

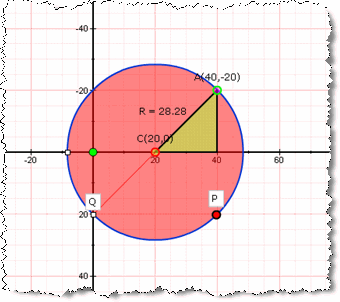
In a Mohr's circle question, you'll be asked either to draw a Mohr's circle on a graph to show stress/strain or to analyze a Mohr's circle by marking points along the circumference of a Mohr’s circle or by drawing one or more radial lines.
 Watch a video: Draw a Mohr's circle
To begin, select  Tips Tour to step through quick on-screen tips that identify the controls for drawing or editing Mohr’s circle graphs.
- Navigate and select toolbar options — Press Tab to navigate within the toolbar and Spacebar to select a toolbar option.
- Label axes — Press Space to select a label. Press arrow keys to navigate through a list. Press Esc to quit editing.
- Main menu — Press ALT+M to get to the main menu.
- Elements on the canvas — Press ALT+Y to get to the elements on the graphing canvas.
- Quit — Press ALT+Q to quit the application.
-
 Toggle Helper — Select this from the toolbar to show/hide keyboard instructions below the graph.
When available, open the Introduction to Mastering assignment and select the Mohr’s Circle Questions item. This assignment provides practice items for different kinds of questions. You can usually return to this assignment anytime during the course, even after its due date. If you completed this assignment, you can usually rework its items for practice.
- Label the axes.
With Label the axes selected on the toolbar, choose labels from the menus provided at the ends of the X and Y axes.
If you choose an incorrect convention for plane stress or strain
You won't lose credit and this message displays: Horizontal axis represents normal stress (or strain) with positive to the right. Vertical represents shear stress (or strain) with positive downwards. - Identify the center of the circle.
Select
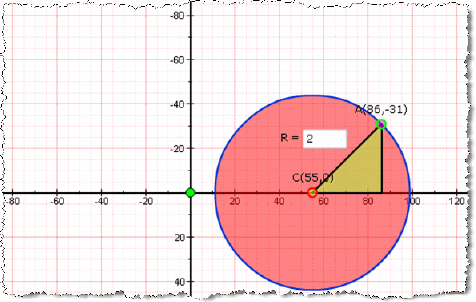
 Mark the center from the toolbar and point on the graph to indicate the center C of the circle, along with the point value like C (2,0). The point C attributes also appear in the attributes area.
To move the center point — Either drag the point labeled C on the graph or adjust the values in the attributes area. You can continue to move this point anytime before you submit your answer.
- Mark the reference point.
Select
 Mark the reference point from the toolbar and then point on the graph to add reference point A.
To move this point: Either drag the point labeled A on the graph or adjust the values in the attributes pane. You can continue to move this point anytime before you submit your answer.
- Set the radius.
Select
 Set the radius from the toolbar and enter a value in the provided box in the attributes pane to indicate the radius R of the circle.
 Reference point A and center point C are connected to help you determine this value.
- Draw the Mohr’s circle.
Select
 Draw the Circle from the toolbar.
The Mohr's circle appears on the graph. You can continue to move any of the points to reposition the location of the circle.
- Select Submit when you are ready to submit your answer.
For these types of questions, you'll be provided with a Mohr’s circle graph. To analyze the graph, mark points along the circumference of a circle or draw one or more radial lines.
- Select
 Add points from the toolbar, then choose the name of a point or radial line from the ones provided. (You cannot add points beyond the ones in the provided list.)
 - Point on the graph to position the point along the circumference of the circle. The point attributes appears in the attributes area.
To move a point in a Mohr's circle — Select and drag the point to a new location or adjust the point values in the attributes pane. You can move this point later, as needed.
- Select
 Add points from the toolbar, then select the name of the radial line you would like to add from the ones provided.
 - Point to mark an end point on the circumference of the circle, then move the radial line to the position that you want.
- Release the mouse or other input device.
The radial line displays as a solid red line. You can move this line later, as needed.To add more radial or other lines to help you solve the problem — Select
 Analysis aids. These display as broken blue lines and are not scored. You can add as many of these lines as you like.
To move a radial or other line — Choose the line by selecting its end point and drag the line to the new location. When you move a radial line, its angle information displays in the attributes pane.
- Select the element.
-
Select
 Delete element from the toolbar.
- Select
 Reset from the toolbar.
 - Choose OK when asked to confirm if you want to clear your work.

