Open and navigate the Pearson eTextbook
Updated 28 Aug 2023
Course participants can navigate, search, and listen to the Pearson eTextbook (formerly known as eText) for your course in a browser. See also work with your Pearson eText in a browser and Pearson+ app for eTextbooks.
If you or your students encounter any issues opening the eTextbook for your course, contact Pearson Support.
- With your course open in a browser, select Pearson eText (or eText) from the course menu.
If you don’t see this option, an eTextbook might not be enabled for your course.
- Select Open my eTextbook or a similar option on the page that opens.
The eTextbook opens in its own browser tab or window.
The Pearson+ is a learning hub with affordable tools for school or starting a career. It can provide students with access to the following resources, some of which may require a purchase.
- eTextbooks associated with your MyLab or Mastering account
Students can also purchase access to other eTextbooks as a one-time purchase or by 4-month or monthly plans. - Channels videos and practice questions for different areas of study
- Job match for internships and job matching
- Partners and Offers provides language learning (from Mondly by Pearson) and student discounts or offers relevant to student life
Pearson+ is also the name of the mobile app for your eTextbook. For more about the app, see Pearson+ app.
- Go to Pearson+.
- Sign in with the same Pearson account you use for your course.
- Select the eTextbook for the course.
If you don’t see the book in your Library —
Search for the book's title, author, or ISBN in Search your library.
To return to Pearson+ from your eTextbook, select  from the menu.
When you first sign in, the eTextbook opens to its contents. When you return later, the eTextbook opens to your last page view.
When you first sign in, the eTextbook opens with its menu in view.
| Select this control | To do this in your eTextbook |
|---|---|
|
|
Go to Pearson+ The Pearson+ home page also features Channels videos and practice questions for exam prep, Job Match for internships and job matching, and Partners and Offers for students, including language learning from Mondly by Pearson. |
|
|
Open the Table of Contents. |
|
|
Open Channels for video explanations of complex topics and practice questions. (There may not be a Channel available for the field of study for your eTextbook.) |
|
|
Navigate your eTextbook quickly using a slider. |
|
|
Search the eTextbook. |
|
|
Open the Audiobook, when one is available. |
|
|
Open the Notebook to review, add, export, or share notes. |
|
|
Open Flashcards for practice activities. |
|
|
Shows Community Posts made by users of the eTextbook. Posts can be book-specific discussions, queries, or other. |
|
|
Adjust eTextbook Display settings, like to hide/show highlights. |
|
|
Hide the menu options except for |
|
|
Expand the menu options in addition to (In the Pearson+ app this option is |


 .)
.)
Select  from the menu then move the slider to a different book location.
- Go to a chapter, section, bookmark, or page —
Move the slider, stopping at a labeled chapter/section or page that you want. For bookmarks, select a point on the bar to go to that bookmark.
- Return to last opened content —
After you move to another location on the bar, select to return to the former location.
- Open the Table of Contents — Select
 from the menu.
 - Show subsections — Select
 in the Contents.
 - Go to a chapter, section, or subsection —
Select a chapter, section, or subsection name in the Contents. You can also drill down to named pages, such as About the Author. - Show bookmarks or recent pages —
Select Bookmarks or Recent, for up to three recently visited pages in the current eTextbook session.
If you recently added any bookmarks or visited pages in your eTextbook, you can quickly return to these from the Table of Contents.
- Select from the menu.
- Choose Bookmarks or Recent.
- Bookmarks — Display in chapter order. You can also remove all bookmarks from here.
- Recent — Shows up to three recent places you visited in the current eTextbook session.
- Select an entry to return to that location.
Don't choose from the Bookmarks list. This removes a bookmark when working with your eTextbook in a browser.
Access to all bookmarks —
Select from the menu, hover along the bar, and then select the point for a bookmark label.
- Go to a previous or next page —
Select the previous or next arrows on a book page. If the previous and next buttons are for chapter subsections, you might need to scroll to see the next or previous page number in the margin.
You can also select
from the menu, then use the slider. - Go to a specific print book page
Use a method below to go to a particular page in your eTextbook. Method availability can vary by eTextbook type.
- Enter a different page number at the bottom of the page.
(For unnumbered book pages, the eTextbook might open to the closest numbered page.) - Select from the menu, then move the slider to visit a particular page.
- Enter a different page number at the bottom of the page.
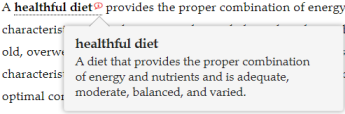
From a book content page, select a figure/table, audio/video, glossary term, or other link to open or play it directly from your current context.
The eTextbook is screen reader accessible, although some content might be inaccessible. In addition to accessibility tools you might use on your laptop, like a screen magnifier, your eTextbook might provide the following.
- Audiobook —
Select from the menu to open the playlist for your book. The audiobook is available for most eTextbooks, although not for PDF eTextbooks.
 - eTextbook display settings —
Select from the menu to change eTextbook display settings, like whether to hide/show highlights or to change the color mode to light, sepia, or dark.
 - Accessibility info from Pearson —
From most eTextbook content pages, select Account settings (top right) then select Accessibility.
If you report an issue with your eTextbook, you might be asked what kind of eTextbook you have.
- Select Account settings (your initials) in the top right.
- Select Title info.
“Integrated SMS eText” shows followed by the type, whether Bronte ePub, CITE, PXE, or PDF (from newest to oldest).Of these types, Bronte ePub might provide the greatest number of eTextbook features and PDF the least. PDF eTextbook pages match the print textbook pages exactly.
Audiobook, search, posts and display settings
You can listen to the audiobook, search, add posts about content, and adjust your personal eText display settings when working with your eTextbook in a browser.
Most eTextbooks provide an audiobook, except for PDF eTextbooks. The Pearson+ app lets you listen to the audiobook when you have internet access.
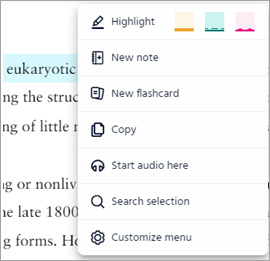
- Go to the book page or section where you want to begin listening, then select from the menu. (If you don't see this option, an audiobook is not available for your eTextbook.)
You might also be able to choose
Start audio here from the menu that shows after you select some content on a book page. - Select
 to start the audio and
  to pause it. You can also stop the audio from
  for the active playlist section.
- Go back or skip ahead —
Drag the slider in the vertical timeline. To move in 10-second steps, select or
or  .
.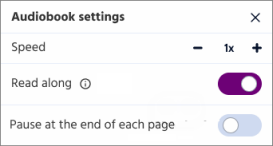
- Adjust the audio speed —
When available, select then choose + or – next to Speed. The range is from 0.5x to 3x.
 - Read along as you listen —
When you play the audiobook, the matching content is automatically spotlighted so you can follow along. To turn this feature off/on, select then Read along.
- Pause audio at the end of each page —
Select then Pause at the end of page. For example, you might want a break to add a note, post, or flashcard. This setting is off unless you turn it on.
- Go back or skip ahead —
- Select
 from the eTextbook menu.
 - Enter your search term or phrase.
- Search applies to book content, your own notes, and more —
Search includes results for page content, figures, videos, interactives, and key terms, as well as any notes or flashcards you might have added. - Narrow your results by content type —
Select a filter to refine your search results by content type. Filters are available for notes and highlights, flashcards (for flashcards you create), videos, images, key terms, or book content.
- Search applies to book content, your own notes, and more —
- Select a search result to jump to that content in the eTextbook.
Search for other instances of a word or phrase —
From a book page, drag to select the word(s) you want to search for. Then select Search selection from the menu that opens. Select a search result to jump to that content in the eTextbook.
Use  Community Posts to start a discussion, ask a question, or share a tip about eTextbook content. Any user of the same eTextbook can view, add, or reply to comments, not just participants in a course. Save posts for later reference, like students can do for review.
The posting feature is available for an eTextbook when shows in its menu.
Show all posts or show posts by chapter —
Select from the menu to show all posts. To show posts by chapter, select All Posts then choose a chapter or other section.
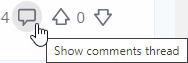
Show post replies (in the comments thread) —
To see post replies, select ![]() next to the number below the post.
next to the number below the post.
If there are many comments, sort by Old to new, New to old, or Most popular.
Open a post from its eTextbook page marker —
Select  next to the highlighted content associated with the post.
Saving some posts can help students review or study. You can also sort and filter posts.
Save a post —
Select  for the post then
  Save. A
  marker displays next to for each saved post.
Unsave a post —
Either select for the post, or select then Unsave.
Sort posts —
Select from the menu, then  and choose from Book order, Most recent, or Most popular.
Filter posts —
Select from the menu, then  and choose from All posts, My posts, or Saved posts.
Any post you add is anonymous. Posts show an identifier for you, but not your name.
Add a post from a book page —
- Select some content from a book page then choose
 Post a question.
 - Add an optional title, enter your post, then select
 .
.- Select a toolbar option to add formatted text (bold, italic, or underline); an emoji, a GIF (animated or still image), image, or video; an attachment, or to enter a formula.

- To let you know that your post is approved, you receive an email with a link to the post. Check your post later for any replies to it.
- Select a toolbar option to add formatted text (bold, italic, or underline); an emoji, a GIF (animated or still image), image, or video; an attachment, or to enter a formula.
Add a post from Community Posts —
Select from the menu, then select  and enter your post.
Add a post from the Pearson+ site —
- Select to open the Pearson+ site.
- Point to an eTextbook in the Library then select .
Your eTextbook opens with all of its community posts.
Edit your own post —
Select from the menu to open the posts. Sort or filter as needed. Select then  Edit.
Edit.
You cannot edit posts made by others.
Delete your own post —
Select from the menu to open the posts. Sort or filter as needed. Select then  Delete.
You cannot delete posts made by others.
- Select from the menu to view the posts for your eTextbook.
- To show support for a post, select
 . If you don’t support it, select
  .
. - To reply to the post, select
 , enter your comment, then select
  to save it.
See post replies —
Select Show comments thread next to .
See our posting Community Guidelines and Acceptable Use Policy.
- Select for the post you want to report.
- Select
 Report and enter your concerns.
Select from the menu.
Most eTextbooks — Control color mode (light, sepia, or dark), text size, font, character case, line spacing, and show/hide highlights. If you hide highlights in the book, any note markers ( or
or  ) remain in the margin.
PDF eTextbooks — Control zoom, single- or double-page view, and show/hide hotspots or highlights.
Student offers, access renewal; loose-leaf purchase; contact Support
If available from your eTextbook, students can select ![]() to choose from available offers. You can see the same partners and offers from the Pearson+ home page by selecting from your open eTextbook.
to choose from available offers. You can see the same partners and offers from the Pearson+ home page by selecting from your open eTextbook.
Offers can include links to discounted services and products relevant to students.
After signing in to https://mlm.pearson.com, students select Renew your Pearson eText access from the course tile and complete the purchase. If the course has ended, they'll select Inactive to view past courses.

- Any student highlights and notes display in the renewed eTextbook. Instructor notes are not included. If students add the same eTextbook to their Pearson+ monthly subscription, it does not include their highlights and notes from the eTextbook associated with your course.
- This renewal feature is not available from an LMS integrated course.
Students might be able to purchase a loose-leaf version of the textbook associated with the course.
- From the course menu, students select Pearson eText (or eTextbook), then Buy the printed textbook.
- In PDF eTextbooks, students can select (top right) then Get loose leaf.
(The pages in PDF eTextbooks match the printed textbook exactly.)
Most eTextbooks —
Select Account settings (top right), Help & support, then Contact Support. You might also be able to select Quick walkthrough from the "Help & support" menu.
PDF eTextbooks —
Select then Contact Support.