Copy assets
Updated 19 Feb 2024
You can use the copy and paste options to make multiple copies of assets to meet your needs.
Teaching assistants must have permission to create assets. You can give teaching assistants the ability to create or edit course materials on the Preferences > Permissions page. (MyLab Languages)
On the Course Materials > Add from Library page, you can copy assets in both the Course Materials Library and the My Course lists. On the Course Materials > Manage Course Materials page, you can see and copy only assets in the My Course list, which are the assets available to your students.
Copy assets in the Course Materials Library using Advanced Options
When you copy an asset in the Course Materials Library, copies are treated as new assets. As shown in the diagram later in this topic, changes you make to a copied asset do not apply to the source asset or to any subsequent copies you make of the asset in the Course Materials Library.
However, when you add an asset to My Course, edits you make to that asset in either the Course Materials Library list or My Course list apply to the asset in both lists.

- Click Course Materials > Add from Library and then click Advanced Options above the Course Materials Library list on the left.
- Select the asset(s) you want to copy.
- From the toolbar, click
 Copy.
Copy.The asset(s) are copied to the clipboard, and appear dimmed. The Clipboard Items number reflects the number of checkboxes you selected. For example, if you select the checkbox for a folder that contains three assets, the clipboard counts the selection as one item. However, when you paste the folder, you create a copy of the folder and all the assets in the folder.
- To paste the assets at the top or bottom of the list, click
 Paste and select Paste At Top or Paste At Bottom.
- or -
To paste the assets before or after a specific asset, select the asset, click
 Paste and select Paste Before Selected or Paste After Selected.
The re-ordered asset appears with a highlighted background.
Copied assets remain on the clipboard after you paste them.
Copy assets in My Course
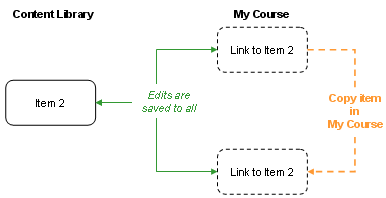
When you create multiple copies of an asset in My Course, the copies are linked; updates to one apply to all linked copies. As shown in the following diagram, changes you make to any copy of the asset in My Course are saved to all other copies in My Course and the Course Materials Library.

- Go to the My Course list on the Course Materials > Add from Library page ot the Course Materials > Manage Course Materials page.
- Select the asset(s) you want to copy.
- From the toolbar, click
 Copy.
Copy.The asset(s) are copied to the clipboard, and they appear dimmed. The Clipboard Items number reflects the number of check boxes you selected. For example, if you select the check box for a folder that contains three assets, it is counted as one item. However, when you paste the folder, you create a copy of the folder and all the assets in the folder.
- To paste the assets at the top or bottom of the list, click
 Paste and select Paste At Top or Paste At Bottom.
- or -
To paste the assets before or after a specific asset, select the asset, click
 Paste and select Paste Before Selected or Paste After Selected. If you select multiple assets, the pasted assets appear before or after the last asset.
The re-ordered assets appear with a highlighted background.
Copied assets remain on the clipboard after you paste them.