Programming and coding assessments
Instructors, your Computer Science course might include auto-graded programming and coding assessments. Use this guide for Computer Science, Introduction to Programming Revel courses CodeGrade; the new Computer Science Assessment partner.
What has NOT changed?
- The narrative content and overall course (ebook) topical coverage has not changed.
- The structure (such as the table of contents) has not changed.
- The number and placement of the Section quizzes has not changed.
- The end-of-chapter programming projects have not changed.
What HAS changed?
- All the auto-scored, end-of-section quiz questions (known as Section quizzes) and the end-of-chapter Auto-graded programming projects (collectively referred to as the “scored assessment items”) have changed.
100% of the scored assessment items are rebuilt in the CodeGrade interface with over 85% of them recreated as active coding exercises giving students more coding practice.
Due to the type of integration with CodeGrade (LTI 1.3) and new scored assessment items, the biggest changes are in Assignment Scoring, Preview, and Selection, the Section Quiz and Programming Project UI/UX, the Course Settings options, student Performance analytics, and Plagiarism detection.
Instructor experience
Scoring policies
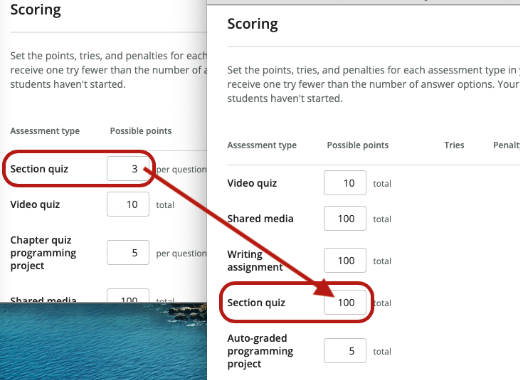
On the Settings tab > Scoring section, the default score for an assignment is 100 possible points. Previously, each end-of-section quiz (now known as “assignment”) had a default score of 3 possible points. Each Section quiz is allocated a standardized 100-point scale, irrespective of the number of questions it contains. This means that every question within a quiz carries equal weight, contributing to the overall 100-point total for the quiz.
To customize the scoring according to your preferences:
- Open the Settings tab.
- In the Scoring section, enter the possible points in the Section quiz field.
- Select Save.
Numbers of attempts
On the Settings tab > Scoring section, the option to set the number of attempts is moved to CodeGrade in the Instructor Preview interface. The default number of attempts has not changed (the default number of attempts is unlimited).
The feature to penalize each additional attempt is removed.
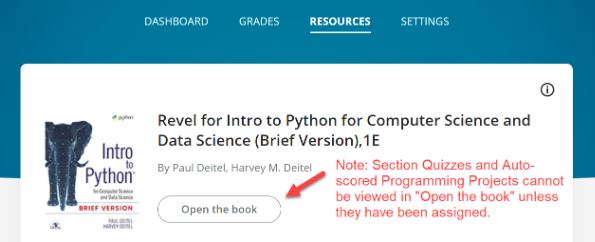
Section quizzes and Auto-graded programming projects cannot be viewed using Resources > Open the book unless they are already assigned. It’s best practice to use Dashboard > Create assignment to see all the scored and non-scored assets available in Revel.
Filter assignments
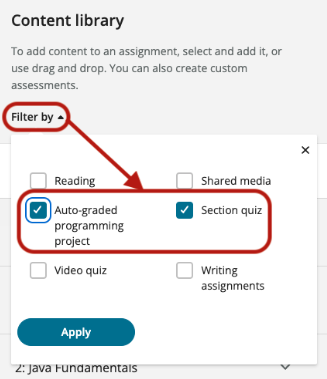
On the Create assignment page, use the Content library to filter content. Use the filters for Auto-graded programming project and Section quiz to see only CodeGrade assignments.
Create, rename, and assign due dates
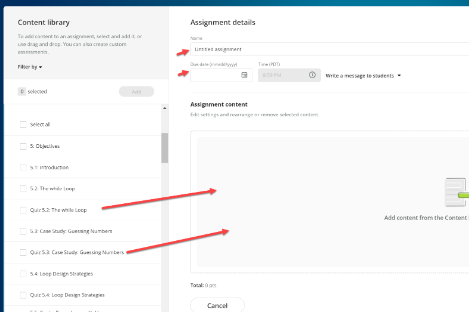
The process to create, rename, and assigning due dates for assignments has not changed. You can drag-and-drop an assignment into the Assignment content field or use the Add button. Additionally, you can customize the assignment name and save it for future modifications. Or you can enter a due date before publishing the assignment.
Preview and choose questions for an assignment
The process to preview and select Section quiz questions and/or Auto-graded programming projects has changed.
Previously, on the Assignment Summary page, a list of questions showed for assignments with multiple questions. The list now shows in the CodeGrade Preview mode.
These groups of quiz questions are now known as Assignments.
For an assignment to be considered complete, students must attempt and Hand in all the quiz questions that the instructor selected and used in the assignment.
Use the Not assigned and Assigned toggles in CodeGrade to select which questions to use in the assignment.
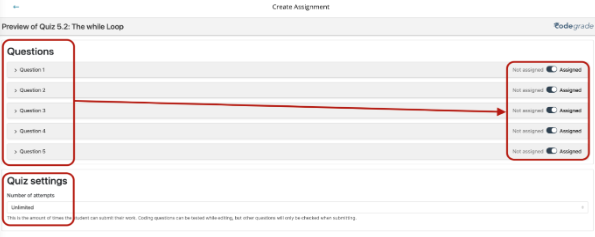
Set the number of attempts allowed for the entire assignment on this page. The default number of attempts is Unlimited.
The attempt count applies to the entire assignment, not to individual questions.
The system automatically saves all adjustments made in preview mode.
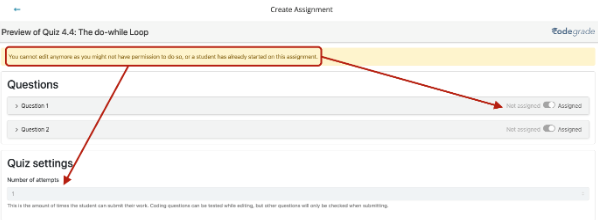
You can edit assignments if no student has worked on them. Once a student (any student) starts an assignment, it is locked, preventing further edits. You can still review the assignment after it's locked.
When you preview a multiple-choice question, the correct and incorrect choices are indicated.
![]()
All multiple-choice question answers are randomized, except for options like true or false, all above, and all below. The Same as below/Different for each student toggle is disabled and cannot be used, ensuring that the answers remain randomized.
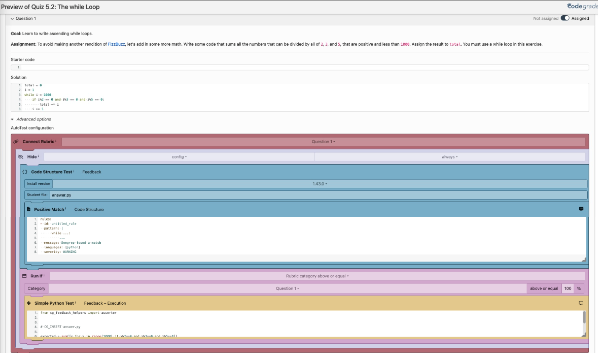
When you preview a coding question or programming project, you can expand each question to see its description, solution, rubrics, and feedback. The Goal and Assignment instructions are above each question statement.
When applicable, you can see the AutoTest configuration after expanding Advanced options.
Modify individual assignment scoring policy
Optionally, adjust the scoring policy for individual assignments. You can do this the following ways:
- Before you publish the assignment – when you create an assignment and move the assignment to the Assignment content field, use the three-dot options menu to select Edit scoring policy. The Edit scoring policy page opens. Change the possible points and select Save.
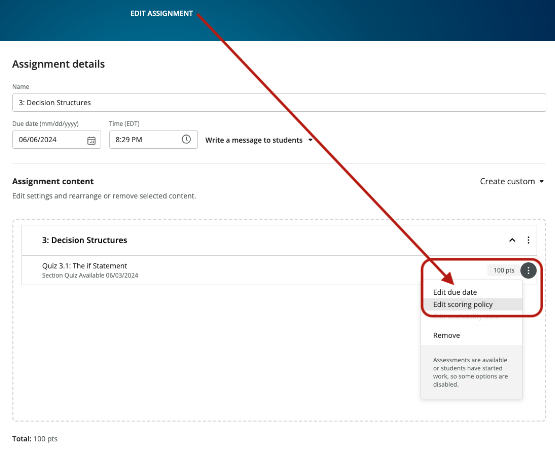
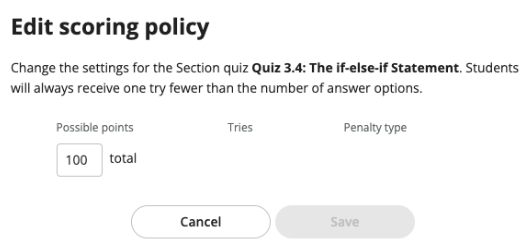
- After you publish the assignment – on the Dashboard, select an unlocked assignment. Use the three-dot options menu to select Edit Assignment. The Edit Assignment page opens. Find the assignment to edit and use the three-dot options menu to select Edit scoring policy. The Edit scoring policy page opens. Change the possible points and select Save.
Test the exercises
After you create and publish an assignment, test the exercises to review the feedback and application behaviors. To test:
- Open the Settings tab.
- Select Open student view. A new browser tab opens.
- In the new browser tab, select an assignment from the list.
- Select Start to work the assignment as a student, assess the feedback, and test the overall functionality.
Run and edit the assignment side-by-side
After testing in the new tab using the student view, return to the original tab to make edits to the assignment. Use the standard Edit Assignment process.
Review
When you select a CodeGrade Assessment on the Grades tab, you enter Review mode. You can view all submissions made by your students for an assignment and provide feedback.
After you enter the CodeGrade system, you'll see a roster of student names who have submitted their responses for the assignments. Select a student's name to see their submissions.
Only students who have turned in their assignments show on the list. Those who have not submitted their work are not listed. This means the roster might not contain all enrolled students.
In a coding assignment, the results of the assignment are on the Code tab. This tab includes the description of the question, the student’s code, auto-graded feedback, output, and indication of pass/fail status.
The Code tab with the description of the question, the student’s code, auto-graded feedback, output, and the pass/fail status.
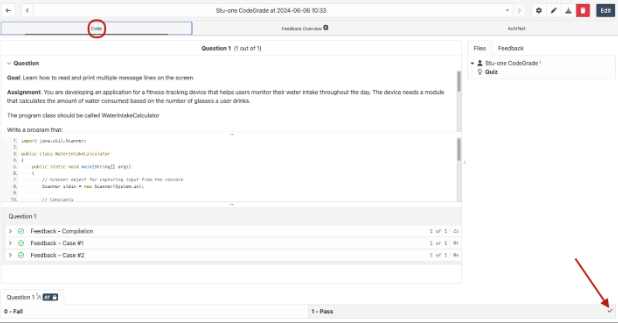
You can provide your feedback. The student can also reply to your feedback.
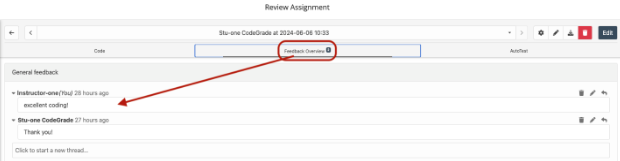
Feedback snippets
If you often give the same personal feedback to students, consider saving it as a snippet. This allows you to quickly apply it to any student's feedback, saving time and ensuring consistency in your responses.
To create a new snippet:
- In the Feedback Overview tab, select the Open Book icon.
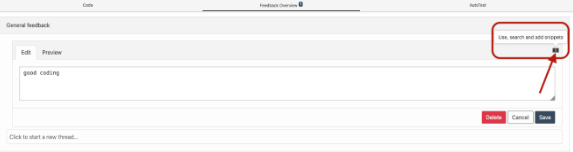
- The system converts the feedback text in the Edit field into a new snippet.
- Name your snippet, without spaces.
- Select the check mark icon to save your snippet.
- Your new snippet shows in the saved snippets list.

AutoTest
The AutoTest tab displays details of the compilation, feedback, and outputs of the student’s code.

To open previous submissions by a student, select the student’s name and choose the desired submission from the top dropdown menu.
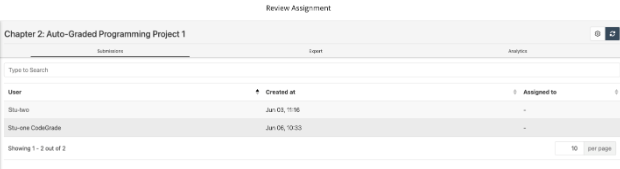
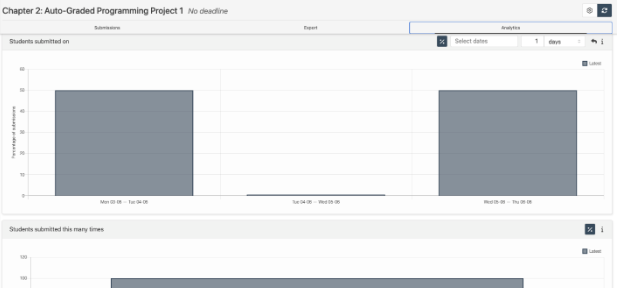
Assignment analytics
On the Review Assignment page, you can export the metadata and view the performance analytical statistics of the assignment.

Plagiarism detector
The system has a built-in plagiarism detector. The plagiarism detector compares students’ submissions within an assignment and indicates if there are identical code structures. This provides an overview of all potential cases. To access it:
Select the Gear icon in the top-right corner.
Navigate to the Plagiarism tab.
For Language, select Quiz. When you select Quiz as the language, the system automatically uses the course language for parsing.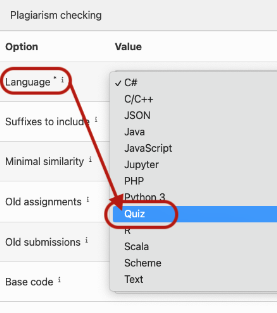
For Minimal similarity, set a percentage. The default is 50. Adjusting the minimal similarity percentage is crucial to tailor the plagiarism detection settings according to your course requirements.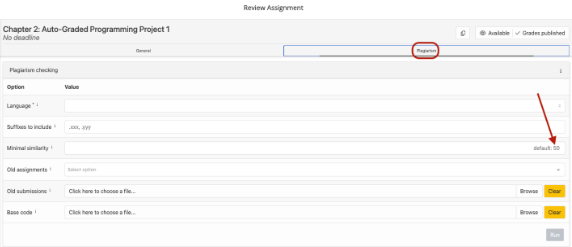
For Old assignments, select assignments. You can select assignments from the current course and pre-loaded assignments from previous ones. You can choose multiple assignments simultaneously, facilitating efficient plagiarism detection across a range of student submissions.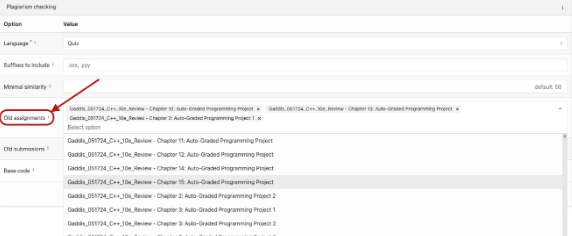
For Old submissions, upload assignments. This is where you upload assignments from previous courses.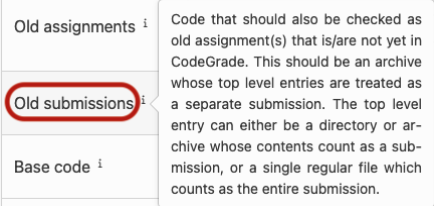
For Base code, upload the code. Upload the code that should be excluded from plagiarism checking to reduce false positives.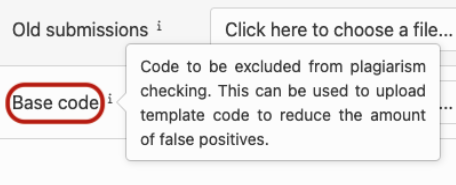
The plagiarism detector does not indicate if a student has plagiarized by copying from online resources or by using AI tools such as ChatGPT. Plagiarism checking is only effective for assessments where students write a significant amount of code. For simple quizzes, students are typically writing the exact same code and you cannot assess plagiarism effectively.
Dashboard
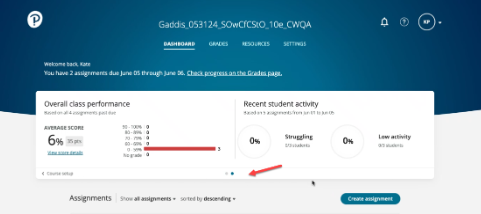
There are two views on the Dashboard: Course Setup and Class Performance. Use the two dots to toggle between the two screens.
Course Setup – shows the number of published and unpublished assignments, along with the count of students who have accessed the course. Additionally, it provides important day-count information for the course. Use Publish all to make all assignments available to students.
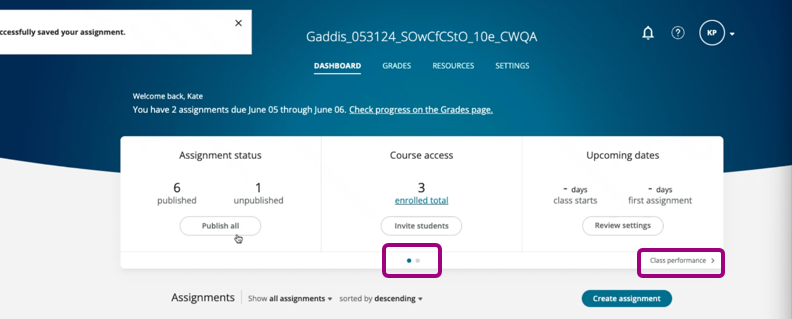
Class Performance – shows the overall class performance. In this image, not all data populated; hence the 0%.
Grades
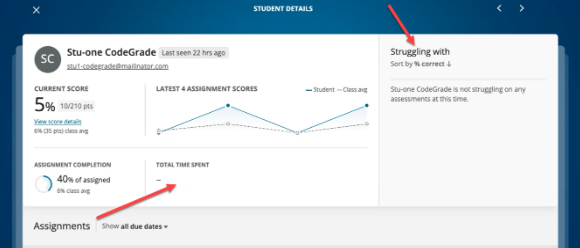
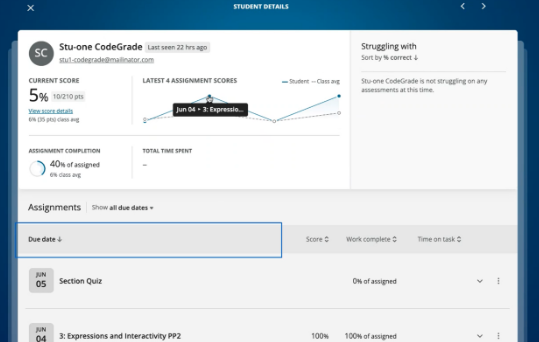
Drill down to an individual student’s details to see the student’s overall performance. In this image Struggling with and Total Time Spent are not populated.
FAQs
Q. Does Course Copying work?
A. Course copying functionality is working! Any customizations made to the individual assignment might not transfer to the copied version. We are actively addressing this issue and anticipate releasing a solution shortly.
Q. How long does it take before feedback shows?
A. CodeGrade’s auto-grader starts running instantly and always runs on each question within an assignment. That means that it can take a few seconds to start running for later questions in the assignment, especially for assignments that contain five or more questions. The auto-grader runs on a cloud-based system that automatically scales up. On rare occasions, it can take up to a minute for the auto-grader to start running. In this case, the system is further scaling or automatically recovering. Check back in a minute, and it will give you feedback as you expect it.
Q. Why can I already see feedback for a later question, even though I haven’t attempted it?
A. CodeGrade’s auto-grader diligently evaluates each question within an assignment, regardless of whether you have attempted it or not. Thus, as you navigate through the questions, you receive feedback based on the Run of preceding questions. Consider these tests being conducted on your attempt.
Updated 22 Jan 2026