Uploading Resources
More than likely, the resources you save to a My Collections folder are only a portion of the resources that you need to teach a specific class. Often, instructors have additional resources on their local computers that augment the resources in their My Collections folders.
To help keep you organized, you can upload resources to a My Uploads folder. The My Uploads folder is a special My Collections folder like the Drop box. The purpose of the folder is to house all uploaded resources; consequently, you cannot add slides to the My Uploads folder.
Note: If you do not see a My Uploads folder, your library does not support uploading content.
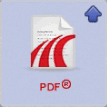
The My Uploads folder can hold up to 100 MB of files. Each upload is restricted to 10 MB and you can only upload one item at a time. The resources in the My Uploads folder appear with a thumbnail representative of the uploaded file type. These thumbnails differ from Pearson resources in that they include an upload image in the top right corner of the thumbnails, as the following image shows.

You can upload files with the following extensions. Uploading videos is not supported at this time.
|
|
File types that Pearson Class Preparation tool can display natively (for example, images) work like any other resource. Files that cannot be displayed natively, (for example, a Word file) are displayed using a second browser window.
You upload files to any My Collections folder except the Drop box. When you upload a file to a folder other than the My Uploads folder, the file is placed in the target folder and the My Uploads folder.
Resources within the My Uploads folder have no ratings or tags. Likewise, you cannot search or browse for these resources. My Uploads resources can be copied to another My Collections folder or modified to include a comment or an annotation. You can also export a presentation with uploaded resources and delete uploaded resources.
To upload a resource:
- Click the Upload button. A dialog box appears.
- Enter a title in the Title field.
- Optionally, enter description in the Description field.
- Click the Browse button to locate the file you want to upload.
- If this is the first time you are uploading a resource, select the I have read and agreed to the Pearson terms of use check box. You can read the terms of use by clicking the Terms of Use link below the check box.
- Click the Upload button to begin the upload process. The Upload button is disabled when the upload starts and a progress bar appears.
If you've uploaded this file before, the following text appears:
You have already uploaded a file with this file name. Do you want to replace all instances of the original resource or create a new resource?
Click Replace to overwrite the previously uploaded file, or click Create New to upload the file with a new name.
While an upload is in progress, a progress indicator appears in the toolbar. When the upload process is complete, a thumbnail for the file appears on the screen when the upload is complete.
 Viewing, copying, or deleting uploaded resources

