Using My Collections
Pearson Class Preparation tool provides a work area called My Collections. This area lets you save, organize, and manage the resources you select for later use. To augment these resources, you can upload additional files of your own, and add links to other resources you find on the Internet. You can also download resources from My Collections if the resources are available for download.
To help manage the files and keep them organized, you can copy, move, re-sequence, and delete the resources as needed. You can also create folders for the resources and copy or move items into these folders.
Pearson Class Preparation tool also lets you create presentations from the resources in a My Collections folder and show them to your students.
Resources can become unavailable for one or more of the following reasons:
- Geographic restrictions; some resources may only be legally available for in one country or another.
- Expired subscriptions; you access to the resources may have expired.
- Removal from a library; Pearson may have removed one or more resources from the library you are using.
Regardless of the reason for a resource being unavailable, when a resource is not available to you, the following image appears in place of the actual resource thumbnail:

A similar icon appears if you view your collected resources in the List View.
By default, My Collections is hidden. To view it, click the My Collections button.
Note: When you view My Collections, the results area is hidden. To hide My Collections again, click the Find Resources button.
You can add resources to My Collections in one of several ways. The resources you add are placed in the location you select. By default, this location is set to a special holding area called Drop box but you can select any other available folder as the target location.
To select a My Collections target folder:
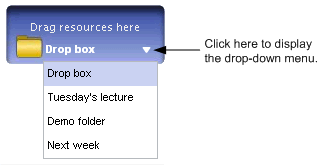
- Open the drop-down menu as shown in the following figure.

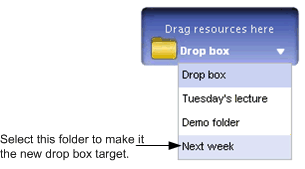
- Select the target folder from the list of available locations.

Once you select a target, all the resources you save to My Collections will be added to that target location.
To add resources to the selected My Collections target folder:
Complete one of the following steps:
- Drag and drop a resource from the results area to the Drop box or target folder.
- Click the Add to My Collections button that appears when the mouse pointer hovers over a resource.
- Right-click the resource and select Add to My Collections from the context menu.
- Display a resource's details and click the Add to My Collections button.

See also