solutionAppletLabel
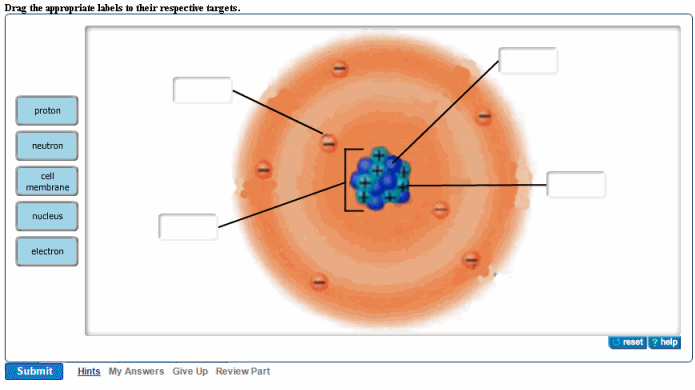
Use this answer type for questions that students answer by dragging labels to the appropriate locations of a background image. Labels can be text or images, located above or to the left of the background image. You can allow students to reuse the same label more than once, and you can create extra (unused) labels as distractors.
You add semitransparent target boxes and leader lines to the background image, to indicate where students should place labels. Each target accepts only images or text. As with labels, you can create extra targets, but unlike labels, students can't reuse the same target multiple times.
If an image already has labels, it may be faster for you to save it as a .png file and add it to the answer box as an overlay image.
Note: Create the background image (.gif or .jpg) and optional overlay image (.png) before creating a solutionAppletLabel item. After creating and saving the item, upload images as assets to the item. See Adding images.
Student view

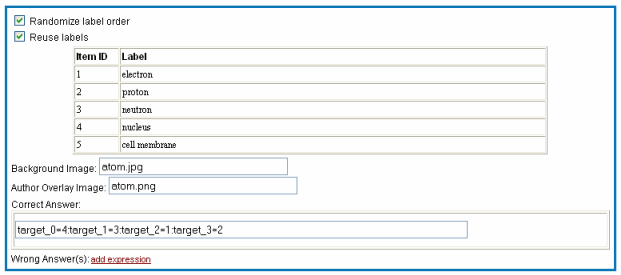
Answer box for this example

To create a solutionAppletLabel item
- Make sure the background image to be labeled (.gif or .jpg) is on your PC.
- In the Item Editor, under Answer Instructions, click the add box and select solutionAppletLabel.
- Enter information in the answer box and applet window, as described below.
For new items, the solutionMultipleChoiceRadio answer box displays in Part A by default. To change this or any other answer type, right-click in the box and select Remove > answer type to see the add box.
Randomize and reuse labels
It's generally good pedagogy to randomize the label order, and to permit students to drag the same label to the image more than once.
Labels
- Under Item ID, enter a unique number, in order, for each label.
- Under Label, click add and select either img to add an image or htmlText to add text.
- Add more labels by placing the cursor in the last row and pressing the Tab key, or right-click within a label description and select Insert before >item or Insert after>item.
Background and overlay images
- Upload the background image and the overlay image, if used, as assets of the item. See Adding images.
- Click add backgroundImage and enter the image file name (.jpg or .gif).
- [Optional] Click add AuthorOverlayImage and enter the image file name (.png). See Using overlay images.
- Add targets and leader lines, described next.
Targets and leader lines
If you have a version of a background image that contains labels, you can use that image to guide target and leader line placement. See Using overlay images.
- Double-click the box under Correct Answer.
- In the applet window that opens with the image, use the buttons in the lower left to:

|
Add targets by clicking and dragging labels to the image. To create empty targets, place any label in the image and then delete the label, leaving a blank target. To delete a target, remove a label if it has one, select the target, and press the Delete key. |
|

|
[Optional] Add leader lines between targets and the items they represent. Draw lines from the target to the correct location in the image. |
|

|
[Optional] Specify target width and height, leader line color and width, layout, and whether the overlay displays (turn off any overlay image before saving the final version, so students don't see the answers). You can move this tool window if it's in your way. |
|

|
Save your changes before returning to the Item Editor. |
See solutionAppletLabel window for details on additional customizations you can make with these buttons.
Correct answers
- In the applet window, drag all labels to their correct locations, and click Save.
- Click OK in the lower right of the Save successful popup that displays.
- Press Ctrl-C to copy the highlighted code for the correct answer, and click OK.
- In the Item Editor, place the cursor in the Correct Answer field, and press Ctrl-V to paste the string.
[Optional] Wrong answer responses
Note: Though not required, it's recommended that you include wrong answer feedback responses.
To include wrong answer responses:
- Click add expression to the right of the Wrong Answer(s) header to see this box:

Each wrong answer response that you code consists of one or more conditions that must be true for students to see the response. Always code more specific wrong answer responses first, followed by less specific conditions.
- You can code:
- A match:
Select a Target (by default, target_0, target _1, and so on) and a corresponding Label from the pulldown menus.- A target:
Select a Target. To indicate no target, select the asterisk symbol. Use the asterisk to provide a specific wrong answer response (WAR) regardless of where students drag the associated label.- The associated label:
Select a Label, (this is the Item ID in the labels table). To indicate no label, select the asterisk symbol. Use the asterisk to provide a specific WAR if a target is empty.- The inverse of a match:
Check the box labeled NOT to indicate that if a student doesn't submit the specified correct target/label match, the student sees the specific WAR.- Multiple matches to one wrong answer:
Right-click within a match and click Insert before >match > match or Insert after > match > match.- Multiple wrong answers:
Right-click within a match and click either Insert before > expression > expression or Insert after > expression > expression.- Wrong answer response:
Click add response, and enter text that displays when students submit a specific incorrect answer.
- To add rows to the table for additional responses, click a row and select either Insert before > expression > expression or Insert after > expression > expression.
See also: