App for Pearson eTexts (Pearson+)
Updated 16 Dec 2021
Course participants can use the app to read, listen to, or study with a Pearson eText on a mobile device while on the go, even when offline.
If you’ve downloaded a Pearson eText app before, you may be prompted to get a newer eText app. Follow the prompts to get the app.
- Open your eText at least once from your course in a browser. This action associates your Pearson account with the eText for your course.
- Download the Pearson app for your location from your tablet or phone.
In the US —
 Pearson+ app for Android or Pearson+ app for iOS
Outside the US (Global) —
 Pearson eText | Global app for Android or Pearson eText | Global app for iOS
- On a mobile device, open the eText from your course in a browser. You’ll be asked if you want to open the eText in its app.
After you’ve crossed over into the app from your course at least once, you can go to your eText by opening the app directly.
- Sign into the app with the same username and password that you use for your course. You remain signed in unless you explicitly sign out.
- Select Download to download your book from the app. (Requires internet)
- After you download the book, open it.
-
US customers (Pearson+ app) —
For eTexts associated with a course, open the app, select
 for the book then select Remove download.
For any other eText subscriptions you bought, open the app, select
 then Remove download.
 -
Global customers (Pearson eText | Global app) —
Open the app. From the bookshelf, select for the book then select Remove download.
Open the eText and navigate in the app.
Most eTexts provide an audio playlist for the audiobook. The audio playlist in the app can help students study even when they're offline. (PDF eTexts do not provide audiobooks.)
-
Select
 from the eText sidebar menu.
 -
Select
 from the Playlist to start the audio. Adjust the volume
  as needed.
 identifies the active chapter section in the audio playlist. The duration for each chapter section helps you to plan your time.
-
Set the audio speed —
Hover over then select + or –. The range is from 0.5x to 3x.
 -
Playback or skip ahead in a chapter section —
Drag the slider in the vertical timeline. To move in 10-second steps, select or
or  .
. -
Follow book content as you listen —
Select to narrow the audio playlist so more book content is in view. To return the playlist to its original width, select
  .
. -
Close/reopen the audio playlist while listening —
Select to close the playlist controls. If you’re still listening, appears in the sidebar menu. Select it to reopen the audio playlist.
-
-
Select
 to pause the audio.
Pearson+ offers 1,500+ eTexts and study tools to students, all in one place, for one low monthly subscription.
-
Select
 from the eText sidebar menu to go to Pearson+.
 -
Select an eText.
Students can choose from an eText associated with a course or one for which they have a monthly subscription.Search your eTexts — Enter the associated course name (or book ISBN), the book name, or its author. You can also choose whether to search from your active eTexts, inactive eTexts, or all eTexts.
When you first sign in, the eText opens to its cover page. When you sign in again later, the eText opens to your last page view.
When you first sign in, the eText opens with its sidebar menu available. To close the sidebar menu, select Hide.
| Select this control | To do this in your eText |
|---|---|
|
|
Go to Pearson+ For course participants, provides access to all eTexts associated with their account. For students, provides 1,500+ eTexts and study tools available for a low monthly subscription. |

|
Navigate your eText quickly using a slider |
|
|
Open the audio playlist, when an audiobook is available |

|
Search the eText |

|
Open the Table of Contents |

|
Open the Notebook to add, filter, or export notes |

|
Study (create flashcards and practice) |

|
Adjust eText display settings, like to hide/show highlights |
Select from the eText sidebar menu then move the slider to a different book location.
-
Go to a chapter, section, bookmark, or page —
Move the slider, stopping at a labeled chapter/section or page that you want. For bookmarks, hover along the bar and then select the bookmark you want.
-
Return to last opened content —
Hover along the bar then select the point (marked by ) with a label, such as “13 Meiosis”.
-
Open the Table of Contents — Select
from the eText sidebar menu. -
Show subsections — Select
 .
. -
Go to a chapter, section, or subsection — Select a chapter, section, or subsection name. You can also drill down to named pages, such as About the Author.
-
Show bookmarks or recent pages — Select Bookmarks or Recent, for recently visited pages in your session.
Work with your eText in the app.
- Select from the eText sidebar menu.
- Enter your search term or phrase.
Search applies to book content, your own notes, and more —
Search includes results for page content, figures, videos, interactives, and key terms, as well as any notes or flashcards you may have added. In some eTexts, you can also search for “page x”.Narrow your results by content type —
You can choose a filter to refine your search results by content type. Filters are available for notes and highlights, flashcards (for flashcards you create), videos, images, key terms, or book content.
- Select a search result to jump to that content in the eText.
Search for other instances of a word or phrase —
From a book page, click, drag, and release to select the word or phrase you want to search for. Then select Search selection from the menu that opens. Select a search result to jump to that content in the eText.
Course participants can customize their personal view of the eText by adding highlights, notes, or flashcards. Add highlights that you can associate with notes. Use the Notebook to add notes independent of a highlight and to filter or export your notes.
Your work syncs between the app and web views of your eText. Any highlights, notes, flashcards, or bookmarks you add when working offline in the app are synced to the browser view of the eText after the app is back online.
Copy and paste functions are disabled in eTexts to protect author intellectual property.
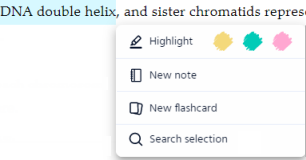
- From a book page, long press and drag over the content you want to highlight. In select eTexts you can also highlight a video or an image, which includes figures and tables.
- Select a highlight color (yellow, green, or pink).
Add a note and optionally share with the class —
Select New note, enter your text, and select Save. To share the note with the class, select then select Save. (The sharing option appears only to the course owner.) Shared instructor notes appear with a blue highlight in the eText to all class participants.
Edit a note —
Select an existing highlight, then choose Edit note. You can change the highlight color and/or change your note text.
Later, you may want to do one of the following.
- Show/hide highlights —
Select from the eText sidebar menu to adjust the Show highlights setting. (The default is to show highlights.). Any note markers remain in the margin. - Review notes associated with a highlight —
Select from the eText sidebar menu. See the next section for details about using Notebook features to study. - Remove a highlight —
Click anywhere on the highlight then select Delete highlight.
Use the Notebook to organize and work with your notes. Your Notebook contains all of your notes, whether associated with a highlight or not.
The Notebook for your eText may provide some or all of the features described below.
Select from the sidebar menu to open the Notebook.
-
Open to the note highlight in the book —
From the Notebook, select the highlight text from a listed note to show its book context on the right. -
Widen your view of the Notebook —
Select to work in a wider view of the Notebook. Select to return to the original Notebook width, with more book content shown.
From the Notebook , select  or
or  to add notes not associated with a book highlight.
-
Associate your note with a chapter — You can associate the note with a chapter or choose No chapter.
-
Share your note with the class — When available, select
. The sharing option appears only to the course owner. -
Add a link in a note (to a resource outside of the eText ) —
Enter the URL beginning with www. When this feature is available, the URL becomes active and turns blue.
- Select from the sidebar menu to open the Notebook.
- Make selections to filter your notes view by chapter or highlight color (yellow, green, pink, blank or blue - instructor note).
To show only notes not associated with a highlight, select Blank.
- Select from the sidebar menu to open the Notebook.
- Prepare the list of notes you want to export.
You can filter your notes by chapter or highlight color. See the section above for filter details. - Select
 and identify where you want to send your notes in PDF format.
Any colored highlights will appear in the notes.
Use the Study area to quiz yourself. Create your own flashcards and use any provided flashcards. In most eTexts you can study with a matching game, fill-in-the-blank questions, and multiple choice questions.
-
From a book page, select the passage you want on a flashcard.
-
Select New flashcard.
-
Create a new deck or associate the new flashcard with a deck.
-
Add a term or question for the front of the card. The back of the card contains your selected text. You can keep it as is or edit it. To switch content between the Front and Back boxes, select
 .
.
When you create a flashcard from book content, a flashcard marker appears in the margin of the book page. Use these markers to open, edit, or delete a flashcard.
-
Select
from the eText sidebar menu to see any provided study content. -
Select
to create a new deck and add flashcards to it. Or, select a deck to edit its flashcards.-
Create a deck or edit an existing deck —
If this is your first deck or you want to create a deck, enter a name for it. To edit an existing deck, select for it, then edit the deck name, add flashcards to it, or delete the deck.
-
Create/edit flashcard content —
-
Enter a term or question to answer to appear on the front of the flashcard.
-
Enter a definition or answer to appear on the back of the flashcard. To switch content between the Front and Back boxes, select
. -
Select either Save and close or Add another to repeat the process.
-
-
-
Select
from the eText sidebar menu to view your flashcard decks or any provided decks. -
Select a deck from the My decks, Practice questions (available for select eTexts), or Key terms.
-
Practice answering questions or matching terms with their definition.
-
Select a study activity
Practice —
Based on your previous answers, uses an adaptive learning algorithm to select the 20 cards you should practice next. Content is a mix of multiple-choice questions, flashcards, and type-in answer questions.View all —
Flip through to view all flashcards. Available only for "My decks" and "Key terms".Matching —
Match key terms with the definitions. Available only for "Key terms". -
Pick items to review —
Choose whether to review all items or just your favorite items. To make key terms a favorite, select Favorite “term name”.
-
Bookmarks let you easily return to areas in the book.
- Add a bookmark — From a book page, select
 (top right).
 -
Go to bookmarked content —
For recent bookmarks, select from the sidebar menu then select Bookmarks. To access all bookmarks, choose
from the eText sidebar menu, move along the bar, and then select the point for any bookmark label.
-
Remove a bookmark —
To remove individual bookmarks, select from the top of a book page or from the Bookmarks list in the Table of Contents .
 You can also select Remove all bookmarks from the Bookmarks list in the Table of Contents.
- Change eText display settings
Select from the sidebar menu. Most eTexts —
Control color mode (light, sepia, or dark), page progression (scroll or swipe), text size, font, character case, line spacing, and show/hide highlights.PDF eTexts —
Control zoom, single- or double-page view, page progression (scroll or swipe), and show/hide hotspots or highlights. - Contact Pearson Support
Select your account initials (top right) then select Help & support. - Sign out from your Pearson app for eText
Select your account initials (top right) then select Sign out.
After you sign into the app with your Pearson account, you remain signed in unless you sign out.