The content editor is used throughout the course to create and edit text, images, hyperlinks, and HTML. For example, you use the content editor to create or edit questions and question feedback, provide students with comments, and send or respond to course mail messages.
Notes:
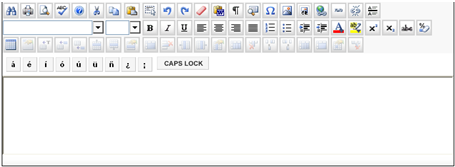
Buttons are grouped by function. Click to view the available tools for each:
Tip: Point to a toolbar button to view a tool tip that explains what it does.
 Tools
Tools
| Click | To | |
|---|---|---|
|
|
Find | Search for characters in the text already entered in the editor. |
|
|
Print the content in the editor. | |
|
|
Preview | Preview how the content in the editor will appear in the course. |
|
|
Help | View this Help topic for information on how to use the editor. |
Edit
| Click | To | |
|---|---|---|
|
|
Check Spelling |
Check the spelling of the content in the editor. |
|
|
Cut |
Remove selected content from the editor and place it on the clipboard. |
|
|
Copy |
Copy selected content from the editor and place it on the clipboard. |
|
|
Paste |
Paste content from the clipboard to the editor. |
|
|
Select All |
Select all content in the editor. |
|
|
Undo |
Reverse the last action or delete the last entry you typed. |
|
|
Redo |
Reverse an Undo action. |
|
|
Delete |
Delete selected content from the editor. |
|
|
Clean HTML Code |
Clean up or remove unwanted HTML code. Content pasted from other applications may contain unwanted HTML code. In particular, use this option to clean text that you paste from Microsoft Word documents. |
|
|
Show WYSIWYG/ |
Toggle between displaying content in WYSIWYG (What You See Is What You Get) and edit mode. |
|
|
Show HTML |
See and edit the HTML code for the content in the editor. |
Insert
| Click | To | |
|---|---|---|
|
|
Insert Special Character/ |
Insert special characters and codes. |
|
|
Insert Media |
Insert an image, Flash file, or Java applet. |
|
|
Insert Media from Content Library |
Insert media assets from the Course Materials Library. |
|
|
Insert Link |
Insert a link to an external URL or an asset in the Course Materials Library. |
|
|
Insert URL |
Insert a link to an asset in the course Course Materials Library. |
|
|
Unlink |
Remove a link without deleting the link text. |
|
|
Insert Horizontal Rule |
Insert a horizontal rule. |
|
|
Record Audio |
Record a message, if audio is enabled for the course. After you click this button, use the record button to record the message, and then click Save and Close. You can re-record or play back the audio by clicking the audio player in the content editor. For more information, see Use the audio feature. |
Text
| Click | To | |
|---|---|---|
|
|
Font Name |
Change the font face. |
|
|
Font Size |
Change font size. |
|
|
Bold |
Apply bold formatting to text. |
|
|
Italic |
Apply italic formatting to text. |
|
|
Underline |
Apply underline formatting to text. |
|
|
Justify Left |
Left align text. |
|
|
Justify Center |
Center text. |
|
|
Justify Right |
Right align text. |
|
|
Justify Full |
Align text evenly on the left and right margins. |
|
|
Numbered List |
Create a numbered list. |
|
|
Bulleted List |
Create a bulleted list. |
|
|
Indent |
Increase the indent of a paragraph or text. |
|
|
Outdent |
Decrease the indent of a paragraph or text. |
|
|
Text Color |
Apply text color formatting. Select a color from the standard color palette or click More Colors to display the Color Selector palette. Select the color you want and click OK to apply the color to the selected text. You can also type the hexadecimal code of a particular color in the box provided. |
|
|
Background Color |
Apply background color formatting. Select a color from the standard color palette or click More Colors to display the Color Selector palette. Select the color you want and click OK to apply the color as the background color. You can also type the hexadecimal code of a particular color in the box provided. |
|
|
Superscript |
Apply superscript formatting to text. |
|
|
Subscript |
Apply subscript formatting to text. |
|
|
Strikethrough |
Apply strikethrough formatting to text. |
|
|
Remove Format |
Remove text formatting. |
|
|
Character Palette |
Inserts non-English characters in the editor. The character palette is only available if it has been enabled. For details, see Use the character palette. |
Tables
| Click | To | |
|---|---|---|
|
|
Insert Table |
Insert a table. |
|
|
Table Properties |
Edit the properties of the table. |
|
|
Insert Caption |
Insert a caption for the table. |
|
|
Insert Header Row |
Insert a new table header row at the top of the table. |
|
|
Insert Footer Row |
Insert a new table footer row at the bottom of a table. |
|
|
Insert Row Above |
Insert a new row above the selected row. |
|
|
Insert Row Below |
Insert a new row below the selected row. |
|
|
Row Properties |
Edit table row properties. |
|
|
Split Cell Rows |
Split a cell into rows. |
|
|
Delete Row |
Delete the selected table row. |
|
|
Insert Column Left |
Insert a new column to the left of the selected column. |
|
|
Insert Column Right |
Insert a new column to the right of the selected column. |
|
|
Column Properties |
Edit the properties of the column. |
|
|
Split Cell Columns |
Split the cell into columns. |
|
|
Delete Column |
Delete the selected table column. |
|
|
Insert Cell Left |
Insert a new cell to the left of the selected cell. |
|
|
Insert Cell Right |
Insert a new cell to the right of the selected cell. |
|
|
Split Cell |
Split the cell into rows and columns. |
|
|
Merge Cells |
Merge table cells into a single cell. |
|
|
Cell Properties |
Edit the table cell properties. |
|
|
Delete Cell |
Delete the selected table cell. |
Terms of Use | Privacy | Accessibility | Permissions | Support | Copyright © 2018 Pearson Education, Inc. All rights reserved.