Example: Define alternate responses for an answer
Updated 16 Jun 2023
The following example shows how to define alternate responses for answers when the question requires more than one solution.
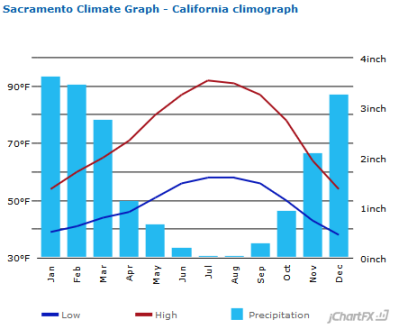
In this example, you want students to interpret a graph and identify the three months with the highest precipitation. The answer should be December, January, February. You also want to accept Dec., Dec, Jan., Jan, Feb., and Feb.
- When you open the Create Custom Question wizard, choose to start with an empty template.
- Select Left/Right as the format and click Next.
- In the Custom Question Builder, enter the following
in the "problem statement" (question) section of the question-and-answer
area:
Use the following graph to identify the three months with the highest precipitation. - Choose Insert > Picture from the menu to insert your chart:
© 2015 US Climate Data
- Enter the following in the answer (interaction) area:
- Move to a new line and click Short Answer under Student Interactions in the menu on the left.
- In the Edit Answer Definition window, click Step 1 in the menu on the left.
- Select Answer is text or contains a symbol and click Next.
- In Step 2, enter 'December', 'January', and 'February' on separate lines in the Value table.
- Under the table, select All solutions listed above are required for
the correct answer. You now see More buttons
 after each entry in the table:
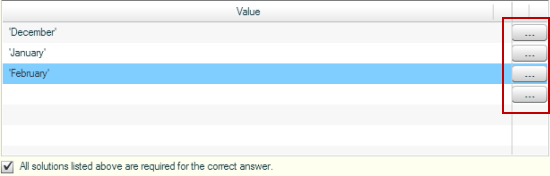
- Click the More button for December.
- In the Multiple Solutions popup, enter 'Dec.' and 'Dec' in the second and third lines of the table. Then click OK.
The first row of the Value table now shows the possible responses to the first required solution.
- Open the Multiple Solutions popup for the other two months and enter the alternate responses.
Your Value table now looks like this:

- Click Next to continue to steps 3 and 4. Accept the defaults in step 3 and optionally enter feedback in step 4.
- Click Save to return to the Custom Question Builder window, where your answer now appears in the answer area.
- Under the short answer box, enter the instruction:
Enter the names of the months, separated by commas. - Click Preview Exercise to view your answer as your students will see it.
- When you are satisfied with your question, click Save and Exit to enter question settings.
The three months with the highest precipitation are