Vector and moment styles (vector moment questions)
Updated 17 Sep 2025
Choose element settings in a vector moment answer type to add vector or moment elements and to adjust properties such as label, color, and line width for a vector.
- Element settings let you control whether students can initially see and manipulate any vector or moment you place in the background.
- You can also set which vectors should be added to the vector sum and control whether students can see the vector sum.
- Element settings apply to ALL answer strings, not just the string being edited.
- You may need to select Edit Answer to make the element settings available for editing.
- When you finish making your element settings edits, choose Save (top right) from the settings box.
To save time creating elements for a vector moment question, you can save element settings to your computer to use again later.
- Save element settings to a file
Choose Save Presets after one or more elements (vectors or moments) have been created in a vector moment answer type. This will create an XML file you can save to a location on your computer. - Import the element settings file
When you return to the element settings for another vector moment question, choose Load Presets to import the XML file so you can choose elements from your previous work.
Vector: Element Settings
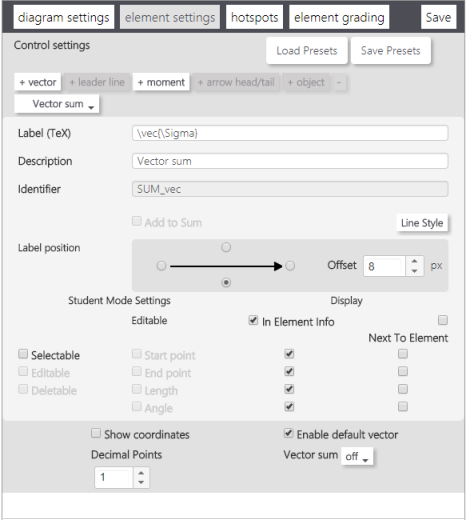
- To add a vector
Select +vector from the elements settings tab and then enter or edit its properties. - To edit the properties of a vector
Select an existing vector from the dropdown list and make your property edits from the provided element settings options. - To delete a labeled vector from element settings
Select the down arrow to view the vectors for the question. Note that you can’t delete the provided unlabeled vector. Select a labeled vector and then choose the minus sign (-) at the end of the elements row. A message appears for you to confirm the delete action.
- To set or change the label, description, and identifier
Default information is provided in the text boxes, which you can edit. Students view this information in the dropdown list when they choose to add an element.
- For the label —
Either accept the default name or enter a new label coded in TeX into the Label (TeX) text box. - For the description —
Enter a plain text description (no HTML formatting) for the vector in the Description text box. - The Identifier —
This is the var-coded equivalent of the label which you can edit. This identifier appears in the correct answer string.
- For the label —
- To set or change the position of a vector label
Select a direction and any Offset in pixels.
- To set line styles for a vector
Choose Line Style. A window opens with settings for line thickness, color, a (alpha) for transparency, dashed, Line and Gap .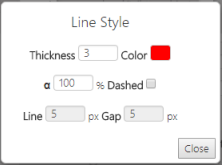
- To set or change whether the vector is added to the sum
Check or clear the Add to Sum check box. - To set whether the vector sum is shown to student
In the bottom right, select the arrow next to Vector sum to select optional, on, or off. Only vectors set to Add to Sum, are added—all others are excluded. If you allow students to see the vector sum, be sure that all vectors have a checkmark in the Add to Sum check box.- When off is selected, the vector sum button in the student display is grayed out.
- When on is selected, the vector sum button is permanently depressed and the sum vector is always visible to the student.
- When optional is selected, students can control whether the vector sum is displayed by using the vector sum button.
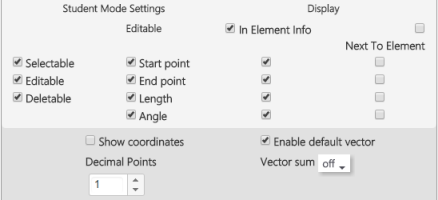
Student Mode: Set how students can interact with vectors
Select or clear the vector check boxes to set whether student can:
- Select, edit, or delete vectors.
- Edit vector properties including start point, end point, length, or angle.
Display: Show/hide vector properties to students
Select or clear the Display check boxes to set whether vector properties are shown to students near the canvas or next to the vector as they work the problem.
Display near the canvas
- Select or clear the In Element Info checkbox.
- Select or clear the check boxes for Start point, End point, Length, and/or Angle.
Display next to the vector
- Select or clear the Next to Element check box.
- Select or clear the check boxes for Start point, End point, Length, and/or Angle.
Show/hide (x,y) coordinates, unlabeled vector, and edit number of decimal points
- For (x,y) coordinates of vector start and end points to be shown to students
Add a checkmark to the Show coordinates check box. - To include “unlabeled vector” in the vector drop-down list for students
Accept the default selection of the Enable default vector check box - To edit the number of decimal points that display for the vector properties
Change the value for Decimal Points to reset the number of decimal points that display for a vector start point, end point, length, and/or angle.
Moment: Element Settings
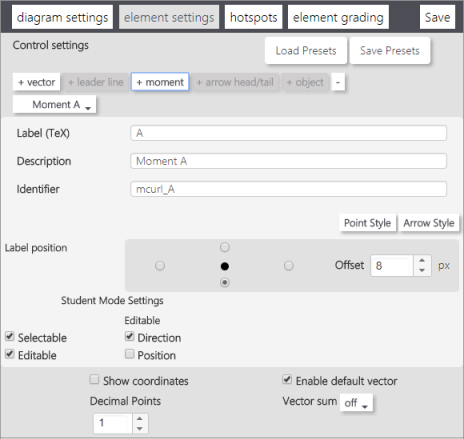
- To add a moment
Select +moment and then enter or edit its properties. - To edit the properties of a moment
Select an existing moment from the dropdown list and make your property edits from the provided element settings options. - To make a moment appear in the Add Element menu for students
Select the Position check box under Editable in the Student Mode Settings area. - To delete a moment
Select the down arrow to view the moments for the question. Select a moment and choose the - (minus sign) at the end of the elements row. A message appears for you to confirm the delete action.
- To set or change the label, description and identifier
Default information is provided in the text boxes, which you can edit. Students view this information in the dropdown list when they choose to add an element.- For the label —
Either accept the default name or enter a new label coded in TeX into the Label (TeX) text box. - For the description —
Enter a plain text description (no HTML formatting) for the moment in the Description text box. - The Identifier —
This is the var-coded equivalent of the label which you can edit. This identifier appears in the correct answer string.
- For the label —
- To set or change the position of a moment label
Select a label position and any Offset in pixels.
- To set the point style for a moment
Choose Point Style. A window opens with settings for the radius (in pixels) and color. - To set the arrow style for a moment
Choose Arrow Style. A window opens with settings for and color.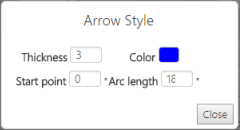
Select or clear the check boxes for moment Student Mode Settings to set whether:
- The moment is Selectable or Editable.
- Students can edit the Direction or Position of a moment.
- For moment (x,y) coordinates to be shown to students
Add a checkmark to the Show coordinates check box. - To include “unlabeled vector” in the vector drop-down list for students
Accept the default selection of the Enable default vector check box. - To edit the number of decimal points that display for the vector properties
Change the value for Decimal Points to reset the number of decimal points that display for a vector start point, end point, length, and/or angle. - To set whether the vector sum is shown to students
In the bottom right, select the arrow next to Vector sum to select optional, on, or off. Only vectors set to Add to Sum are added—all others are excluded. (Moments cannot be added to the Vector Sum.) If you allow students to see the vector sum, be sure that all vectors have a checkmark in the Add to Sum check box.- When off is selected —
The vector sum button in the student display is grayed out. - When on is selected —
The vector sum button is permanently depressed and the sum vector is always visible to the student. - When optional is selected —
Students can control whether the vector sum is displayed by using the vector sum button.
- When off is selected —
See also: