Create and edit fill-in-the-blank questions
Updated 19 Feb 2024
For fill-in-the-blank questions, you enter question text as well as one or more blanks that students complete to answer the question.
When creating or editing your question, you can switch among sections at any time. However, you may need to complete one section prior to opening another. If this is the case, a message appears directing you to enter the required information. You can click a section or subsection's bar to expand or collapse it.
The course saves your input as you enter it. To preview your question at any time, click Preview.
To view
an example of the question type, click ![]() Sample Question.
Sample Question.
- As you add or edit an activity, click Add Questions > Create New Question on the Questions page.
- or -
Click Course Materials > Additional Instructor Views > Manage Question Bank, and then click Add Course Materials. (MyLab IT only)
From the Today's View or any other page within a course, click Course Materials > Manage Question Bank and then click Add Course Materials.(MyLab Languages only)
- Click Fill in the Blank. A page appears with the following sections:
- Question Layout
- Questions & Answers
- Hints
- Preferences (MyLab Languages only)
- The best way to add activities (create assignments) is with the Course Materials Wizard. To access the wizard, select Course Materials from the menu bar. This wizard lets you add assignments by taking you to the Course Materials Library, copy materials from another course using the Course Materials Library, and manage your content library. Refer to Using the Course Materials Wizard for more information.
- You can also add activities from the Course Materials Library and then move them to the My Course list where you can set appropriate scheduling. Use the Course Materials wizard to access the library.
- Another option is to add an activity to the My Course list. If you do that, you will be prompted to save the new activity to the Course Materials Library. In this case, navigate to and select the Course Materials Library folder where you want to save the activity and then click Add and Close.
- Click to select a question layout.
By default, layout 1 is selected.
The layout specifies where the question text and the question answer appear during question presentation. As shown, layouts have one answer location and can have one or two text fields.

- In the Edit Question subsection of the Question & Answers section, enter up to 100 characters for the question's title and text.
- Add a question narrative.
- Enter instructions for the question:
- If the question layout has one text area, enter your instructions in Question Section A.
- If the question layout has two text areas, enter your instructions in Question Section A and any additional information the student needs in Question Section B.
Notes
You can change the question layout at any time. However, if you switch from a layout with two question text fields to a layout with one question field or from a layout with one question text field to a layout with no question field, you are prompted to confirm the switch because some or all of the question text you enter will not appear in the new layout.
To define your question you can either Add Text or Add Blanks. For example, if your question is "A modem modulates an _____________ to encode digital information" with "analog carrier signal" as the correct answer, you would use Add Text for "A modem modulates" and "to encode digital information" and Add Blank for "analog carrier signal."
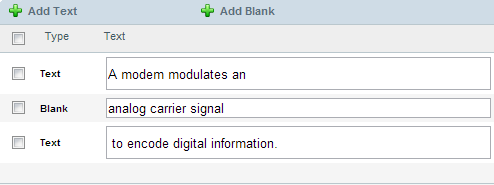
Here is how the final question looks to students:

- Click
 Add Text and choose the location to insert the text in the Answer display. Options are:
- Add at top: Adds the text as the first item.
- Add before selected: Adds the text before the selected text or blank.
- Add after selected: Adds the text after the selected text or blank.
- Add at bottom: Adds the text as the last item.
In order to enable Add before selected and Add after selected, you must first select a Text or Blank item in the Answer field. If you select multiple items, the new item appears before or after the first or last item in the group.
- Type the question text in the entry box of Type Text that appears. To format the text you type, click Edit HTML to open the content editor.
- Click Add Blank and choose the location to insert the blank in the Answer
display. Options are:
- Add at top: Adds the blank as the first item.
- Add before selected: Adds the blank before the selected text or blank.
- Add after selected: Adds the blank after the selected text or blank.
- Add at bottom: Adds the blank as the last item.
To enable Add before selected and Add after selected, you must first select a Text or Blank item in the Answer field. If you select multiple items, the new item appears before (or after) the first (or last) item in the group.
- Type the question answer in the entry box of Type Blank that appears. The question answer you enter does not appear when students attempt the question; instead, they see a blank space that they need to fill in.
- Select a Blank length. Each blank length is a set number of pixels:
A Blank length of ... Gives a field Length of ... The approximate number of visible characters is ... XX-Small 25px 1-3 X-Small 50px 3-6 Small 100px 7-18 Medium 150px 11-30 Large 200px 15-45 X-Large 325px 24-52 XX-Large 450px 34-72 To delete question text or blanks, select their boxes and click Delete. To reorder question text or blanks, use the order icon
 to drag and drop text or blanks in a new location.
In the Edit Score and Feedback section, you can edit the answer text for question blanks or provide alternate answers, and set scores and feedback for correct and incorrect answers.
- Click the Add Score and Feedback subsection. The Answer column lists all of the text you defined as Blanks in the Edit Question section.
- You can enter answers in the Pre-filled text column. The answer you provide appears in the question blank when students view the question. When answering the question, students can either accept or edit the answer you provide.
- To provide Alternative answers, or to edit the current text, click Edit. Enter the alternate answer, click Add, and then click OK.
Adding alternate answers lets you accept specific spelling, capitalization, or other variations that may occur when students enter their answers.
- Enter the Score for correct answer and Score for incorrect answer for each answer.
- Enter Feedback for correct answer and Feedback for incorrect answer for each pair. To format the Text, click the Edit button to open the content editor.
- To consider text case when grading the question, under Options, select Case sensitive. For example, if enabled, "month" and "Month" are considered different answers.
- To consider similar sounding words when grading the question, under Options, select Allow similar sounding words. You cannot select both this option and the Ignore Punctuation (Apostrophes will not be ignored) option.
The application evaluates similar sounding words based on an algorithm that converts the text string to a code string. The conversion is based on the phonetic sound of the string. If the code string matches the words in the student answer, it is considered to be similar sounding.
- To ignore punctuation errors, under Options, select Ignore Punctuation (Apostrophes will not be ignored). You cannot select both this option and Allow similar sounding words. This option is also not available in all courses.
- To ignore spaces that the student may have entered in their answer, select Ignore extra spaces. For example, if enabled, "can not" would be graded the same as "cannot."
- To set the grading for accents while evaluating the student response, select an Accents option:
- Strict grading: When selected, students do not receive credit for answers with accent mark mistakes.
- Partial grading: When selected, you can enter a specific value (percentage) to deduct for accent mark mistakes. Students receives partial credit for answers with accent mark mistakes based on the value you enter.
- Partial Credit value: Enter the percentage that should be deducted for accent mark mistakes. The scoring value must be from 0 to 100. Click Reset to Default to reset the value to the default value (50%).
- Loose grading: When selected, students receive full credit for answers with accent mark mistakes.
- Add any hints you want to include for the question.
- Set the question's preferences. (MyLab Languages only)
- Click Save and Close.
On the Questions page, you can use the question's options menu to edit, delete, or try out the question.
If you have access to the Course Materials > Manage Question Bank page in the course, you have access to additional question options, such as Preferences and Tryout.(MyLab Languages only)
- When creating or editing an activity,
select
Edit from the question's options
menu on the Questions page.
- or -
From within a course, click Course Materials > Manage Question Bank and select Edit from the question's options menu. (MyLab Languages)
From within a course, click Course Materials > Additional Instructor Views > Manage Question Bank and select Edit from the question's options menu. (MyLab IT)
- Make your changes.
- Click Save and Close.