Upload multiple files using ZIP and Ingestion Spreadsheet

Use these procedures to upload a ZIP file of new audio and/or video files and their supporting files, and upload an Ingestion Spreadsheet to the Media Server.

collapsedTo create the ZIP file

  1. Create a ZIP file containing the files you want to upload (audios, videos, captions, thumbnails, chaptering XML).
    • Limit the size of the ZIP file to 1 GB.

      If the ZIP file is larger than 1 GB or causes browser time-outs, you need to upload your files to the Media Server and provide a link to the files in the Ingestion Spreadsheet instead. See Upload files using the Media Server for directions.

    • The ZIP file cannot contain nested folders; your files must be in the root of the ZIP file.
    • The supported audio/video file types are: .mp3, .m4v, .mp4, .mov
    • Other supported file types are:
      • Caption files (.srt) in English, Spanish, Italian, German, or Mandarin

        Only 5 caption files can be added to a video when using an Ingestion Spreadsheet. You can, however, update the files with additional caption files.

      • Thumbnails (.jpeg, .gif, .png, or .bmp)
      • Chaptering XML (xml)
      • Audio Descriptor video files

collapsedTo download and complete the Ingestion Spreadsheet

  1. Go to https://mediaconsole.pearsoncmg.com/gcs/auth/ and login.
  2. Select the Upload New Files tab.
  3. Select the Upload Spreadsheet link and download the spreadsheet.

  4. Fill out the Ingestion Spreadsheet.
  5. Save the Ingestion Spreadsheet in the .xls format. (The .xlsx spreadsheet format is not supported.)

    For the file name, keep in mind that:

    • File names cannot have spaces or special characters.
    • File names are case sensitive. If your video is named MYVIDEO.MP4 and you enter myvideo.mp4 in the Video Source File Name field in the spreadsheet, GCS will alert you to the error during upload.

collapsed
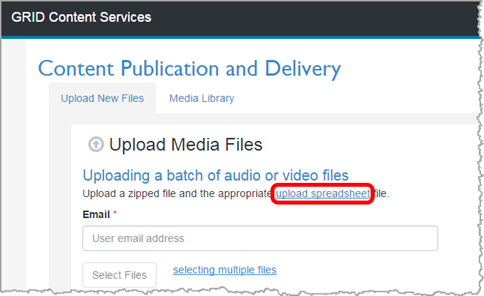
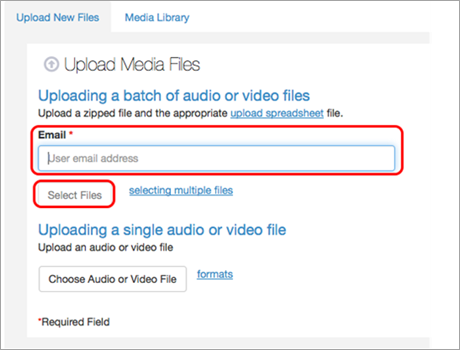
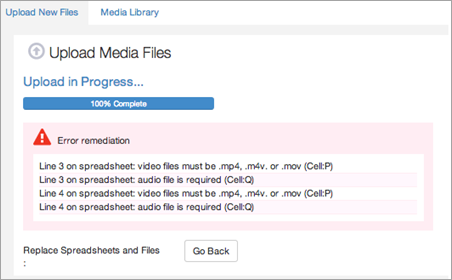
To upload a new ZIP file and Ingestion Spreadsheet

You'll be selecting the ZIP file and spreadsheet at the same time; this selection automatically triggers the upload. Make sure both the ZIP and spreadsheet files are in the same folder before you start this procedure. (The exception is if your browser's file selector allows you to select different files from different directories at the same time; that too will trigger the upload.)

  1. Go to https://mediaconsole.pearsoncmg.com/gcs/auth/ and login.
  2. Select the Upload New Files tab on the Content Publication and Delivery page.
  3. Enter your Email ID (typically your Pearson email).
  4. Click the Select Files button.

  5. Select the ZIP file and filled-in Ingestion Spreadsheet you created in the above procedures.

    A progress bar shows the status of the upload and the validation of the spreadsheet.

    If there are validation errors (like missing files, wrong file types, etc.), a message is displayed telling you which spreadsheet cell contains the error.

    You can click the Go Back button, resolve the spreadsheet issues, and then repeat this step to ingest your ZIP file and spreadsheet again.

    Allow some time for the processing to complete, depending on the size of your upload. Uploads of 100 MB or less can take from 5 to 10 minutes. Uploads greater than 500 MB can typically take 30 minutes or more.

    If there are no errors, a success message is displayed, and the files are sent to the Platform (MPX) for processing. The time it takes for your media to process through the Platform (MPX) depends on the size of your files and the number of files already in the MPX queue.


See also: