Adaptive diagnostics
In some courses, you can create an adaptive diagnostic test. This assignment type uses an adaptive test to pinpoint topics students need to learn. These tests assess which objectives each student knows and diagnose student weaknesses.
You can associate the test with pre-selected content and customize that content, or you can select your own topics from the content library. You can create more than one test and require students to do them in sequence.
After students take the test, you see students’ results in your gradebook.
- Open the Assignment Manager.
- From the Create or Create Assignment menu, select Create Adaptive Diagnostic.
Step 1, the Start tab opens.
- Enter a test name.
- Select Next.
The Select Your Content window opens.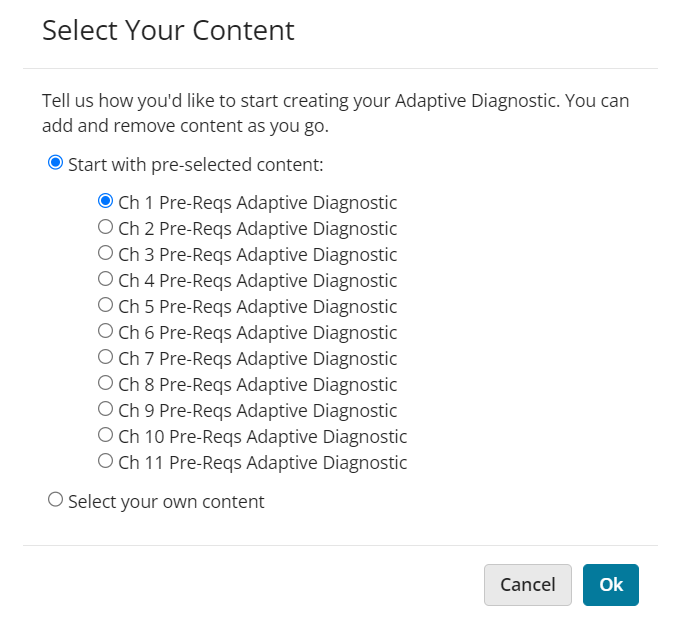
- Choose the content for which you want to assess students' prerequisite knowledge:
- Choose Start with pre-selected content to assess student readiness for the suggested content. Select the content you want to test for.
- Choose Select your own content to select your own content.
For either choice, you can customize coverage in a subsequent step.
- Select OK.
Step 2, the Add/Remove Content tab opens.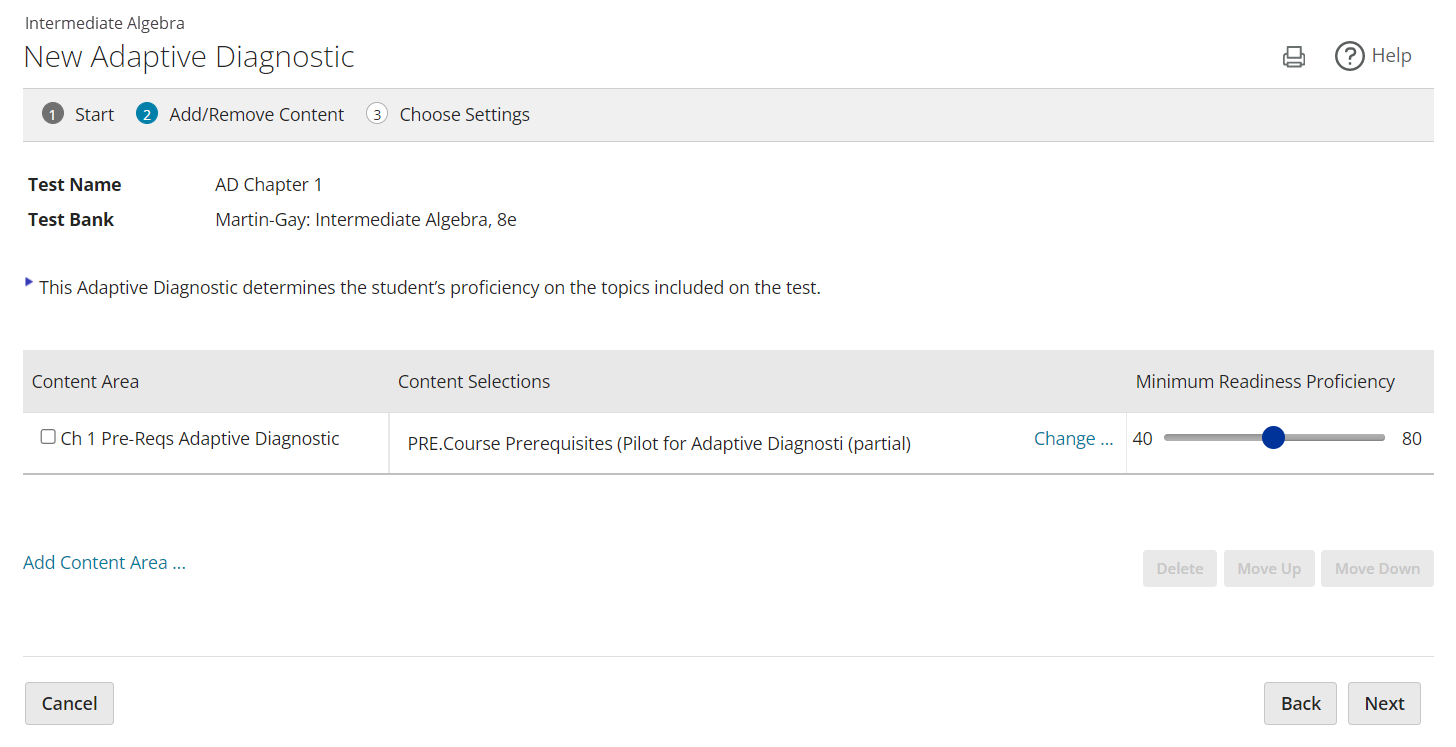
- If you selected pre-selected content, a table shows the content and lists the sections for which prerequisites are assessed.
- To select your own content, select Add Content Area to open a window where you can customize the content covered in the test.
- Select Change after a content selection to open the Add/Edit Content window.
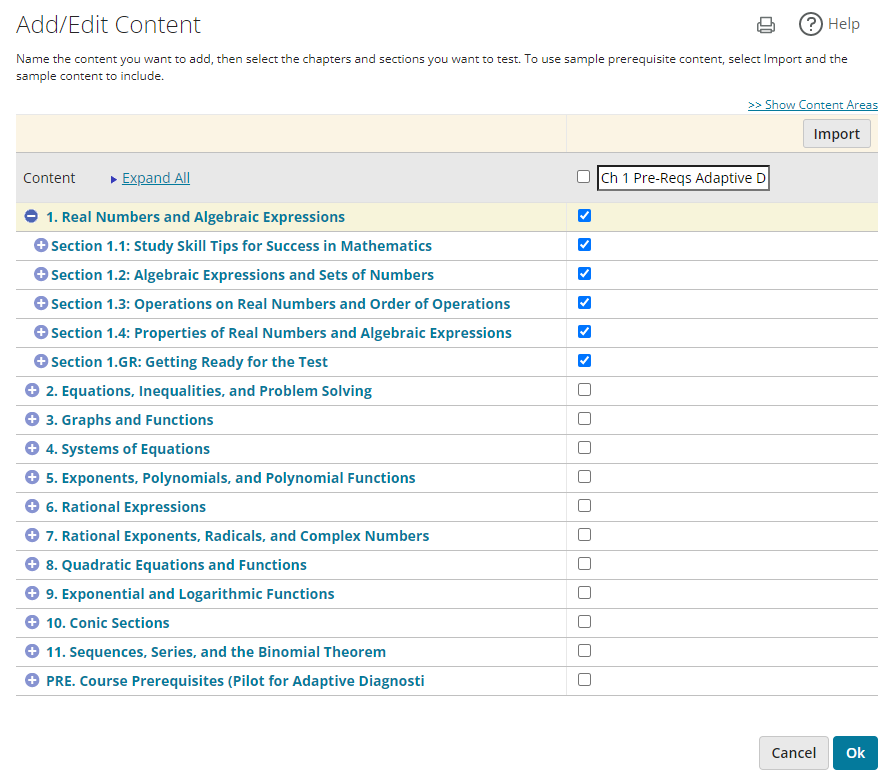
- Customize the content covered in the test:
- Select a section to include prerequisites for the material in the test.
- Select Show Content Areas to add or remove content in the table.
- Select Import to import sample Adaptive Diagnostic content into the prerequisites. Any existing selections are overwritten with the sample content.
- Select OK to return to step 2.
- In the table, select a content area and choose Move Up or Move Down to change the order in which it presents to students. Select Delete to remove it.
- Use the sliders to choose the score students must achieve to prove proficiency.
- Select Next.
Step 3, the Choose Settings tab opens.
- Select Review Individual Student Settings to see any students who have individualized settings for the assignment.
- Specify Availability Options:

- Set the date and time when the Adaptive Diagnostic displays to students and when it is due.
- For Available, select Change to choose your time zone or Daylight Savings Time setting.
- For Chapter Associations, select Change to choose the chapters or units associated with the Adaptive Diagnostic. The chapters are based on the questions you selected on step 2. When questions are associated with multiple chapters, only the last chapter displays. Questions with no chapter association are associated with chapter 1.
- Specify Access Control options:
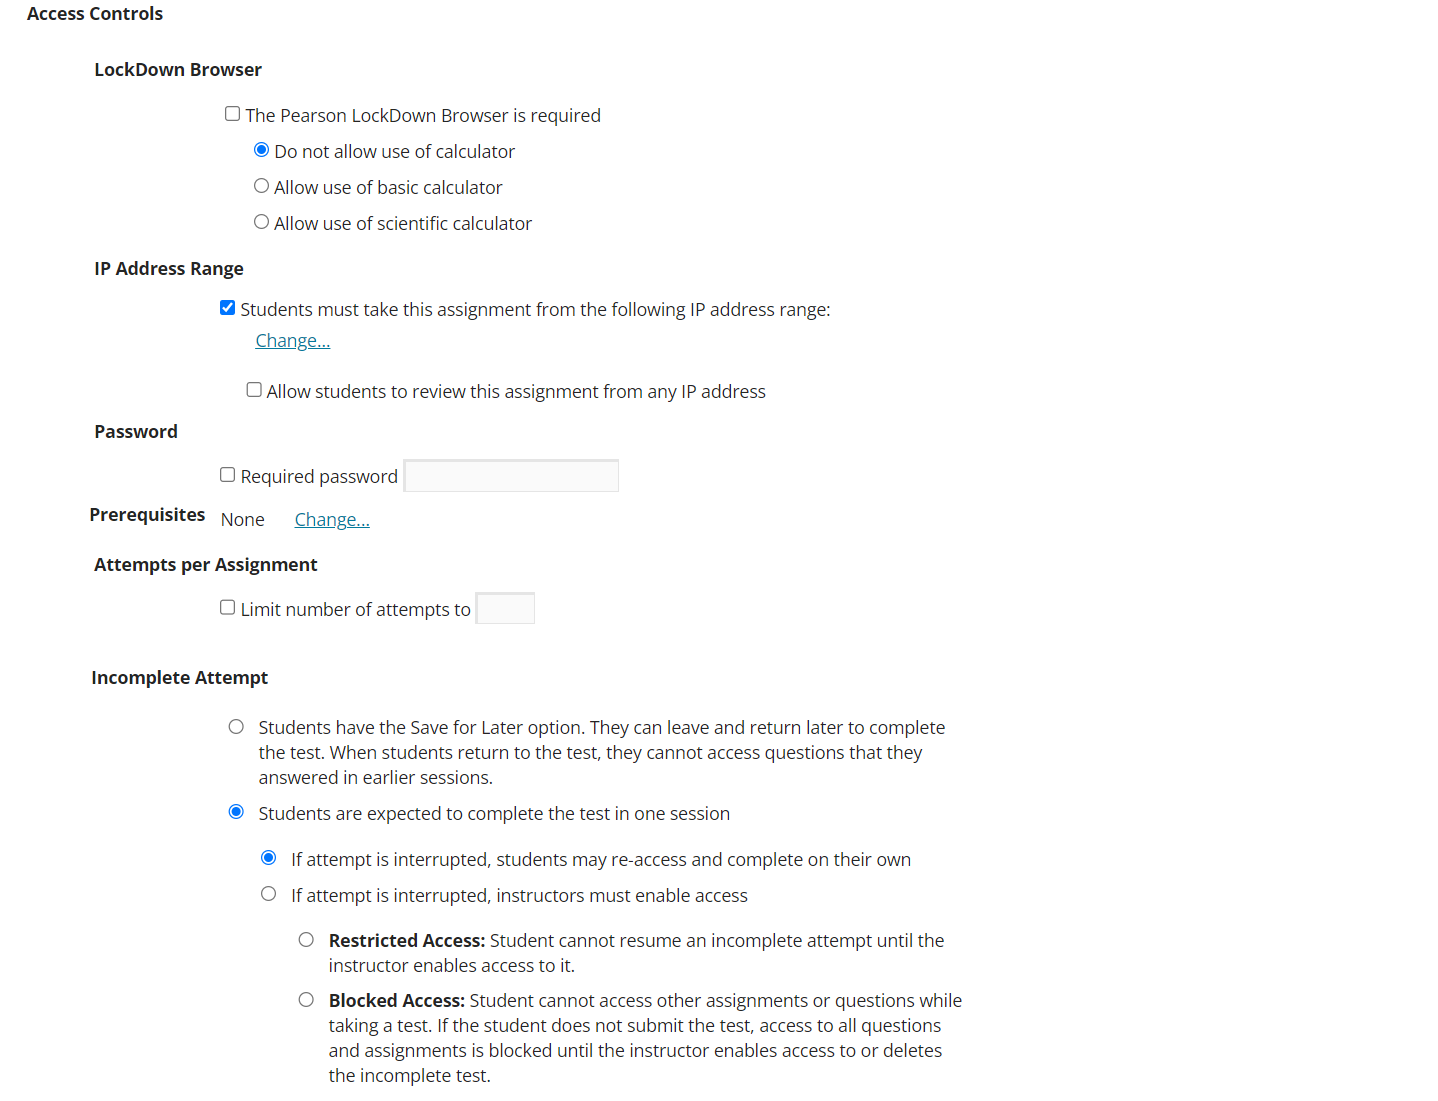
- If available, select The Pearson LockDown Browser is required. This is available only after it is set up at the course level.
- Optionally allow to students use a basic or scientific desktop calculator.
- When IP restrictions are enabled in your course settings, optionally clear Students must access this assignment from the following IP address range to deactivate the IP restriction. You also can select Allow students to review this assignment from any IP address so they can review outside the IP address range.
- Select Require password and enter the password students must supply to do the Adaptive Diagnostic.
- For Prerequisites, select Change to add or modify prerequisites the student must complete. You can require one or more prerequisites or specify alternate prerequisites. Optionally enter a minimum score for the prerequisite. See Use prerequisites.
- Select Attempts per assignment and enter the maximum number of times students can attempt adaptive diagnostic test.
- In the Incomplete Attempt section, choose whether to allow students to save the test and return to it later. When an incomplete test is resumed, all the previous answers are reloaded but students cannot change their earlier answers.
If you require students to complete the test in one session, you can choose what happens if the session is interrupted:
- Select If attempt is interrupted, students may re-access and complete on their own to allow students to resume without your permission.
- Select If attempt is interrupted, instructors must enable access to require students to get your permission to resume the test. If you choose Restricted Access, students can work on other assignments before returning to the test. Blocked Access prevents students from doing any other assignments until after they complete the test.
- Specify Presentation Options:

- Select Graphing to allow students to enter coordinates to plot points on a graph.
- Specify Review Options:

- Select Results Display to choose whether to show or hide results to students after they complete the test.
- Optionally select Edit Test Summary Message to customize the results message. You also can select a follow-on test for students to take next.
- For Reviewing Test, choose when to let students review all the questions, with their answers and the correct answers. If you display only the test score for the Results Display but allow students to review at any time, students can see both their test score and their responses to each question when they review.
- Select or clear Feedback to allow or prevent students from seeing helpful hints when they review a question they answered incorrectly.
- Select or clear Study Plan to allow or prevent results on this test from updating students' Study Plan mastery.
- If available, select Print to allow students to print the questions and answers when reviewing.
- Specify Other options:

- Select Importing to allow other instructors to import the assignment.
- Select Save to save your test and assign it later.
OR
Select Save & Assign to make it available to students.
Adaptive tests adjust the number and difficulty of questions based on students' previous answers. For example, if a student answers a medium question correctly, a harder question follows. If the student struggles with the medium question, an easier question is given.
Adaptive tests require students to answer only the minimum number of questions needed to give you accurate results.
Each question on an adaptive test is worth one point. Partial credit is not awarded for questions on an adaptive test.
After students take your test, you see students’ readiness evaluations for each course in your gradebook. You also can place students or message them based on their adaptive test scores.
To create an adaptive test:
- In the Test Manager, select Create Test > Create Adaptive Test.
Step 1, the Start tab opens.
- Enter a test name.
- Select Next.
The Select Course Associations window opens.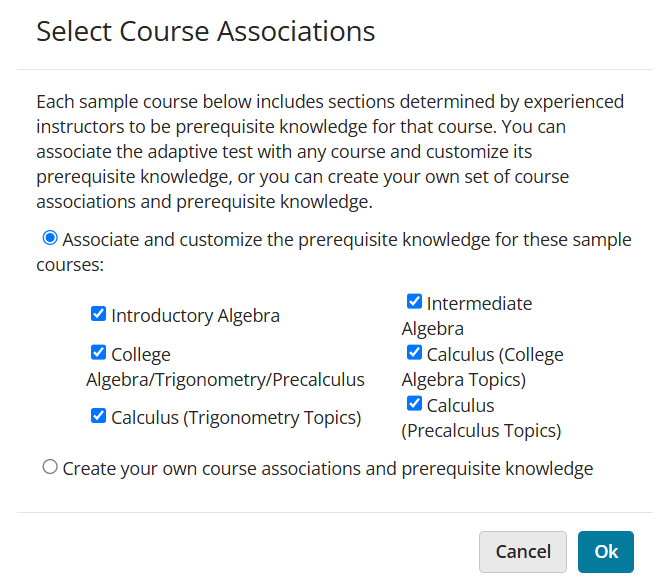
- Choose the courses for which you want to assess students' prerequisite knowledge:
- Choose to Associate and customize the prerequisite knowledge for these sample courses. Select or clear the courses to test for.
- Choose to Create your own course associations and prerequisite knowledge.
For either choice, you can customize course coverage in a subsequent step.
- Select OK.
Step 2, the Add/Remove Content tab opens.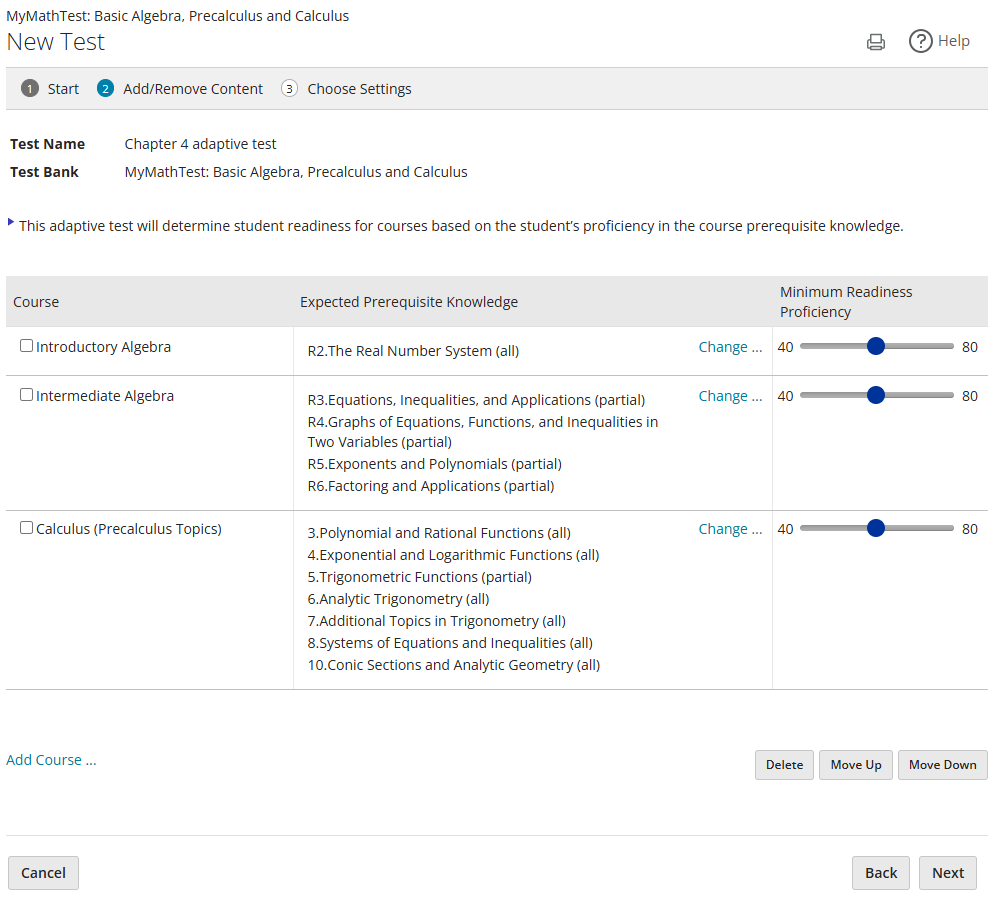
- If you selected sample courses, a table shows the content and lists the sections for which prerequisites are assessed.
- To select your own content, select Add Course to open a window where you can customize the content covered in the test.
- Select Change after a course name to open the Add/Edit Prerequisite Knowledge window.
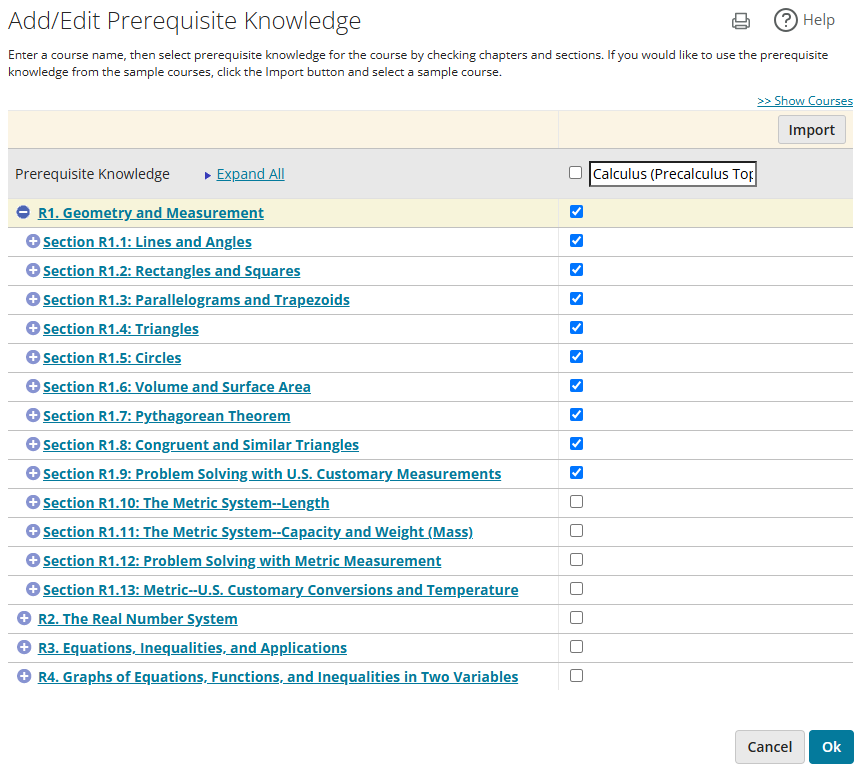
- Customize the courses and sections covered in the test:
- In the list of sections, select the sections include.
- Select Show Courses to add other courses to the table.
- Select Import to import sections from another sample course into the prerequisites for a course.
- Select OK to return to step 2.
- Use the sliders to choose the score students must achieve to prove proficiency.
This score represents a probability measure of what a student is expected to answer correctly from the entire prerequisite knowledge base for the course. If a student gets 75 on a course in the test, then the student is expected to answer 75% of the questions from that course’s prerequisite topics correctly. - Select a course and use Move Up or Move Down (at the bottom of the page) to change the order in which it presents to students. Select Delete to remove it.
- Select Next.
Step 3, the Choose Settings tab opens.
- Select Review Individual Student Settings to see any students who have individualized settings for the assignment.
- Specify Availability Options:

- Set the date and time when the Adaptive Diagnostic displays to students and when it is due.
- For Available, select Change to choose your time zone or Daylight Savings Time setting.
- For Chapter Associations, select Change to choose the chapters or units associated with the Adaptive Diagnostic. The chapters are based on the questions you selected on step 2. When questions are associated with multiple chapters, only the last chapter displays. Questions with no chapter association are associated with chapter 1.
- Specify Access Controls options:

- If available, select The Pearson LockDown Browser is required. This is available only after it is set up at the course level.
- Optionally allow to students use a basic or scientific desktop calculator.
- When IP restrictions are enabled in your course settings, optionally clear Students must access this assignment from the following IP address range to deactivate the IP restriction. You also can select Allow students to review this assignment from any IP address so they can review outside the IP address range.
- Select Require password and enter the password students must supply to do the Adaptive Diagnostic.
- For Prerequisites, select Change to add or modify prerequisites the student must complete. You can require one or more prerequisites or specify alternate prerequisites. Optionally enter a minimum score for the prerequisite. See Use prerequisites.
- Select Attempts per assignment and enter the maximum number of times students can attempt adaptive diagnostic test.
- In the Incomplete Attempt section, choose whether to allow students to save the test and return to it later. When an incomplete test is resumed, all the previous answers are reloaded but students cannot change their earlier answers.
- If you require students to complete the test in one session, you can choose what happens if the session is interrupted:
- Select If attempt is interrupted, students may re-access and complete on their own to allow students to resume without your permission.
- Select If attempt is interrupted, instructors must enable access to require students to get your permission to resume the test. If you choose Restricted Access, students can work on other assignments before returning to the test. Blocked Access prevents students from doing any other assignments until after they complete the test.
- Specify Presentation Options:

- Select Graphing to allow students to enter coordinates to plot points on a graph.
- Specify Review Options:

- Select Results Display to choose whether to show or hide results to students after they complete the test.
- Optionally select Edit Test Summary Message to customize the results message. You also can select a follow-on test for students to take next.
- For Reviewing Test, choose when to let students review all the questions, with their answers and the correct answers. If you display only the test score for the Results Display but allow students to review at any time, students can see both their test score and their responses to each question when they review.
- Select or clear Feedback to allow or prevent students from seeing helpful hints when they review a question they answered incorrectly.
- Select or clear Study Plan to allow or prevent results on this test from updating students' Study Plan mastery.
- If available, select Print to allow students to print the questions and answers when reviewing.
- Specify Other options:

- Select Importing to allow other instructors to import the assignment.
- Select Save to save your test and assign it later.
OR
Select Save & Assign to make it available to students.