Enter course details
Updated 17 Sep 2025
Using an LMS?
![]() If you're using a Learning Management System, go to MyLab and Mastering for your LMS: Instructor Help to get started. You might work with Blackboard, Canvas, D2L Brightspace, Moodle, Sakai, or Schoology.
If you're using a Learning Management System, go to MyLab and Mastering for your LMS: Instructor Help to get started. You might work with Blackboard, Canvas, D2L Brightspace, Moodle, Sakai, or Schoology.
Using MyLab and Mastering without an LMS?
If you're getting started with MyLab and Mastering without an LMS, use the instructions below.
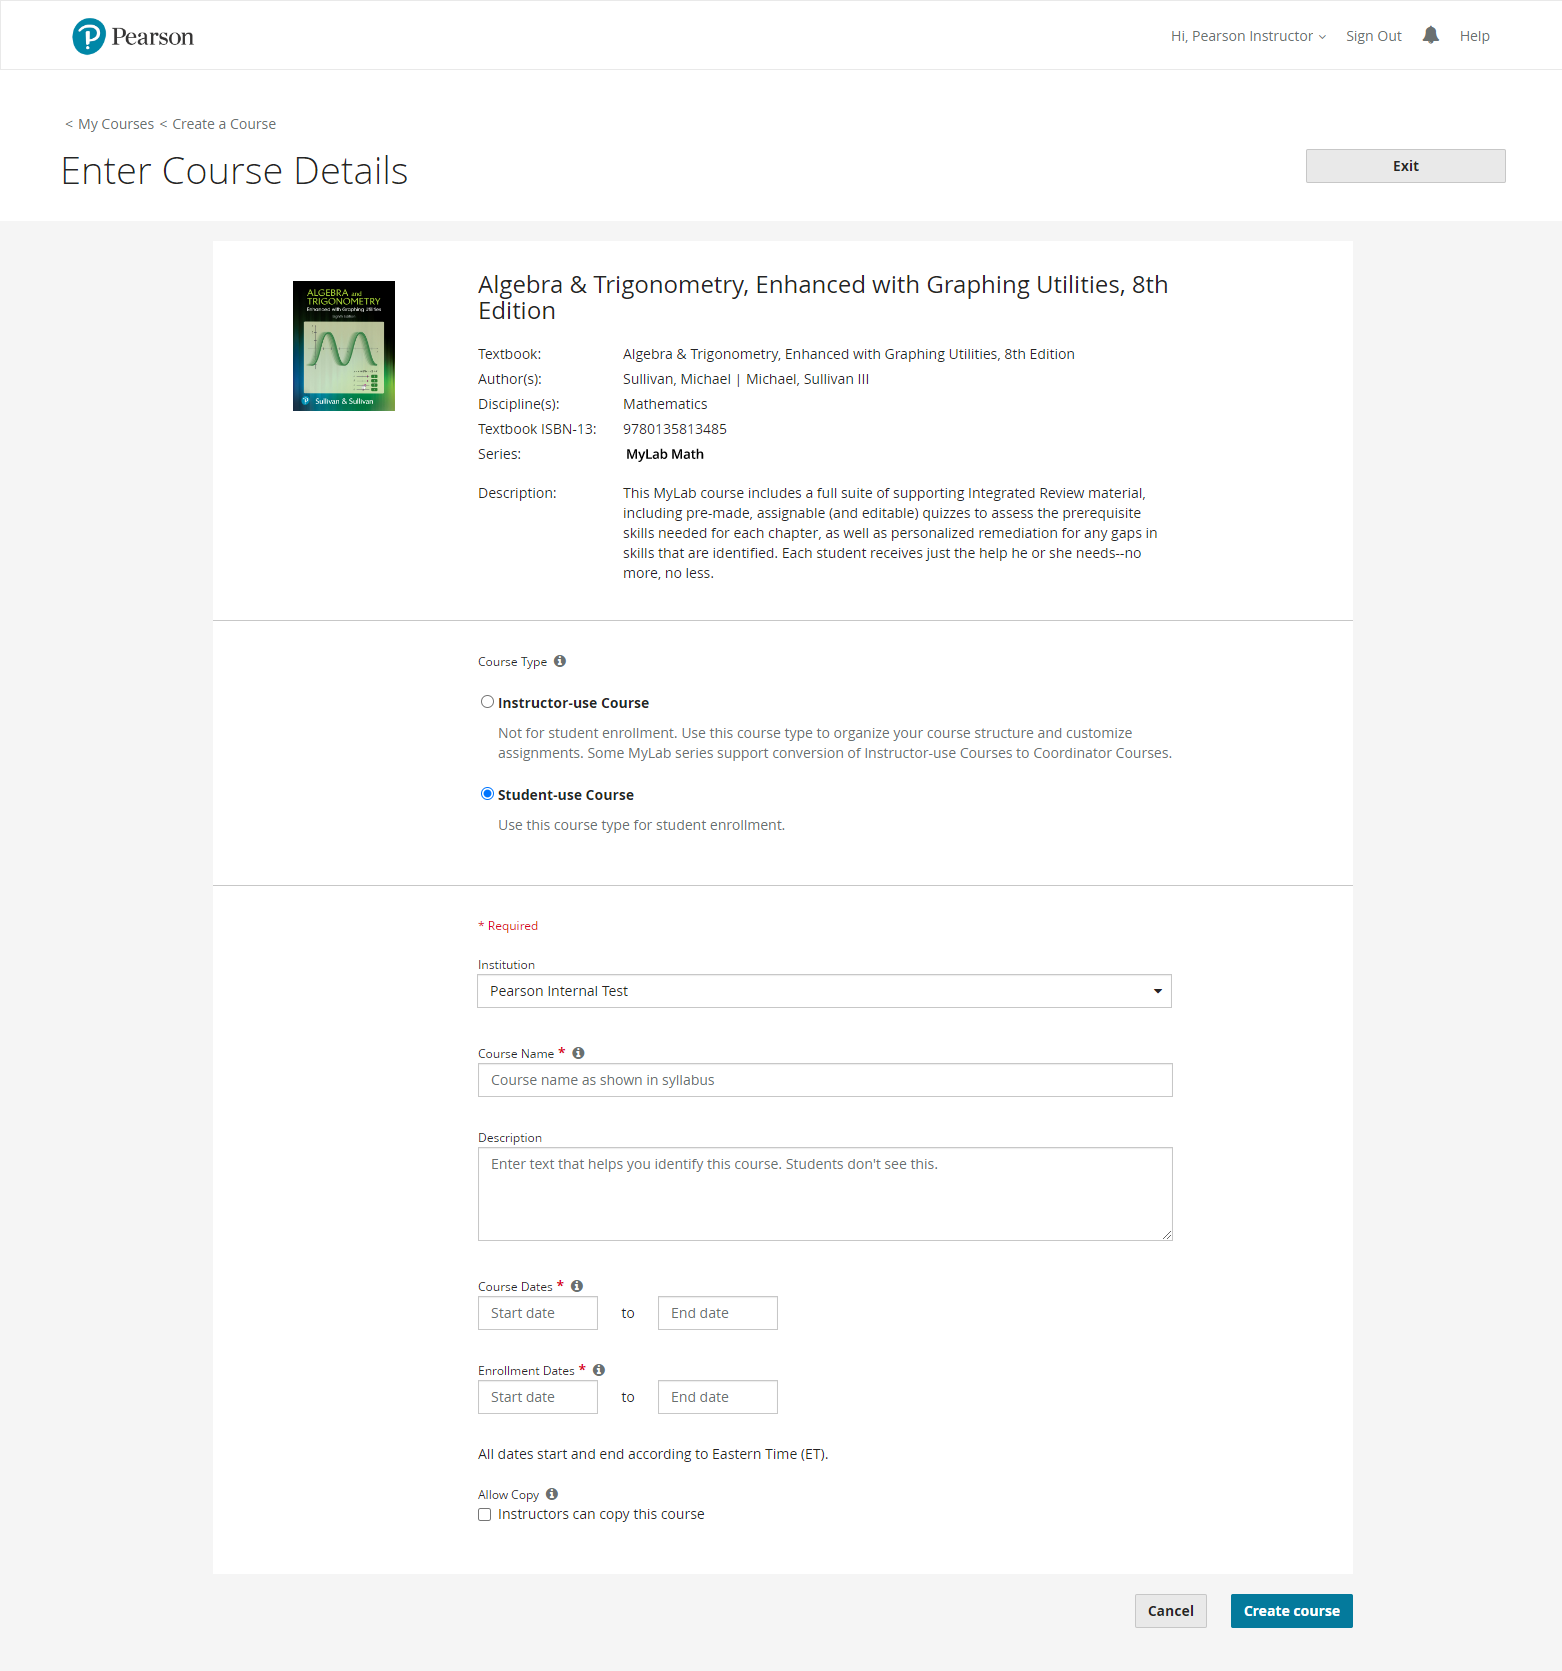
Before entering information and creating your new course, make sure the course materials at the top of the Enter Course Details page are correct. To select different materials from the catalog or an existing course, select Cancel.
To enter course details:
- Select a Course Type.
- Instructor-use course - Use an instructor-use course to:
- Organize your course structure and customize assignments before creating student courses for enrollment. Students do not enroll in instructor-use courses.
- Reuse the course in a future semester. Changes made in instructor-use courses are included in new copies of the course, but do not impact existing courses.
- Share the course with other instructors.
- Copy it to a student-use course for enrollment.
Instructor courses do not provide the course group management features available in coordinator courses. Student courses created from an instructor course are independent of each other, and future changes in the instructor course do not flow to student courses. You can convert some MyLab materials from an instructor course to a coordinator course. See the XL Coordinator Member Sections article or contact your Pearson support rep.
- Student-use course - Use a student-use course if students will enroll in the course.
- Coordinator course - If you selected coordinator course materials from the catalog, the course type is automatically coordinator course and cannot be changed. Organize your coordinator course structure and assignments before copying it to Member Sections for enrollment. Students do not enroll in coordinator courses.
- Member section - Use if students will enroll in the course. Member sections are linked to a coordinator course.
- Instructor-use course - Use an instructor-use course to:
- Number of Copies (optional): Enter the number to create, then select Update.
- Number of Copies is available only when copying to student courses or member sections. You cannot make multiple copies of instructor courses, or when creating student courses from catalog materials.
- You can’t make multiple copies of student courses paired with a learning management system (LMS) course.
- Enter a Course Name.
- Enter a name that students will easily recognize. For example, use the same name that's in your syllabus.
- The course name can be up to 65 characters.
- When creating multiple copies, the first course name you enter is the default for all copies, with the addition of a section number for each. You can rename copies.
- Enter a Description (optional).
- Enter description text that helps you identify the course. For example, add the course number and section, or when the course meets. Students do not see this text.
- When creating multiple copies, the description you enter for the first course is the default for all copies. Give each copy a unique description if you want.
- Course Dates (student courses only): Use the calendar to select the dates when you’ll teach the course.
- Course creation dates are in US Eastern Time.
- When creating multiple copies, you can select Apply to all copies for course dates. You can later change dates if you want.
- Student access begins on the course start date and ends early the next morning after the course end date. (For example, if you select Jun 1, 2021 as the end date, student access ends early in the morning of Jun 2, 2021 Eastern Time.)
- You can change the start date for student courses any time before students enroll. After the first student enrolls, a 90-day limit for course start date changes takes effect.
- The course end date can be up to 24 months from the course start date. (The maximum duration might be shorter for some materials. See course details to find the maximum course end date for your course.)
Tip: Set the course end date about one month after the last day of classes to let students complete makeup work or study for final exams. As soon as student access ends, save grade data.
As the course owner (creator) you can access the course until it's automatically deleted, about one year after student access ends. Before the course is deleted, you'll receive several email reminders to export the gradebook and make a copy of your course for reuse later.
- Enrollment Dates (student courses only): Use the calendar to select the dates when students can enroll.
- Course enrollment dates are in US Eastern Time.
- The default course enrollment dates are the first 14 days after the course start date, to correspond with the temporary access period. You can adjust these dates. A relatively short enrollment period helps you control course enrollment. You can reopen enrollment if necessary.
- Students with temporary access can pay anytime to gain full access to the course, even after the enrollment period ends or after temporary access expires. Students should use their existing username and password from temporary access. Do not create a new account when upgrading access.
- When creating multiple copies, you can select Apply to all copies for enrollment dates. Change dates later if you want.
 Using an LMS? Enrollment dates don’t show when creating a course paired with an LMS. To learn more, start from your learning management system online help.
- Allow Copy (optional): Select Instructors can copy this course.
- After you receive email confirming course creation, you can send the course ID to the other instructors so they can make a copy of your course.
- Tip: Select Instructor-use Course type in step 1 to guarantee that all future student course copies share the same customizations.
- When another instructor makes a copy of your course, all content is copied, except for the gradebook, roster, and calendar events.
- Clear this setting to prevent other instructors from copying the course. As the course owner, you can still copy your own course.
- Assignment Dates (Mastering course copies only): Select Don’t copy assignment dates, Copy exact dates, or Adjust dates based on this first assignment due date.
When creating multiple copies, you can select Apply to all copies for assignment dates.
If you choose to adjust dates...
- Assignments are scheduled based on the initial due date you set and the intervals between assignments in the original course. You must add assignment due dates for any assignments that fall outside of the new course dates. You might need to adjust for holidays.
You can revise assignment dates later within the course. - Tip: If you create a course for a future semester, select Instructor-use Course type in step 1, and then select Adjust dates based on this first assignment due date in this step. Revise assignment due dates as needed within the instructor course first before creating student course copies.
- Assignments are scheduled based on the initial due date you set and the intervals between assignments in the original course. You must add assignment due dates for any assignments that fall outside of the new course dates. You might need to adjust for holidays.
- Select Create course.
To stop creating the course, select Cancel to go to the Create a Course page, or select Exit to return to the My Courses page.
Using an LMS? To return to your learning management system, select Exit and then close the tab or window.
You'll receive a confirmation message that course creation has started and an email when the course is ready.
You can edit almost all course details later.