Quick start: My Courses for MyLab and Mastering
Get started with MyLab and Mastering. My Courses lets you create, open, and teach courses from a single location.
Using an LMS?
![]() If you're using a Learning Management System, go to MyLab and Mastering for your LMS: Instructor Help to get started. You might work with Blackboard, Canvas, D2L Brightspace, Moodle, Sakai, or Schoology.
If you're using a Learning Management System, go to MyLab and Mastering for your LMS: Instructor Help to get started. You might work with Blackboard, Canvas, D2L Brightspace, Moodle, Sakai, or Schoology.
Using MyLab and Mastering without an LMS?
If you're getting started with MyLab and Mastering without an LMS, use the instructions below.
About the Mastering Platform Update
If you're using the Mastering Platform Update, learn about the features available in your Mastering course.
- First steps
- Prepare your course
- Reuse or copy materials
- Get to know your course
- Get students started
First steps
Create an instructor account
Register as an instructor to sign in to MyLab and Mastering Pearson products. Use the same account for any Pearson course.
 Read how to create an account
 Watch how to create an account
Access your course
To access your course:
- Go to MyLab & Mastering.
- Select Sign in to your course.
- Enter your credentials.
- Create a new course or select an existing course.
Prepare your course
Create a course
The My Courses page is where you manage your courses. To create a course, you can either search the Pearson catalog for course materials or you can copy an existing course. Only instructors can create a course; section instructors cannot create courses.
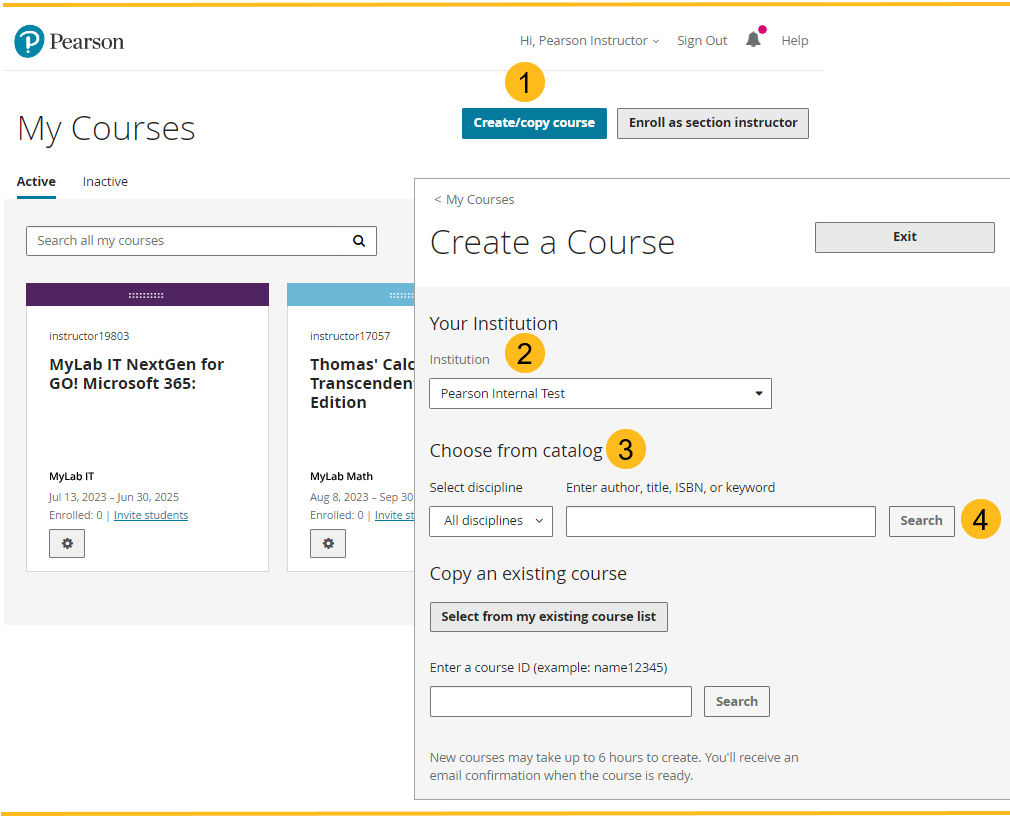
- On the My Courses page, select Create/copy course. The Create a Course page opens.
- Identify the Institution where you’ll teach the course.
- To find course materials:
- Choose from the Pearson catalog, or
- Copy an existing course
- Select Search.
The page refreshes and you can select course materials and enter course details.
- Select Create course.
You'll receive an email confirmation when the course is ready.
Select course materials
After you search for course materials, review the results on the Select Course Materials page to choose the best materials for teaching your course.
- Materials display in alphabetical order by textbook title, then by edition.
- Some courses offer materials for high school educators and display High School Users or Advanced Placement.
- Some courses are available only as coordinator courses. Students do not enroll in coordinator courses.
- Some courses are available for the Mastering Platform Update.
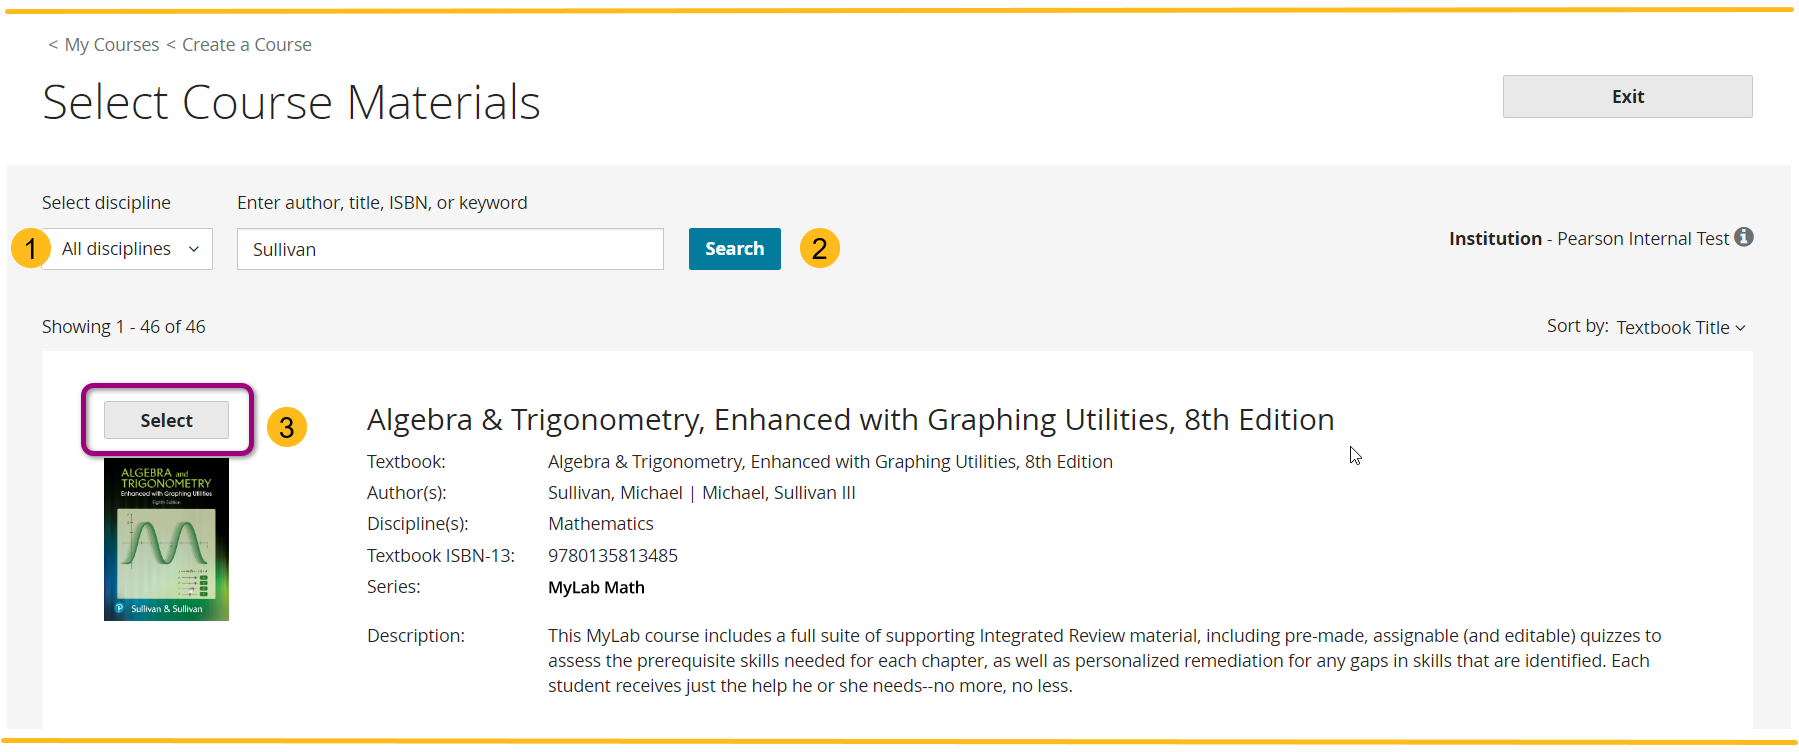
- Use the filter to select a discipline.
- Use the Search field to enter an author's last name or a book series.
- Choose Select or Select coordinator materials next to the course materials you want to use.
The page refreshes and you can enter course details and create your course.
Enter course details
Enter course details when you create your course. You can edit almost all course details later.
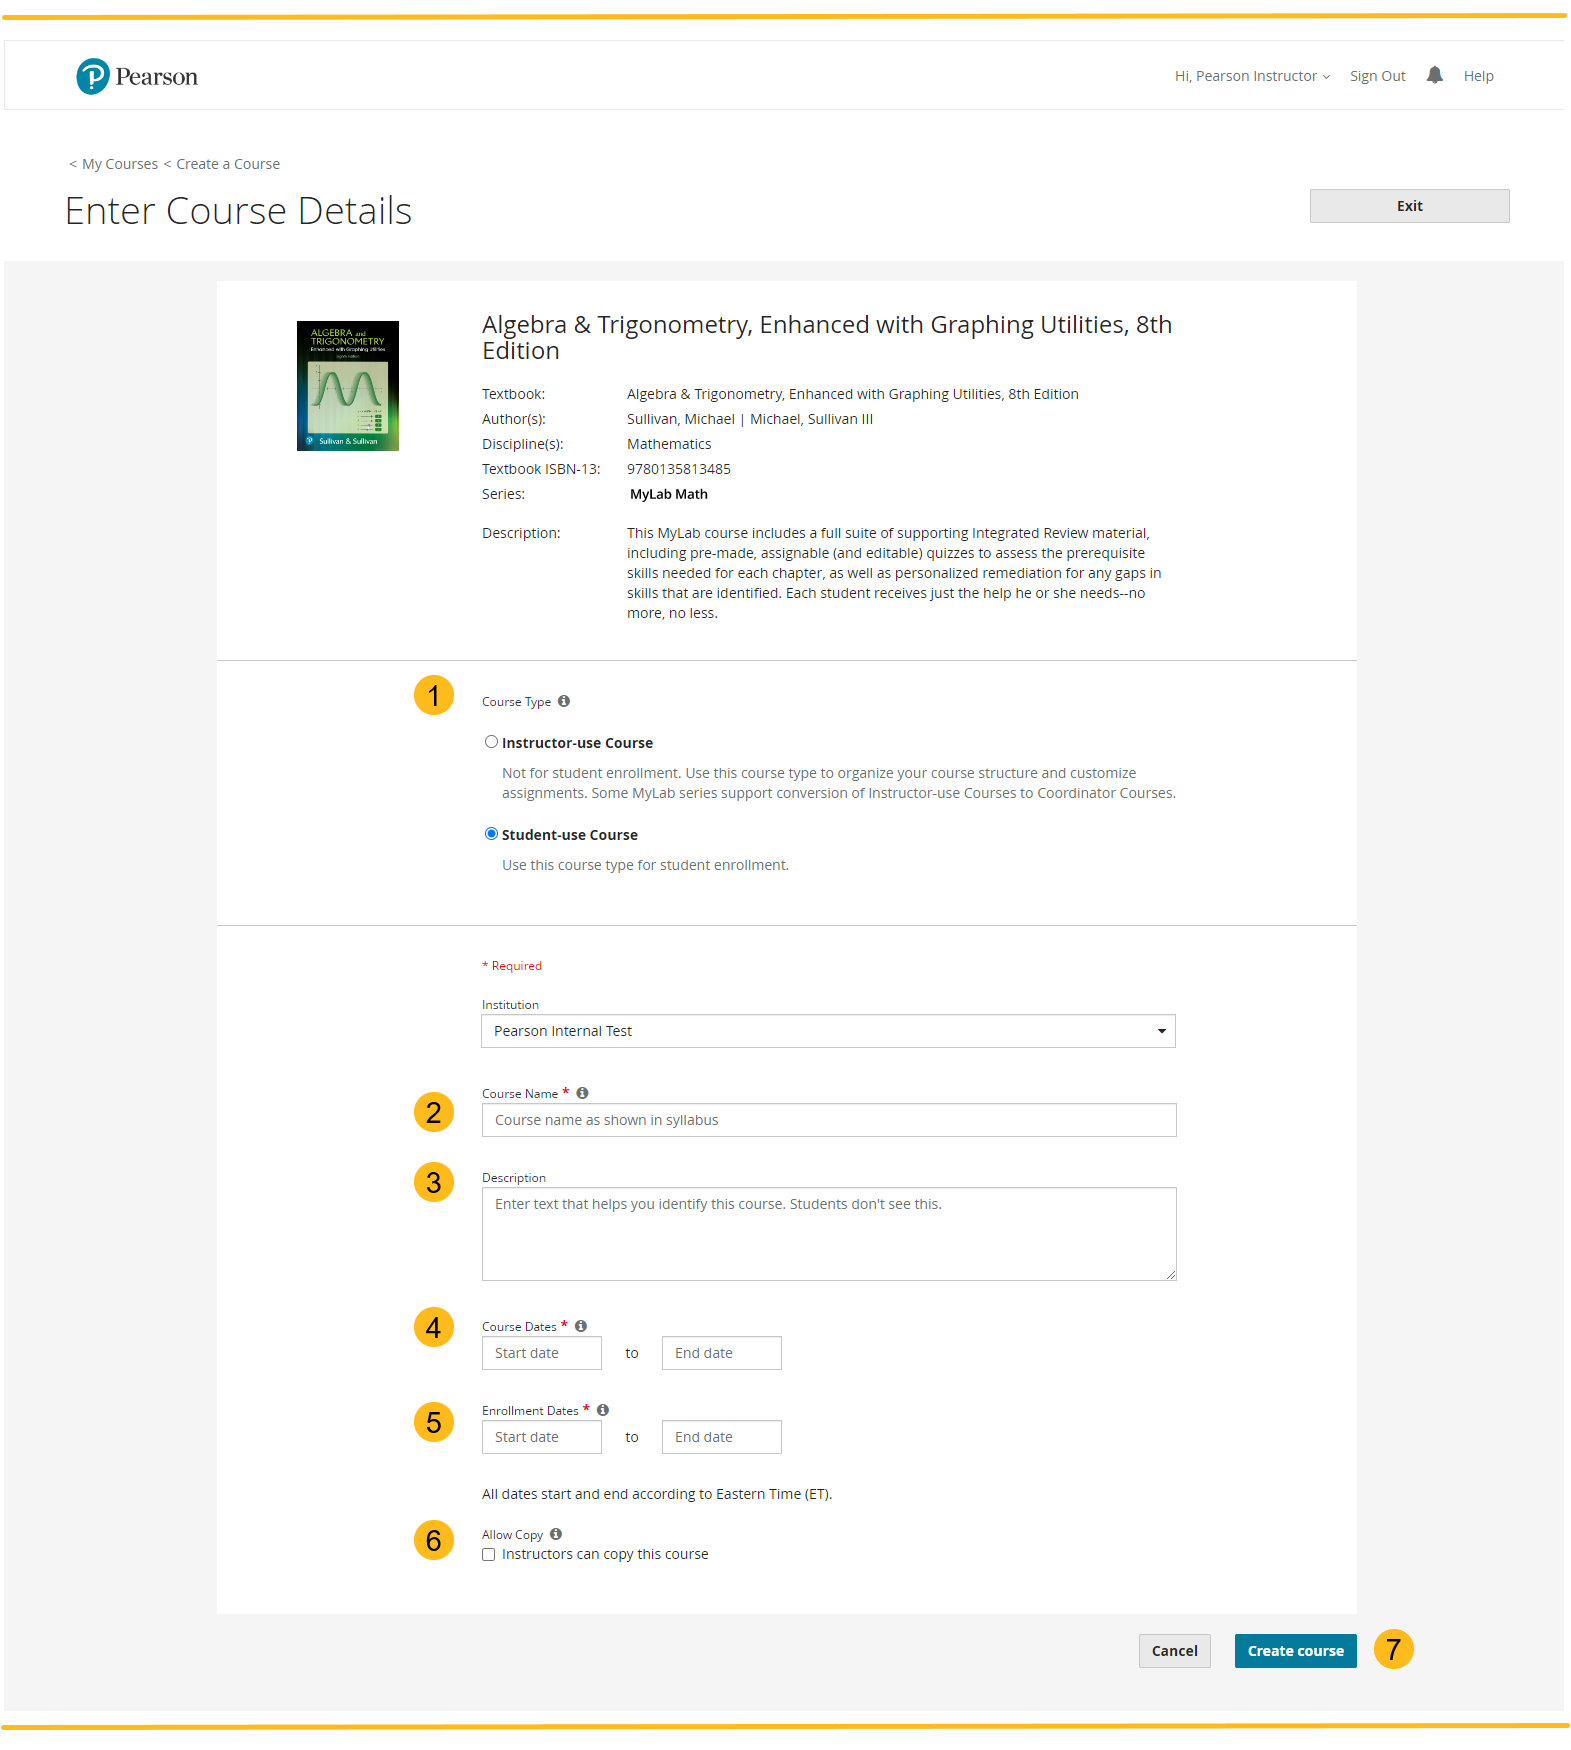
- Select a Course type: Instructor-use Course, Student-use Course, Coordinator Course, or Member Section.
- Enter a Course Name.
- Enter a Description (optional).
- Course Dates (student courses only): Use the calendar to select the dates when you’ll teach the course.
- Enrollment Dates (student courses only): Use the calendar to select the dates when students can enroll.
- Allow Copy (optional): Select Instructors can copy this course.
- Select Create course.
Reuse or copy materials
Copy your course or another instructor's course
When you copy your own course or another instructor's course, all course content copies except for the gradebook, roster, and calendar events. The new course has a different course ID and an empty gradebook.
If you are not the course owner, make sure the course settings allow other instructors to copy.
You can create multiple copies from an existing course. If your course spans several terms, set it up as a multi-semester course.
Copy a course to a new edition, new version, or platform update
A message shows on your course if a new edition, new version, or platform update is available for your course materials.
What's the difference between a new edition, a new version, and a platform update?
- A new edition includes course materials with extensive content and textbook updates. When you copy a course to a new edition, you must import your assignments to the new course. Students are prompted to pay to enroll in a new edition course.
- A new version includes updates to the same textbook edition and course materials as your current course. These might include course software improvements, important content changes, or corrections to the course. When you copy a course to a new version, your custom assignments and questions automatically copy to the new course. Students who enrolled in the current course can enroll in the new version course without paying.
- A platform update is available for some Mastering courses and might include new edition or new version material. Learn about the features available in an updated Mastering course.
Get to know your course
Course types
When you enter course details, select a course type.
- Instructor-use course - Use an instructor course to organize your course structure and customize assignments before creating student courses for enrollment.
- Student-use course - Use a student course if students will enroll in the course.
- Coordinator course - Use if you selected coordinator course materials from the catalog.
- Member section - Use if students will enroll in the course. Member sections are linked to a coordinator course.
You cannot edit the course type for an existing course if:
- Students are already enrolled in a student-use course.
- The instructor-use course already has student course copies.
- The course type is set as coordinator course or member section.
Explore the My Courses page
The My Courses page alphabetically lists courses and products and has tools to help you manage courses.
- Select
 to see course information, such as the course ID, instructors’ names, your role, all course dates, course copy history, and original course materials.
 -
 indicates a course is linked (paired) with a learning management system (LMS).
 - Alert messages help you monitor the status of each of your courses.
There are many ways to personalize and organize your course list:
- Toggle between tile
 and list
  views.
 - Use
 to drag to move a course to another location on the page.
 - Choose a unique color for your course.
- Add personal categories to organize the course list as you like.
Banner navigation and tab views
In the top navigation banner and on the My Courses page you can select:
- Account — To edit your personal account information (such as your email address or password).
Smaller devices: Select
 and then select Account.
 - Sign Out — To sign out and prevent the next user on the computer from accessing your instructor resources, such as the gradebook. This is especially important in a computer lab or shared office environment.
Smaller devices: Select
 and then Sign Out.
 - Announcements
 — To read Pearson announcements including alerts for planned or unplanned system maintenance, short descriptions of new product or software releases, or other important product information.
- Help — To search online help.
Smaller devices: Select
 .
.To learn about specific features on a page, select
 .
.
- Search all my courses — To find courses located on any of your My Courses pages: Active, Inactive, and within coordinator member section lists and instructor student course lists.
- Active course tab — To see all of your active Pearson courses and other Pearson product subscriptions.
- When you sign in to MyLab and Mastering for the first time, the Active course list might be empty. After you create your first course, it shows in this list as a course tile (or card).
- To open a course select its name on the tile.
- You might see a message about supported browsers and operating systems or enabling pop-ups and cookies. Following these recommendations improves your experience with the course.
- Inactive course tab — To see student courses that have ended as gray course tiles.
- Courses show for 12 months beyond the end date unless you delete them.
- Create a copy if you plan to teach again with this content.
The student My Courses page is like the instructor page, with access to announcements, account profile, online help, and Active and Inactive course tabs. Students can also select Enroll in a course to join a course.
Get students started
Enroll students
To enroll in your course, your students need a valid email address and either a course invite link or the course ID.
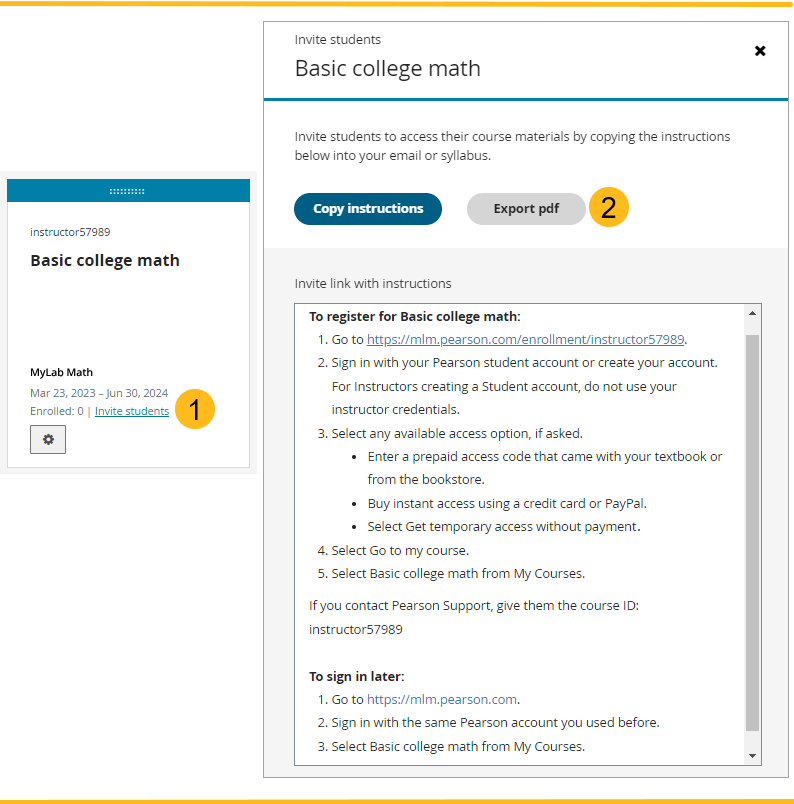
- On the My Courses page, find your course tile and select Invite students.
- Select Copy instructions or Export pdf to share the course invite link and instructions with students. Students use the course invite URL to go directly to the registration page for your course.
Manage the student roster
You can view your roster and access student results in your gradebook, but roster management is done on the My Courses page. See Course roster for details on managing your roster.
Updated 17 Sep 2025