Input on a diagram answer type
Updated 08 Jan 2026
You can use the Simple Editor to edit or create question in which students must enter text, real numbers, complex numbers, and units on or outside of an image. Students select units from a picklist. The input on a diagram answer type can be used for a part or hint question.
- The input on a diagram answer type can also apply to questions that ask students to enter answers in input boxes without any background image.
- To search for input on a diagram items in the Item Library, select Numeric/Symbolic.
- This answer type is accessible to students who rely on keyboard entry.
- For students to drag labeled tiles onto an image, see instead the labeling answer type.
- Open the Simple Editor so that the item you want to edit appears in the Edit Item window.
- Navigate to the Answer box for the input on a diagram question you want to edit.
You can make the following edits to input on a diagram answers. Most of these edits are described in the “Create an item with the input on a diagram answer type” section below.
- Add a background image — See Add a background image in the instructions above. Make sure the Size dimensions for the question are large enough to accommodate the size of the background image.
- Remove a background image — Select X next to the image filename. Follow message instructions to save all answers AND also save the item before you choose OK to delete the image. The image will no longer be associated with the bending moment question, but remains in the asset list for the item.
See the following sections in the instructions below.
See Add wrong answers and wrong answer responses in the instructions below.
Make your edits in the Show this response field of the input on a diagram Answer box using the editing toolbar and menus. About entering TeX
Make your edits in the Follow-Up Text field of the input on a diagram Answer box using the editing toolbar and menus. About entering TeX
Save your edits in the item:
Select ![]() Save (from the top toolbar) or the Save & Preview link (top right). Do NOT press Ctrl+S (Windows) or Command-S (Mac OS).
Save (from the top toolbar) or the Save & Preview link (top right). Do NOT press Ctrl+S (Windows) or Command-S (Mac OS).

This circuit diagram example includes a background image. You can also use this answer type for questions that ask students to fill in the answer boxes without a background image.
 Tips Tour (top right) — Provides quick instructions about entering their answers.
 Help — Opens this Help topic when working in the Simple Editor. Students see a different Help topic, which you can also see from Student View.

- From the Modified Mastering course menu
, select Instructor Tools then Item Library.
Don't see the Instructor Tools option?
Select Item Library from the course menu. - Select Create New Item (page bottom) next to "Can't find what you need?" The Simple Editor opens in a new window.
- Specify the answer type.
Scroll down to the Answer box for the part. Select the dropdown menu next to Answer Type (on the right) and choose input on a diagram. (The default is multiple choice.)
- Select OK in response to the message that if you change the answer type, some of the solution content may be lost and you will not be able to undo the change.
- See the sections below for instructions on how to add the correct answer, wrong answer and any wrong answer feedback, and any follow-up text for completed questions.
- To save your edits, select
 Save (from the top toolbar) or the Save & Preview link (top right). Do NOT press Ctrl+S (Windows) or Command-S (Mac OS).
- Add a background image (Optional). Some questions may require a diagram, like for an electrical circuit. You can also create answers with input box elements only.
- Prepare your background image, if you haven’t done this already.
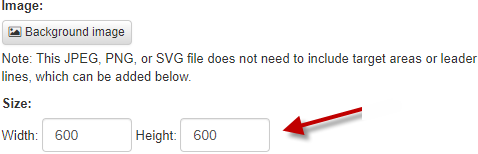
 Make sure the image size is compatible with the display size
If needed, change the Size dimensions in the Answer box to fit your image.
- Default display size: 600px width x 600px height
- Custom size range: The maximum dimension is 1200px width x 1000px height. The smallest is 150px by 150px
An image that is too big won’t display on the canvas work area.
You can add label text onto the image laterAfter you upload an image, you can always add one or more Static Label elements to it when creating or editing the input on a diagram question. More about adding elements, including Static Label
- Select
 Background image (below Images) to open the Insert/edit image dialog box.
 - If you haven’t uploaded the background image yet:
Choose Upload to locate the image to add to the item’s asset manager.
If the image has already been uploaded:
Select an image name to preview it, then choose Select for that image. (You may need to move or close the preview window to be able to see the image file names with their associated Select option.) - Select OK.
- Prepare your background image, if you haven’t done this already.
- Select Edit Answer from the Correct Answer area in the input on a diagram Answer box.
Your view scrolls upwards so the canvas is in view. Scroll below the canvas to see image settings, element settings, and element grading settings.
- Set image settings for the background image.
Make any edits needed for the background image and select when you’re finished. (Some input on a diagram questions may not have a background image.)
Don't see the Save button? Either resize the window or in Windows, select
 Restore Down (top right).Alt text
 Enter or edit the image description that describes the background image, especially to help students who use a screen reader.
ScaleTo change the size of the background image, adjust the x and y scale settings. Default is 100%. Constrain ensures that the width and height of the image are scaled at the same ratio, so the image does not look skewed.
AlphaTo adjust the opacity of the background image, 100% is for completely opaque lines. 0% is completely transparent (not visible).
PositionTo adjust the placement of the background image in the workspace, select Position. A box appears that allows you to make the image draggable, move the center of the image to a different x and y pixel location or select Center to center the image (x= 0, y=0). Choose Close when you're finished.

- Add/delete input box elements.
- Select Edit Answer from the Correct Answer area in the input on a diagram Answer box, if you haven’t already done this. If the canvas is in view, scroll down to select the element settings tab.
- Add or delete input box elements as described below.Add input box elements
Drag one or more elements on or around the diagram, in locations where students will enter their answers.
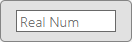
Use Real Num for real numbers, such as 1000 or -13.33.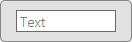
Characters you can use in a Text element are a-z, A-Z, and 0-9. You can set whether text answers are graded by capitalization or not.
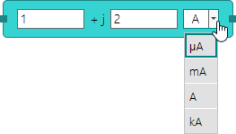
Complex number in the form of a+jb, where a and b are real numbers.
Complex number in the form of a/theta, where a and theta are real numbers.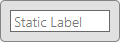
Use Static Label to add a label on the diagram or near an input element. Consider adding text to explain to students the kind of answer for an input box, such as "Enter a real number." or "Enter a complex number in polar form."Reset the canvasSelect
 Reset (top right) to reset the canvas to its beginning state.Delete input box elements
Select an element on the canvas. (Squares appear on either side and the area around the input turns blue.) Then select
 Delete Element (top left).
 - Select when you're finished.
Don't see the Save button? Either resize the window or in Windows, select
Restore Down (top right).
- Enter/edit the correct answers or text in the input box elements.
- On the canvas, select an input box element and enter either the correct answer (for real number or text fields) or the text you want in a static label.
 Adjust the width of an input box
On the canvas, select a handle on either side of the element and then drag. You cannot adjust the height. You can also adjust the number of pixels in the Input Width property on the element settings tab.
- Select when you’re finished.
Don't see the Save button? Either resize the window or in Windows, select
Restore Down (top right).When you return to the Answer box in the Simple Editor, notice that an answer string appears in the Correct Answer box.
- On the canvas, select an input box element and enter either the correct answer (for real number or text fields) or the text you want in a static label.
- Set/edit properties for each input element.
- Select an input box element on the canvas and then select the element settings tab to see each element’s settings. The options shown depend on the element type. Set or edit these for each element.
Add pre-text or post-text (Optional)
Add text to display before (Pre-text) or after (Post-text) a Real Num or other type of element input box.
- For example, you could enter R1 as the Pre-text and ohm as the Post-text.
- You can add pre-text or post-text to all element types except Static Label.
Element IDAs you add input elements to the canvas, an ID is added automatically for each in the format “entry1”.
- You don't need to do anything with the Element ID.
- The element ID appears in the beginning of the Correct Answer string.

Input WidthFor a selected element on the canvas, a number automatically appears in the Input Width field to indicate the width of the input area in pixels.
To change the input width — You can either edit this number or adjust the element width on the canvas.
Units (Applies to real number and complex number elements)Select a unit to be part of the correct answer for a real number, such as V or A. Students will see a picklist of units to choose from after a real number or the final real number in a complex number, whether in rectangular or polar form.
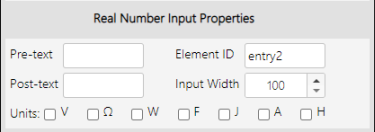
Whichever unit or units you select will show all forms of each unit in the picklist. For example, if you select A, the units A, μA, mA, or kA will all be included in the list.
 Elements Description (Applies to text elements)
Add the Alt text description of what students need to enter and where the element is located in relation to the image. This description helps screen reader users.
- Select when you’re finished.
Don't see the Save button? Either resize the window or in Windows, select
Restore Down (top right).If you adjust the canvas size after saving, elements you added might be pushed off the screen. To correct this, resize the canvas. (The default size is 600 x 600px.)
- When you return to the Answer box in the Simple Editor, notice the answer string that now appears in the Correct Answer box.
- Select an input box element on the canvas and then select the element settings tab to see each element’s settings. The options shown depend on the element type. Set or edit these for each element.
- Set/edit element grading settings for the correct answer for each element.
- Select an input box element on the canvas and then select the element grading tab to see each element’s settings. The options shown depend on the element type. Set or edit these for each element.
Value (applies to real number fields)
If you haven’t entered a value for the correct answer yet, you can enter it here or enter it in the input box element on the canvas. You can enter spaces in between numbers, but entering only a single blank character space can cause validation issues. Complex numbers require 2 values for each correct answer.
Tolerance value % or custom high/low rangeTolerance value %: Accept or edit tolerance % for the correct answer. Mastering has a default 3% tolerance. The input on a diagram answer type does NOT check for or correct significant figures
Set a custom tolerance:
For an exact answer match, select either 0.1% for Tolerance value. (Adding the .1 can help to avoid possible scoring issues.)
To set a range for a correct real number answer, select Set custom tolerance and then enter the accepted values for the lower and upper range (not in %).
Complex number answers allow you to set a tolerance for each value, whether as a percentage or a range between lower and upper limits. If you assign upper or lower tolerance values, the system provides a note with the accepted range for a correct answer.
 Capitalization grading (applies to text element)
By default, grading ignores capitalization in student answers. Select Capitalization grading if you want students to be graded on a capitalization match with the correct answer.
- Select when you’re finished.
Don't see the Save button? Either resize the window or in Windows, select
Restore Down (top right)
- Select an input box element on the canvas and then select the element grading tab to see each element’s settings. The options shown depend on the element type. Set or edit these for each element.
- Add an additional correct answer. (Optional)
- From the input on a diagram Answer box, select Add an additional correct answer.
- Select Edit Answer next to the new, empty correct answer field. Your view scrolls upwards so the canvas is in view.
To quickly change of one or more input box element answers:
Edit one or more answer boxes in the elements on the canvas. When you select Save, the additional answer string appears as a Correct Answer in the Answer box for the input on a diagram question.Don't see the Save button? Either resize the window or in Windows, select
Restore Down (top right).To change any associated element grading or other settings:
Select Edit Answer for the new answer string and follow the next steps. - Select the element settings tab below the canvas.
- Create a new set of correct answers and/or set element properties, like for grading. Drag elements onto the canvas, enter the correct answers, and add any other applicable element and grading settings for the correct answer of each element, as described above
- Select when you’re finished.
Don't see the Save button? Either resize the window or in Windows, select
Restore Down (top right).
Wrong-answer feedback can help students learn from their mistakes or incorrect choices. Mastering provides the feedback "Incorrect; Try Again; x attempts remaining", followed by the wrong answer text you provide.
- From the input on a diagram Answer box, select Edit Answer next to the correct answer string.
Your view scrolls upwards so the correct answer is in view.
- Select the element grading tab below the canvas.
- Select + in the Wrong Answers section.
The first wrong answer field is initially identified as wa1, where “wa” is short for wrong answer.
- Select an input box element on the canvas.
- Return to the element grading tab and select
 Edit.
Edit. - Accept or change the answer condition and answer.
By default, the wrong answer condition is “not correct” (as shown in the element on the canvas). If the wrong answer applies only to one input field (or a subset) being different from the correct answer, then you must set the other field conditions to be Equal To instead of Not Correct.
Replace “wa1” (optional): You can replace this wrong answer identifier by double-clicking and entering another value. Replace the wa1 name BEFORE you add any wrong answer feedback. Otherwise, the existing wrong answer feedback will be lost, and you'll need to re-add it.
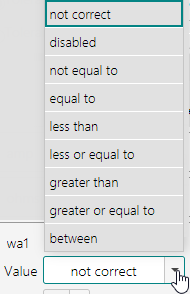
Change the answer condition: Select another condition from the dropdown, either on the element grading tab or from an element selected on the canvas.
Condition descriptions for real number and text wrong answersCondition Description Not correct
!Display wrong answer response when the student answer meets one of the following conditions:
- Answer is NOT WITHIN TOLERANCE of the correct answer for this real number element.
- Answer does NOT MATCH the correct answer for this text element.
This option is non-editable.
Applies to real number and text answers.
Disabled
0- Do not display a wrong answer response, regardless of what the student enters.
- Use this condition when you want to disable a wrong answer response for a particular input box.
- For example, if there are three elements on a diagram and the wrong answer response condition is >10 for the first element and >20 for the second element, you may want to disable the wrong answer response for the third element.
Applies to real number and text answers.
Equal to
=Display wrong answer response when the student answer meets one of the following conditions:
- Answer is WITHIN TOLERANCE of the correct answer for this real number element.
- Answer MATCHES the correct answer for this text element.
Applies to real number and text answers.
Not equal to
≠Display wrong answer response when the student answer meets one of the following conditions:
- Answer is NOT WITHIN TOLERANCE of the acceptable range of correct answers for this real number element.
- Answer does NOT MATCH the correct answer for this text element.
Applies to real number and text answers.
Less than
<Display wrong answer response when the student answer is:
- LESS THAN the acceptable range of correct answers, based on tolerance, for this real number element.
Applies to real number answers only.
Less than or equal to
≤Display wrong answer response when the student’s answer is:
- LESS THAN OR EQUAL TO the acceptable range of correct answers, based on tolerance, for this real number element.
Applies to real number answers only.
Greater than
>Display wrong answer response when the student’s answer is:
- GREATER THAN the acceptable range of correct answers, based on tolerance, for this real number element.
Applies to real number answers only.
Greater than or equal to
≥Display wrong answer response when the student’s answer is:
- GREATER THAN OR EQUAL TO the acceptable range of correct answers, based on tolerance, for this real number element.
Applies to real number answers only.
In between
[]Display wrong answer response when the student’s answer is:
- IN BETWEEN the acceptable range of correct answers, based on tolerance, for this real number element.
Use this option when the WAR states that an element lies between two values, such as “between 11 and 17.”
Applies to real number answers only.
Set real number conditions for a wrong answerYou can set conditions for a real number input element from either the element grading tab or the canvas (select the element first).
 or
or  Set text conditions for a wrong answer
You can set conditions for a text input element from either the element grading tab or the canvas (select the element).
 or
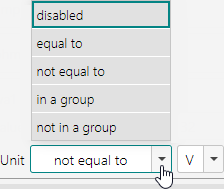
or 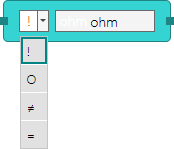 Condition descriptions for unit wrong answers
Condition Description Disabled
0Do not display any wrong answer response, regardless of the unit selected by the student.
Equal to
=Display wrong answer response when the student answer:
- MATCHES the unit selected in the dropdown.
Not equal to
≠Display wrong answer response when the student answer:
- DOES NOT MATCH the correct unit for this element.
In a group 
Display wrong answer response when the student answer:
- MATCHES a unit belonging to the group selected in the dropdown.
- For a unit to be within an answer group, it must be some form of the same unit, such as Ω, μΩ, mΩ, or kΩ or MΩ.
- Groups include: volt (V), Ohm (Ω), watt (W), farad (F), joule (J), ampere (A), or henry (H)
Not in a group 
Display wrong answer response when the student answer:
- DOES NOT MATCH a unit within the group of correct answer units for this element.
- For a unit to be within an answer group, it must be some form of the same unit, such as Ω, μΩ, mΩ, or kΩ or MΩ.
- Groups include: volt (V), Ohm (Ω), watt (W), farad (F), joule (J), ampere (A), or henry (H)
Set unit conditions for a wrong answerYou can set conditions for a text input element from either the element grading tab or the canvas (select the element first).
 or
or 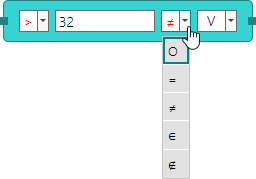
- Select to return to the Wrong Answer Feedback box in the input on a diagram Answer box.
Don't see the Save button? Either resize the wondow or in Windows, select
Restore Down (top right). - Enter your wrong answer feedback in the Show this response box, using your keyboard and options from the editing toolbar and menus. About entering TeX
From the element grading tab choose an option for the wrong answer, whether Move Up, Move Down, Edit Copy, or Delete.
From the input on a diagram Answer box in the item, click into the Show this response box and either edit or delete the wrong answer feedback.
Follow-up text appears after a student completes a part question, whether the student answers correctly, exhausts all answer attempts, or requests the answer. Follow-up text can reinforce learning by providing more information or an interpretation of the answer the student just submitted.
- From the input on a diagram Answer box, select add follow up text.
- Enter feedback in the Follow-Up Text box, using your keyboard and options from the editing toolbar and menus. About entering TeX
See also add and edit follow-up text.
See also: