Sorting answer type
Updated 17 Sep 2025
You can use the Simple Editor to edit or create a sorting question in an item. Use this answer type when you want students to sort items into categories. Students drag items into two or more labeled bins to sort them. The items to be sorted can be text, images, or a combination of text and image items.
- For text items to be sorted
Text can be plain text or formatted (bold, italic, underlined, subscript/superscript, or TeX/ChemTeX). Text items can include math and chemical expressions. You can also define variables for text items. - For image items to be sorted
You select the images from files uploaded to the asset manager for the item. The images must be an appropriate size to fit in the correct answer. (They don’t automatically scale.) - For combination text + image items to be sorted
Prepare images that include the text as part of the image.
The sorting answer type lets you do the following.
- Randomize the starting order of the items to be sorted in student view
- Choose whether items to be sorted are reusable (that is, can apply to more than one sorting bin)
- Provide an optional background image for sorting bins or bin labels
- Save items you added if you change the answer type to ranking instead
You can make any of the following edits to sorting answers. Most of these edits are described in the Create an item with the sorting answer type section below.
Edit the items to be sorted and their characteristics
The set of items to be sorted appears in the “+Add item” area of the Answer box. Once added, you can delete and re-add items but you cannot reorder them.
- To add items to be sorted
See the subsection “Add the correct answer” in the Create an item with the sorting answer type section below. - To delete items from the set of items to be sorted
Select the X in the upper right of the item in the "+Add item" area of the Answer box. The deleted item is also removed from any sorting bins for correct or incorrect answers.Tip: Although deleted image items no longer appear in the correct and incorrect answers for the sorting question, any uploaded image files remain in the asset list for the assignment item unless you explicitly delete them from the Asset Manager. (The same is true for images you remove from anywhere in any answer type.) More about adding or editing images
- To delete items from a sorting bin
Select the X in the upper right of the item to delete it from the sorting bin. If you delete the last instance of the item from the correct answer sorting bins, the item returns to its unused status (with blue background) in the “+Add items” area of the Answer box.
You can add sorting bins for the correct answer and as you create wrong answer responses for incorrect answers. The display size of the sorting bins in Standard View (student view) is automatically determined, based on the number of bins and the size set for the sorting area. You cannot reorder sorting bins or drag and drop items among sorting bins.
- To add a sorting bin — Select Add bin in the bin area of the correct answer or when adding wrong answer feedback.
- To change the label of a sorting bin — Select the bin name and then place your cursor in the box to enable the editing toolbar. Enter the revised name and select Save.
- To change the background image for a sorting bin — Select X to delete the current image and then choose Background image to either choose a different image from the asset manager or upload another image, if needed.
- To delete a sorting bin — Select the X in the upper right of the bin. Any items that had been added to the deleted bin return to their unused status (with blue background) in the “+Add items” area of the Answer box. Because of the two bin minimum, you cannot delete a bin if only one would remain.
You can make these appearance and property changes to a sorting question:
You can resize images to be sorted whose file size is less than 1MB. Resizing doesn’t affect the display or file size of the original image file uploaded to the Asset Manager.
- Select the image item from the +Add item box (not a sorting bin) in the correct answer so that it opens in the "Edit item" dialog box.
- Choose the image and drag it by a corner to resize proportionately.
- Select OK when you are satisfied with the size.
The image is resized wherever it appears in the correct answer.
For guidelines about the size of image items in sorting answers —
See information about adding image items in the subsection “Add the correct answer” in the Create an item with the sorting answer type section below.
To add a background image to a sorting bin —
Choose Background image and choose Select in the row for the image you want from the asset manager. (If you haven’t added the image to the asset manager yet, locate the image by choosing Browse under Upload file(s) and then select Upload. The image must be less than 1 MB.)
To remove a background image from a sorting bin —
Select X next to the image file name. The image file will no longer be associated with the sorting question, but will remain in the asset list for the item.
See the subsection “Set the size of the sorting area (Optional)” in the Create an item with the sorting answer type section below.
Select or clear the appropriate Properties area check box:
- Randomize items: Choose this setting when you want the items to be sorted to appear in a random order as different students open the question. This can help discourage cheating among students.
- Avoid text/image overlap: Choose this setting if the correct answer contains sorting bins with a mix of text and image items. This setting stops image items from hiding text items after students drag the items into a sorting bin.
- Center items: Choose this setting so that multiple items are centered vs. aligned to a side edge of the sorting bin. A single item will automatically be centered.
- Reusable items: Choose this setting when you want a correct answer to allow the same item to be sorted into more than one bin. Otherwise, leave this property unselected.
You can edit the answer responses for a sorting question.
To add a wrong answer response:
Select the add wrong-answer feedback link. For more details, see the subsection "Add wrong-answer responses to help students (Optional)" in the Create an item with the sorting answer type section below.
To reorder wrong-answer responses:
Choose the ![]() Move Up or
Move Up or ![]() Move Down arrows to reorder the wrong answers and associated feedback.
Move Down arrows to reorder the wrong answers and associated feedback.
To delete a wrong answer response:
Select ![]() Delete choice in the row for the response.
Delete choice in the row for the response.
To add follow-up text: Select the add follow-up text link.
To delete follow-up text: Select the remove follow-up link.

Students drag the provided items into the category bins. In the sample above:
- The items to be sorted are text items.
Alternatively, you could use all image items or a mix of text and image items to be sorted. - Each bin includes a label and a background image. Background images for bins or bin labels are optional.
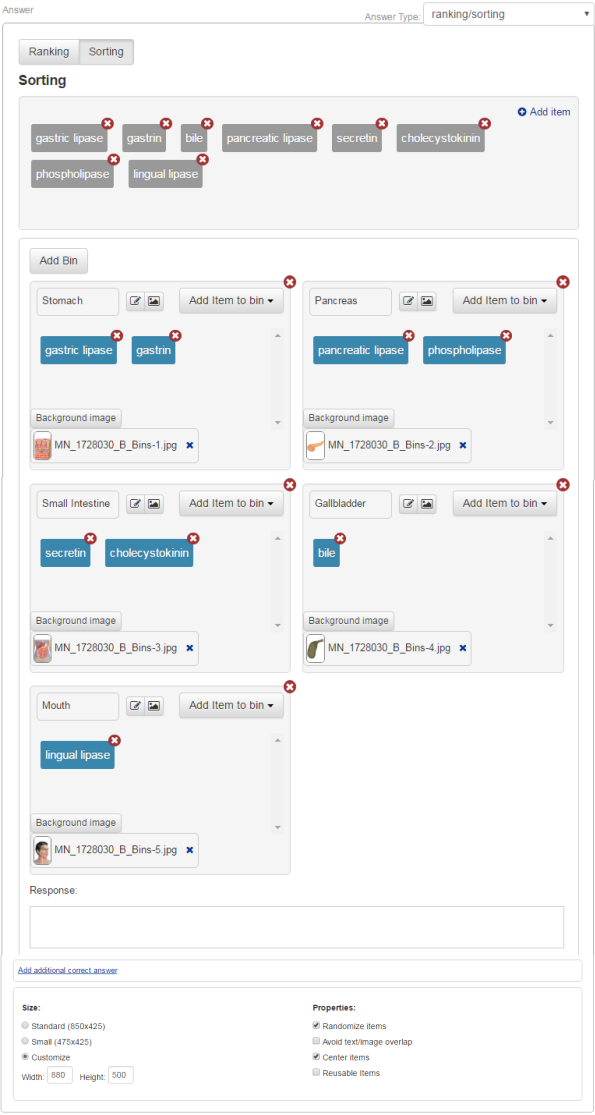
This is the answer box for the sorting question shown in the example student view above.
- Select Instructor Tools then Item Library.
Otherwise, select Item Library from the course menu.
- Select Create New Item (page bottom) next to "Can't find what you need?" The Simple Editor opens in a new window.
- Specify the answer type.
Scroll down to the Answer box for the part. Select the dropdown menu next to Answer Type (on the right) and choose ranking/sorting. Then, choose the Sorting button to specify the sorting type over the ranking default.
 About switching between the ranking and sorting answer types
If you choose the Sorting or Ranking button to switch the answer type after adding items, the items remain available to you in the part Answer box.
Note that when switching from sorting to ranking, the items will appear ranked from left to right, so you will likely need to edit them for the correct answer. Other answer information is cleared, such as wrong answer feedback.
- In the Answer box, enter the following. The correct answer is required.
- Add the correct answer.
Answer includes items to be sorted and the category bins to which the items apply. - Set the size of the sorting area.
Area includes items to sort and the sorting bins. - Set any item properties.
“Randomize item order”, “Avoid text/image overlap", "Center Items" and "Reusable items" - Add pre-text and/or post-text.
- Add the correct answer.
- Add wrong-answer feedback to help students. (Optional)
- Add follow-up text in response to completed part questions. (Optional)
- To save your edits, select
 Save (from the top toolbar) or the Save & Preview link (top right). Do NOT press Ctrl+S (Windows) or Command-S (Mac OS).
For detailed instructions, see the next sections.
- Select +Add Item.
The “Add item” dialog box opens.Although you’ll likely add more than two items to be sorted, you must provide at least two items.
- Place your cursor in the box so that the editing toolbar appears.
Use this toolbar to format the item to be added, whether as text, a variable, or an image. Add a text item (Optional)
Text items can include math and chemical expressions. A simple text item looks like this:

- To enter the text:
Use the editing toolbar to apply formatting or to add a link. How to add TeX or ChemTeX - To copy and paste standard text:
Use standard keyboard shortcuts to copy text from a resource and paste it into the Add item text box. Show copy and paste shortcuts
Copy = Ctrl+C for Windows, Command-C for Mac OS
Paste = Ctrl-V for Windows, Command-V for Mac OSIf needed, apply text formatting using the editing toolbar.
- To copy and paste as plain text:
Copy text that includes formatting, such as bold or other.In the Add item dialog box, choose
 Paste as text from the editing menu, select OK when asked if you want to paste as plain text, and then paste the selection into the text box using a keyboard command.
 Add an item with a variable (Optional)
Variables let you add randomized values in the items that students will sort. As you add sorting items, you can either define a numeric variable (for simple numeric, a range of values, an equation, function, or another variable) or define a list variable (use a List ID to associate numeric or string values that can include letters, words, or expressions formatted with TeX or ChemTex). More about variables to vary item content
To add a variable in an item to be sorted:
- Enter any text that includes a variable name, without any spaces or special characters.
- Select the variable name and choose
 Add Variable.
 - In the popup that opens, choose define to open the Define Variable form.
- Enter information to define the variable (whether numeric or list) and select OK.
- Check the appearance of the variable values by choosing “Save & Preview” for the item. Or, check this later from either Standard View or Solution View.
 Add an image item—includes any image items with text (Optional)
Prepare your images:
The image items must be an appropriate size to fit in the correct answer—they don’t automatically resize to fit the sorting area.
- To set the size of the sorting area (items and bins):
See the section below "Specify the size of the sorting area (Optional)".Consider the number of image items and whether the WIDTH of the sorting area should be set to Standard (850px), Small (475px), or Customized. If the HEIGHT of the sorting area is the default 425px, an image height of about 120px works when the image items fit in a single row.
- To resize the image item after it has been added to a sorting answer:
See instructions in the subsection “Resize an image item to be sorted” in the section “Editing sorting answers” below. You can resize images whose file size is less than 1MB. - To include a text label with an image:
Incorporate the text as part of the image before you upload the image into the asset manager. For example, see the image shown in step d below. - Consider uploading a few trial images into the asset manager for the item so you can add them to the sorting question and check their fit in Standard View (student view).
To insert image items to be sorted:
- Select
 Insert/edit image.
 - In the Insert/edit image dialog box, select
 Upload.
The Upload file(s) window opens, with a list of any previously uploaded files to help you manage your image assets for the item. - Follow the instructions at the bottom of the page (for browsing, uploading, and selecting) for each image to be sorted. More about adding or editing images
- Provide accessibility information for each image you add.
Hover Text: Enter an identifying label to appear when a user’s cursor hovers over the image. The hover text will appear in the student view for the question.
Alternative Text: Enter a description (maximum 987 characters) that explains the image for screen reader users.
- Select OK to add the item and close the Add Item dialog box.
The image item appears with a blue background, as shown below. The blue background means the item hasn't been assigned to a sorting bin for the correct answer yet.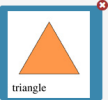
- To enter the text:
- Continue to add items to be sorted, as needed. Note the following:
- You cannot add “distractor” items for a sorting question. All items to be sorted must be used in at least one correct answer.
- Blue vs gray item color. Each item initially appears in the “+Add item” box with a blue background. This means the item hasn’t yet been added to a sorting bin for the correct answer.
After the item has been added to a sorting bin: Items in the sorting bins for the correct answer are blue and items in the “+Add item” box change from blue to gray.
- Add your labels to the provided category sorting bins and add another sorting bin, if needed:
Place your cursor in the Bin label box for bin_1 or bin_2. Replace this text with the sorting category name you want, and choose Save. If you need more bins, choose Add bin.
- Add item(s) to each sorting bin for the correct answer:
For each bin, select Add item to bin and choose items from the list. Items already chosen are grayed out because each item can only be used once by default. For items to apply to multiple sorting bins, choose Reusable items from the Properties area.As you add items to the bins, they appear with a blue background (and now with a gray background in the “+Add item” box, so you can visually see whether you’ve used all items).
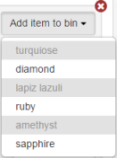
Tip: Be sure to place ALL items into the sorting bins before you save the answer. Otherwise, you’ll see a message like this:

- Add a background image to a sorting bin or to a sorting bin label. (Optional)
- To add a background image for a bin: Choose
 Background image (lower right corner of the bin).
To add a background image for a bin label: Choose
 Add background image for a bin label (to the right of the bin label).
 - If you haven’t added the image to the asset manager yet, locate the image by choosing Browse under Upload file(s) and then select Upload, so that the new image appears in the item asset list.
- Choose Select in the row for the image you want and then select close at the bottom of the asset manager window.
- Provide accessibility information for each image.
Hover Text — Enter an identifying label to appear when a user’s cursor hovers over the image. The hover text will appear in the student view for the question.
Alternative Text — Enter a description (maximum 987 characters) that explains the image for screen reader users.
- Choose OK.
A thumbnail of the image and its file name appear to the right of the “Background image” button in the Simple Editor.

After adding background images:
Check that they aren't visually distracting, especially if the items to be sorted include images.To remove a background image:
Select X next to the image file name. The image file will no longer be associated with the sorting answer, but will remain in the asset list for the item. - To add a background image for a bin: Choose
- Add a response. (Optional)
In the Response box, enter correct answer feedback specific to this correct answer if there will be alternate correct answers. (See next step for instruction about adding an additional correct answer.) - Add an additional correct answer. (Optional)
Choose Add additional correct answer and create the answer by adding items to sorting bins the same way you did in step 5 above. - To save your edits, select
 Save (from the top toolbar) or the Save & Preview link (top right). Do NOT press Ctrl+S (Windows) or Command-S (Mac OS).
The sorting area includes both the items to be sorted AND the category bins into which students drag the items.
Choose an option from the Size area:
- Standard (850px width x 425px height) — This is the default for newly created sorting questions. Displays in a single-column layout.
- Small (475px width x 425px height) — Choose Small if you want the items and sorting bins to display within a two-column layout.
How to set item layout to one or two columns Note that the column layout is dependent on the maximum width of ALL assets in the item.
- Customize: Specify a custom size in pixels for Width and Height. When setting a custom size, be sure to preview the item to ensure that the sorting question appears as you intended.
The default 425px height lets most laptop users view a line of instructions, the Reset & Help buttons, the items to be sorted, the sorting bins, and the Submit button without the need to scroll. An image item height of about 120px will work with the default 425px height when the image items fit in a single row.
To help discourage cheating among students, you should usually select Randomize items in the Properties area. (Otherwise, all students will see the same initial order of the items to be sorted.) However, if items to be sorted are a series of numbers or other elements that make more sense to be presented in a specific order, leave this setting unchecked.
The items to be sorted by students initially appear centered in one or more horizontal rows, as shown in the above section “Student view of a sorting question”. If there’s a mix of text and image items to be sorted, the item row(s) are also centered vertically, as shown here:

The following item property settings apply to the appearance of items after students drag them into a sorting bin.
Avoid text/image overlap
Choose this setting from the Properties area if the correct answer contains sorting bins with a mix of text and image items. This setting stops image items from hiding text items.
When all items cannot be displayed fully in the sorting bin: The “Avoid text/image overlap” setting does not stop the partial overlap of image items that cannot otherwise be displayed fully in a sorting bin for the correct answer. In that case, the latest sorted image displays in full on top of partially hidden images added to the bin earlier. The same is true for text items.
Center items
Select Center items in the Properties area so that multiple items are centered vs. aligned to a side edge of the sorting bin. A single item will automatically be centered.
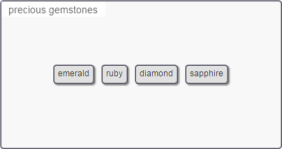 With "Center items" property set
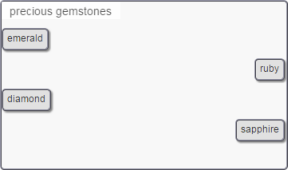 Without “Center items” property set
If you want a correct answer to allow the same item to be sorted into more than one bin, choose Reusable items. Otherwise, leave this property unselected.
- Although optional, it is recommended that you provide wrong-answer feedback. Wrong-answer feedback can help students learn from their mistakes or incorrect choices.
- Mastering provides the feedback "Incorrect; Try Again; x attempts remaining", followed by the wrong answer text you provide. For example:

To add wrong answer-feedback for a sorting answer type:
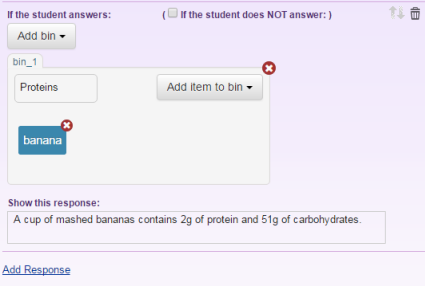
- Select the add wrong-answer feedback link.
- Select the check box for "If the student does NOT answer:" if you want to account for this condition.
- Choose Add bin and select the sorting bin for a wrong answer.
- Choose Add item to bin and select the item(s) for a wrong answer.
- Enter your wrong answer feedback in the Show this response box, using your keyboard and options from the editing toolbar and menus. About entering TeX
- Select Add Response to generate additional rows for as many wrong answers and associated wrong-answer feedback as you need. Enter more specific wrong answers first, followed by less specific ones.
Add a link to a hint in the wrong-answer response:
Select the Link to a hint link, then choose a hint title from the ones available for the part. The “Link to a hint” option appears only when hints are available for the part.Reorder wrong-answer responses:
Select the Move Up or
  Move Down arrows to reorder the wrong answers and associated feedback.
Delete wrong-answer responses:
Choose Delete choice in the row for the response.
 - To save your edits, select
 Save (from the top toolbar) or the Save & Preview link (top right). Do NOT press Ctrl+S (Windows) or Command-S (Mac OS).
 - Test the student experience of wrong-answer feedback by submitting different incorrect answers in the saved item.
To delete the wrong answer feedback: Choose ![]() Delete on the toolbar for the response.
Delete on the toolbar for the response.
See also: