Mohr's circle answer type
Updated 08 Jan 2026
You can use the Simple Editor to create or edit a Mohr's circle answer type in an item. A Mohr’s circle is a 2D graphical representation engineers use to analyze shear stresses on any plane and to show the coordinates of these stresses.
Use this answer type to ask engineering students to do one or both of the following.
- Draw a Mohr's circle
Show plane stress or strain. The answer is graded as correct when the center and reference points are correct. - Analyze a Mohr's circle
Add a point on the circumference of a circle and draw radial lines.For example, you can ask students to mark the maximum in-plane shear stress and to draw a line showing stress at 30 degrees element.
Use the Simple Editor to create Mohr's circle questions that are accessible to students who use a keyboard (instead of a mouse) or screen reader. Students can select  Toggle Helper (top toolbar) to show or hide keyboard control instructions below the work area.
The Mohr's circle answer type can be used for a part question or as a hint question.
- Open the Simple Editor so that the item you want to edit appears in the Edit Item window.
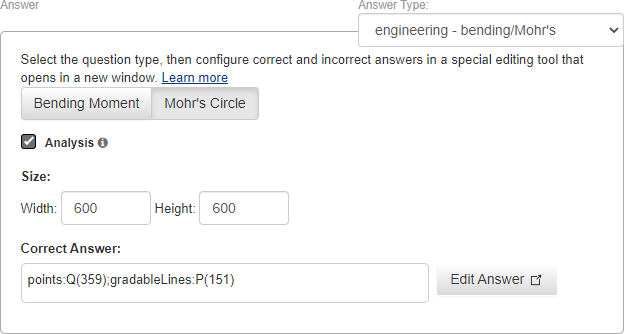
- Navigate to the Answer box for the engineering - bending/Mohr's answer type question you want to edit.
You can make the following edits to Mohr's circle answers. Most edits are described in the Create an item with the Mohr's circle answer type section below.
Edit background grid appearance (diagram settings)
Edit drawing styles (element settings)
Edit hotspots for accessibility
Edit grading conditions (element grading)
In the “Create an item with the bending moment answer type” section below, refer to the Add/edit wrong answers and wrong answer feedback subsection.
In the “Create an item with the Mohr's circle answer type” section below, refer to the Follow-up text: Add/delete (Optional) subsection.
Follow-up text appears after a student completes a part question, whether the student answers correctly, exhausts all answer attempts, or requests the answer.
The image below shows the student toolbar and work area for a Mohr's circle analysis question.
Students are provided with a circle to analyze. They must add a point on the circumference of a circle and draw radial lines.

For a Mohr's circle drawing, students draw the circle on the provided background grid.

The answer box below is for a Mohr's circle analysis question.
-
The Analysis check box is selected.
-
To add or edit the correct answer, select Edit Answer to use the provided drawing tool and settings box.
The answer box below is for a Mohr's circle drawing question. To add or edit the correct answer, select Edit Answer to use the provided drawing tool and settings box.

- Select Instructor Tools from the course menu (left) and then choose Item Library.
Don't see the Instructor Tools option?
Select Item Library from the course menu. - Select Create New Item (page bottom) next to "Can't find what you need?"
The Simple Editor opens in a new window.
- Specify the answer type.
- Scroll down to the Answer box for the part.
- Select the dropdown menu next to Answer Type (on the right) and select engineering - bending/Mohr's. (The default is multiple choice.)
- Choose Mohr's Circle to change from the default Bending Moment.

- Add the correct answer.
The correct answer can require students to either draw or analyze a Mohr's circle. For instructions, see the applicable section below. - Add wrong-answers and wrong answer feedback. (Optional)
For details, see the section below. - Add follow-up text in response to completed questions. (Optional)
For details, see the section below. - Save your edits.
Select Save (from the top toolbar) or the Save & Preview link (top right). Do NOT press Ctrl+S (Windows) or Command-S (Mac OS).
After you select the Mohr's Circle button, you can create the answer that students must draw to show plane stress/strain. The Mohr's circle answer is graded as correct provided the center and reference points are correct.
For students to analyze a Mohr's circle: See the next section.
- Size: Accept the default 600 pixels wide by 600 high, or edit the size.
These dimensions include both the graph and drawing controls that students see. - Select
 to open the drawing tool.
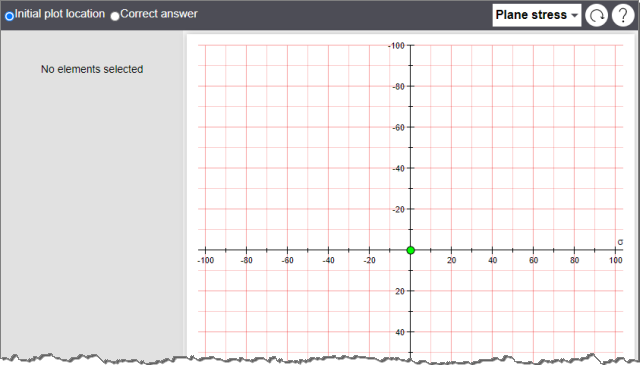
- Initial plot location
With Initial plot location selected (top left), either accept the default location or drag the origin to reposition the grid. This will be the grid starting position that students will see. If you make a mistake, select Reset.
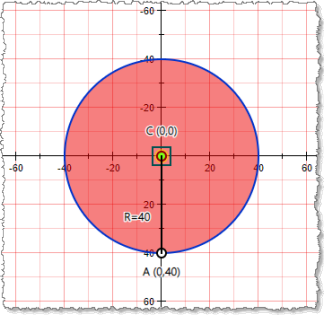
 - Select Correct answer (top left) to plot the correct answer. A circle automatically appears on the grid with default reference point A (0,40), center point C (0,0), and a radius of 40 degrees.
- Select plane stress or plane strain (top right).
- Set the correct answer.
Set the axis: Select diagram settings and element settings for options to set the axis. (On a laptop, these tabs may appear below the grid.) Details about diagram settings or element settings
Set points A and C: To draw on the grid, select and drag the reference point A and the circle center point C. (You can also edit these attributes using the controls on the left.) Plotting points A and C creates the correct answer. The radius is calculated automatically
- Make any changes to the drawing appearance and grading settings from the settings box.
- For the appearance of the background grid, including axis lines, tick marks, and labels, select diagram settings.
- For the appearance of elements like the fill and line styles for the circle and points, select element settings.
- To add or edit hotspots for accessibility (so students can use their keyboard and/or screen reader), select hotspots.
- To set tolerances and add wrong answers, select element grading. For instructions about adding wrong answers, see the section “Add/edit wrong answers and wrong answer responses” below.
- Select Save to close the drawing tool.
When you return to the Answer box in the Simple Editor, notice the answer string that now appears in the Correct Answer box.
The Item Assets list now contains a configuration file named config_mohrs_circleX.xml that contains the diagram settings, element settings, and wrong answers associated with this correct answer string. (This file is not viewable as an image when selected in the Item Assets list.)
For a Mohr's circle analysis question, students mark points along the circumference of the circle (to show in-plane shear stress) and draw one or more radial lines. To create this kind of correct answer, follow the instructions below.
For students to draw a Mohr's circle, see the previous section.
- After you select Mohr's Circle, choose
 .
. - Size: Accept the default 600 pixels wide by 600 high, or edit the size.
These dimensions include both the graph and drawing controls that students see. - Select Edit answer to open the drawing tool.
- Select Plane stress or Plane strain (top right).
 .
. - Mark and label any number of the points and radial lines.
Select Add points and then select Point along the circumference and Radial line to add or edit these.
- Point along the circumference — As you add this point, its position and label attributes appear in the top left. The point is labeled P, unless you change this.

- Radial line — As you add this line, its position and label attributes appear in the top left. The point is labeled Q, unless you change this.

Element labels — A label can be any single uppercase letter (B-Z) not assigned to an element. A and C are already assigned in the provided circle.
- Point along the circumference — As you add this point, its position and label attributes appear in the top left. The point is labeled P, unless you change this.
- Make any changes to the drawing appearance and grading settings from the settings box. (On a laptop, this box may appear below the grid.)
- For the appearance of the background grid, including axis lines, tick marks, and labels, select diagram settings.
- For the appearance of elements like the fill and line styles for the circle, points, and radial lines (for analysis questions), select element settings.
- To add or edit hotspots for accessibility (so students can use their keyboard and/or screen reader), select hotspots.
- To set tolerances and add wrong answers, select element grading. For instructions about adding wrong answers, see the section “Add/edit wrong answers and wrong answer responses” below.
- Select Save.
When you return to the Answer box in the Simple Editor, notice the answer string that now appears in the Correct Answer box.
The Item Assets list now contains a configuration file named config_mohrs_circleX.xml that contains the diagram settings, element settings, and wrong answers associated with this correct answer string. (This file is not viewable as an image when selected in the Item Assets list.)
Mastering provides the initial feedback "Incorrect; Try Again”, followed by the wrong answer text you provide. Although optional, it is recommended that you provide wrong-answer feedback. Wrong-answer feedback can help students learn from their mistakes or incorrect choices.
- From a Mohr’s circle question, select to open the drawing tool and settings box.
- Select element grading from the settings box. (On a laptop, this box may appear below the grid.)
- Choose
 Add Wrong Answer.
A new row appears with “WrongAnswer1” (or another number).
- Select
 Edit in the row for the wrong answer, such as for WrongAnswer1.
(Selecting Edit also lets you examine the properties set for any pre-existing wrong answers.)
- Open the choices to apply values for the wrong answer.
The correct answer point/line positions and tolerance are shown to help you complete your wrong answer choices. You can open the choices for one wrong answer at a time.Mohr’s circle drawing questions —
Select or enter values for the Location of the circle’s center, Location of the reference center, or Radius of the circle.Mohr’s circle analysis questions —
Select or enter values for Wrong placement of point Q or Wrong placement of radial line with point P.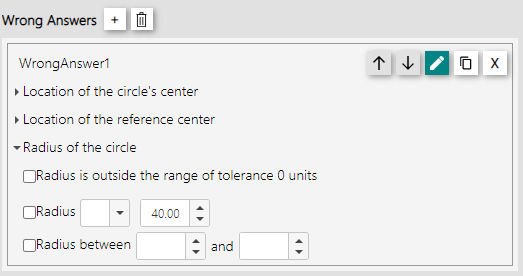
- Select Save.
You return to the Mohr’s circle question in the Simple Editor, where a Wrong Answer Feedback box appears.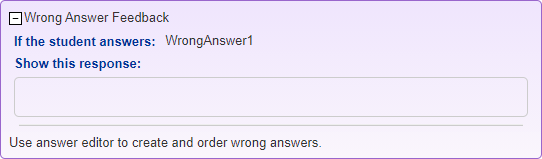
- In the Show this response box, enter the wrong answer feedback for that incorrect answer, using your keyboard and options from the editing toolbar and menus.
- To add additional wrong answers and responses, repeat the process.
You can also select
 Copy to create a wrong answer based on an existing one.
 - To save your edits, select Save (from the top toolbar) or the Save & Preview link (top right). Do NOT press Ctrl+S (Windows) or Command-S (Mac OS).
- Test the student experience of wrong-answer feedback by submitting different incorrect answers in the student view of the saved item. (Optional)
- To remove wrong answers, select , element grading, and then select
 Delete in the row for the wrong answer you want to remove. To remove all wrong answers, select
  Delete All.
 - To reorder wrong answers, select , element grading, and then select
 Move Up or
  Move Down.
 - To remove wrong answer feedback from the question’s Answer box, remove the text in the Show this response box and save the item.
Follow-up text appears after a student completes a part question, whether the student answers correctly, exhausts all answer attempts, or requests the answer. Follow-up text can reinforce learning by providing more information or an interpretation of the answer the student just submitted.
- Select the add follow-up text link.
- Enter your answer feedback, using your keyboard and options from the editing toolbar and menus.
To delete follow-up text — Select the remove follow-up link.
See also: