Bending moment answer type
Updated 08 Jan 2026
You can use the Simple Editor to create or edit the bending moment answer type in an item. Use this engineering answer type when you want students to identify a bending moment based on shear force. The bending moment answer type can be used for a part or hint question.
Use the Simple Editor to create bending moment questions that are accessible to students who use a keyboard (instead of a mouse) or screen reader. Students can select  Toggle Helper (top toolbar) to show or hide keyboard control instructions below the work area.
- Open the Simple Editor so that the item you want to edit appears in the Edit Item window.
- Navigate to the Answer box for the bending moment question you want to edit
You can make the following edits to bending moment answers. A number of these edits are described in the section below, “Create an item with the bending moment answer type”.
Add a background image — In the “Create an item with the bending moment answer type” section below, refer to step 1 in the Add the correct answer subsection.
Remove a background image — Select X next to the image filename. Before you choose OK to delete the image, save all answers AND save the item. The image is no longer associated with the bending moment question, but remains in the asset list for the item.
In the “Create an item with the bending moment answer type” section below, refer to the Add the correct answer subsection.
Edit background grid appearance (diagram settings)
Edit line and line segment styles (element settings)
Add hotspots for accessibility
Set grading conditions (element grading)
In the “Create an item with the bending moment answer type” section below, refer to the Wrong-answer feedback: Add/delete (Optional) subsection.
In the “Create an item with the bending moment answer type” section below, refer to the Follow-up text: Add/delete (Optional) subsection.
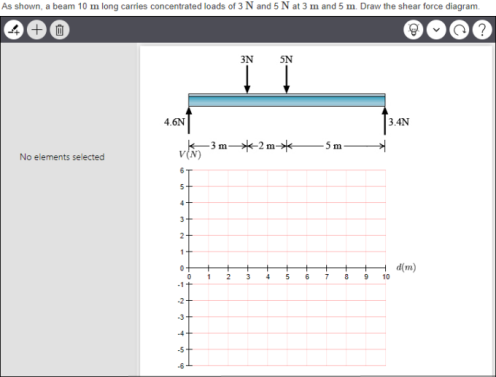
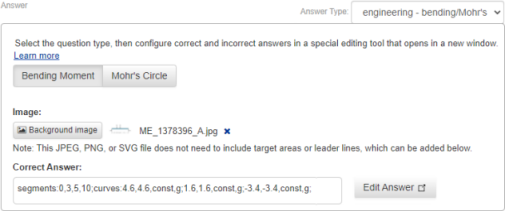
The correct answer shown is for the bending moment student view example shown in the previous section.
- From the Modified Mastering course menu, select Instructor Tools then Item Library.
Don't see the Instructor Tools option?
Select Item Library from the course menu. - Select Create New Item (page bottom) next to "Can't find what you need?"
The Simple Editor opens in a new window.
- Specify the answer type.
Scroll down to the Answer box for the part. Select the dropdown menu next to Answer Type (on the right) and select engineering - bending/Mohr's. (The default is multiple choice.)- The answer type scrolls so that the answer box is in view.
- The Bending Moment engineering answer type is active by default—not Mohr's Circle.

- Add the correct answer. For details, see the next section.
- To add wrong-answer feedback to help students, see the section below.
- Add follow-up text in response to completed part questions.
For details, see the section below. - To save your edits, select
 Save (from the top toolbar) or the Save & Preview link (top right). Do NOT press Ctrl+S (Windows) or Command-S (Mac OS).
For details on primary grading conditions, see Set grading conditions for bending moment.
- Add a background image: This image is the diagram that will appear above or to the left of the provided grid image in the student’s view of the question.
- Select
 to open the Item Assets window for the item.
The image can be in JPEG, PNG, or SVG format and about 550px by 250px in size (for placement above the grid).
If you haven’t added the image into the asset list for the item yet: First, locate the image by choosing Browse and then select Upload, so that the new image file name appears in the asset list.
- To view an image in the provided list, select its name.
- Choose Select for the background image you want and to return to the bending moment answer box.
The name of the image and a thumbnail appear to the right of
.
- Select
- Select
 next to the Correct Answer box in the item.
The workspace appears with the background image applied.
- Position the background image and grid.
- Select Diagram settings from the settings box below the workspace.
- To reposition the provided grid, select Position for the Background, Draggable, and Close.
- To reposition your diagram, select Position for the Image, Draggable, and Close.
- Drag the grid and diagram images to position them on the workspace.
The diagram image can be above or to the left of the grid.
- Add lines of discontinuity.
Select
 Add vertical/horizontal line on from the top toolbar and place the lines on the grid.
If a line isn’t positioned exactly where you want — Select
Add vertical/horizontal line off again to turn off this control and then reposition the line. - Add line segments between lines of discontinuity.
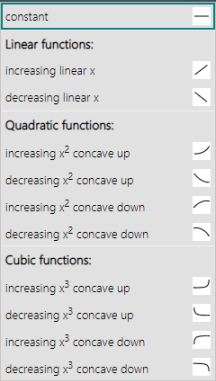
- Select
 Add segment from the toolbar to choose whether to draw a constant or to select a type of linear, quadratic, or cubic function.
- Position the line segment(s) between lines of discontinuity.
- To check the exact position of the segment endpoints you’ve placed — Point inside the shaded area to see the point values and segment type attributes on the left, where you can make any needed adjustments.
- Select
- Set any additional diagram settings, element settings, hotspots, and element grading settings from the settings box below the workspace.
Diagram settings — Use diagram settings to set the appearance and position of the background grid as well as the position of the image.
Element settings — Use element settings to set the line orientation, offset, and style for lines of discontinuity as well as segment line style.
Hotspots — Add hotspots for accessibility, so that students can use their keyboard and/or screen reader.
Element grading — Select tolerance and whether to allow line crossover for the correct answer. You can also add wrong answers from here.
- To save your edits, select Save (from the top toolbar) or the Save & Preview link (top right). Do NOT press Ctrl+S (Windows) or Command-S (Mac OS).
- Although optional, it is recommended that you provide wrong-answer feedback. Wrong-answer feedback can help students learn from their mistakes or incorrect choices.
- Mastering provides the initial feedback "Incorrect; Try Again”, followed by the wrong answer text you provide.
Add wrong answer-feedback for a bending moment answer type:
- Select next to the Correct Answer box in the item.
- Select Element Grading below the workspace.
- Select Add Wrong Answer.
A new row appears with “Wrong Answer 1” or other.
- Select
 Edit.
Edit. - Select one or more of the grading conditions that appear below “WrongAnswer x”. (You may need to open some options to see all of the conditions.)
- Select Save.
The tool closes and “WrongAnswer x” appears next to “If the student answers:”
- Enter your wrong-answer feedback in the Show this response box, using your keyboard and options from the editing toolbar and menus.
Entering TeX in wrong-answer feedback —
Enter the TeX code, select it, and then choose TeX (or choose TeX and then enter your TeX). The unrendered TeX appears in a yellow box. - Add a link to a hint from a wrong answer response. (Optional)
Select the Link to a hint link, then choose a hint title from the ones available for the part. The “Link to a hint” option appears only when hints are available for the part. You can link to only one hint per wrong answer response.If no hints are available for the part yet —
See Add or edit hints for instructions, including how to copy and paste a hint within an item. - Add more wrong-answer responses (Optional) — Repeat steps 1-7 to add more wrong answers and feedback as needed.
- To copy an existing wrong-answer grading condition — Select
 Copy from Grading Elements, select Save, and enter your wrong answer feedback in the item. (The new “Wrong Answer x” box appears under the grading condition you copied.)
 - To reorder wrong-answer responses — Select , Element Grading, and then select either the
 Move Up or
  Move Down arrows to reorder the wrong answers and associated feedback.
- To copy an existing wrong-answer grading condition — Select
- To check your edits without saving, select
 Validate (from the top toolbar) to verify the XML.
 - To save your edits, select Save (from the top toolbar) or the Save & Preview link (top right). Do NOT press Ctrl+S (Windows) or Command-S (Mac OS).
- Test the student experience of wrong-answer feedback by submitting different incorrect answers in the saved item. (Optional)
To delete wrong answer feedback — From the item, select
, Element Grading, and then select  in the row for the wrong-answer condition.
Follow-up text appears after a student completes a part question, whether the student answers correctly, exhausts all answer attempts, or requests the answer. Follow-up text can reinforce learning by providing more information or an interpretation of the answer the student just submitted.
- Select the add follow-up text link.
- Enter your answer feedback, using your keyboard and options from the editing toolbar and menus.
To delete follow-up text — Select the remove follow-up link.
See also: