Set up Access Pearson or Access Pearson Codeless - Blackboard Ultra
Transitioning your course from the MyLab and Mastering tool, Partner Integration, or Direct Integration (LTI 1.1) to Access Pearson (LTI 1.3)? Learn how to prepare.
 Quick summary of this topic
- If your course will belong to a course group, set up the template first.
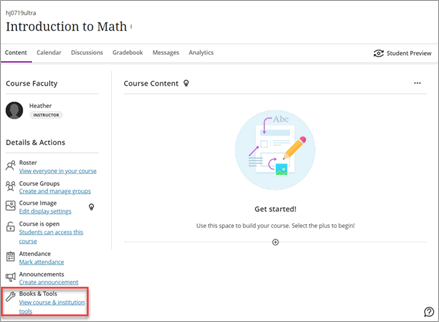
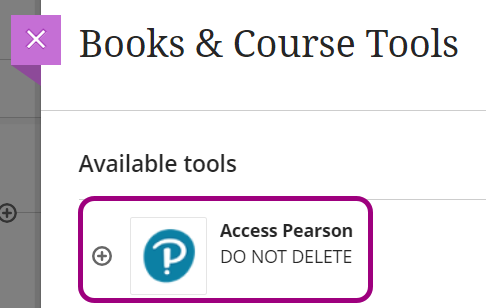
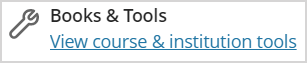
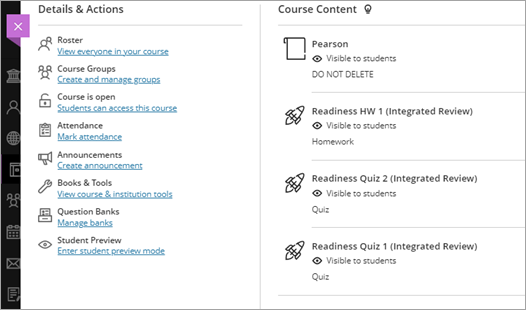
- From your Blackboard course, add the Access Pearson link, under Books & Tools, select View course & institution tools. Next, under Available Tools, select Access Pearson.
Using a bookstore and not Access Pearson? For Barnes & Noble, Follett-Willo, RedShelf, or VitalSource, select the bookstore link to enable Access Pearson Codeless. Then skip to step 4.
- Select View course & institution tools again and then Access Pearson.
- Select Open Pearson and then choose MyLab and Mastering for the product.
- If prompted, select Get Started to link your accounts and pair your MyLab or Mastering and LMS courses.
- Open your MyLab or Mastering course to turn on any grade settings and create assignments.
- Select Grade Sync. Then select whether to sync grades automatically and choose any specific assignments to sync.
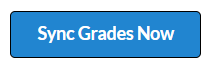
- Select Sync Grades Now to create assignment links and to initially populate the Blackboard gradebook.
To set up Access Pearson or Access Pearson Codeless:
- Add the Access Pearson link if you don't see it.
- Pair your Blackboard course with a MyLab or Mastering course.
- Add assignment, course tool, or eText links.
- Get students started.
- Sync grades.
- If applicable, enable Access Pearson Codeless.
You have the Blackboard Ultra course view if Books & Tools is in your course's left (base) navigation.
Not sure which integration was set up for you? This topic covers Access Pearson, Pearson Seamless, and Access Pearson Codeless for Barnes & Noble, Follett-Willo, RedShelf, and VitalSource. The name and location of the link to access these integrations depend on your course setup. For Access Pearson, the link is usually named Access Pearson. For Access Pearson Codeless, the bookstore link is sometimes named Course Materials and may include your bookstore name. Check the Launch Type in Diagnostics or ask your LMS administrator if you're unsure.
Step 1: Add the Access Pearson link
If Access Pearson has been installed by your institution and you don't see the link, add it to your Blackboard course following the instructions below. If Access Pearson is unavailable and you aren't using a bookstore, contact your Blackboard administrator. Provide the administration guide for Pearson integrations.
Using a billing program like Inclusive Access via a bookstore without Access Pearson? Go to Step 6: Enable Access Pearson Codeless.
- If your Blackboard course will belong to a course group (copied from a template or a coordinator course), set up the template before creating student-use copies.
- Open your Blackboard course.
- If prompted, choose the Ultra course view. Your selection is permanent and can't be undone.
- If you're transitioning a Partner Integration or Direct Integration (LTI 1.1) course to Access Pearson (LTI 1.3), you'll need to prepare your course. See Transition your course for instructions.
- Under Books & Tools, select View course & institution tools.

-
Under Available Tools, select Access Pearson.
- Agree to any authorization requests.
Next, pair your courses.
Step 2: Link accounts and pair courses
To open MyLab and Mastering from your LMS course, link your accounts once. Then pair your courses and set up assignments in your MyLab or Mastering course.
 Watch how to link accounts and pair courses (5:10)
Link your accounts
If you're a section instructor or teaching assistant, see Register as a section instructor or TA.
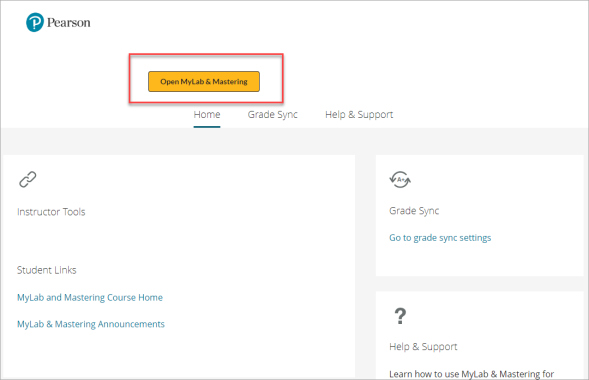
- Select the MyLab and Mastering or Access Pearson link. (Add the link if you don't see it.)
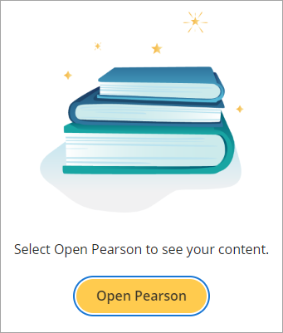
- Select Open Pearson.
 How to re-open your content
If the Pearson Home page isn't already open in another tab, return to your LMS course navigation and select the MyLab and Mastering or Access Pearson link again.
-
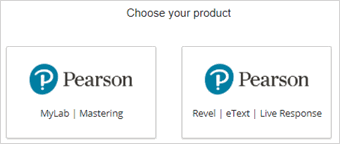
If you're asked to choose your product, select MyLab | Mastering. (For Revel, eText, or Live Response, go to Revel and Pearson eText for your LMS Help.) Your selection is permanent and can't be undone.
- Agree to any authorization requests and accept cookies.
- If prompted, select Get Started to link your accounts.
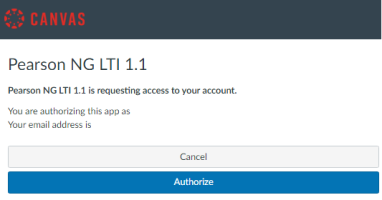
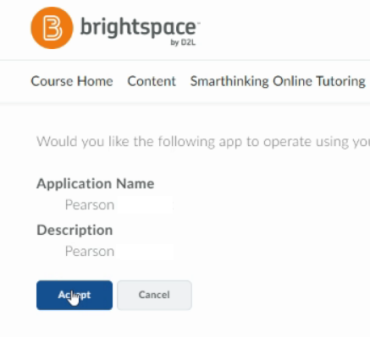
 IMPORTANT: Authorization for link migration from LTI 1.1 to 1.3
If prompted, select Authorize to automatically migrate your Pearson assignment links from LTI 1.1 to LTI 1.3. Without authorizing LTI 1.1, your links won't migrate and you'll get a Socket_RP_84 error message.
Sample Canvas message:
Sample D2L Brightspace message:
 Don't see the Pearson Home page?
For Pearson Seamless, go to step 6 to link accounts.
- Enter the username and password from your existing Pearson instructor account and select Link accounts. If you don't have an account, select Create an account and follow the prompts. You can only link one LMS account to one Pearson account.
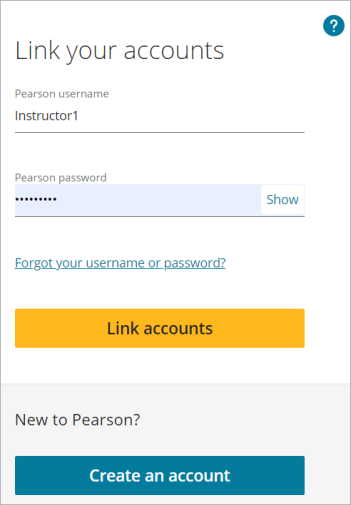
-
Select Continue.
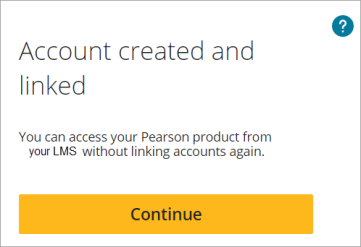
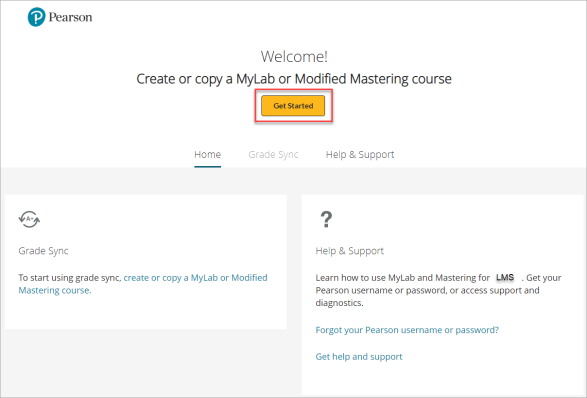
- If prompted, select Get Started on the Pearson Home page to pair your courses.
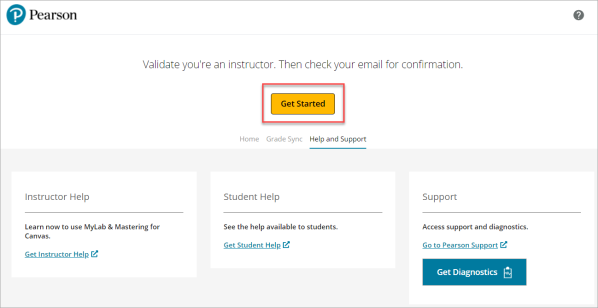
 Not yet a validated instructor?
Select Get Started and follow the prompts to enter details about your role. Wait for a confirmation email.
Tips
Blank white pageIf you see a blank white page, you might need to temporarily disable the AdBlock and similar browser extensions. See your browser Help for instructions.
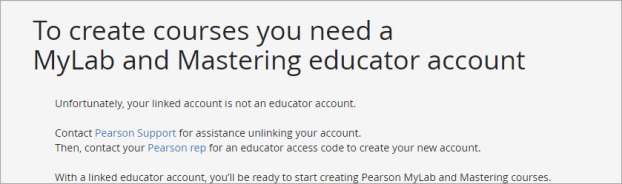
Account upgradeIf you have a valid Pearson account and get the message, "Account Upgrade Needed," contact Pearson Support. Your account is active but needs a subscription to the MyLab and Mastering course.
Educator account neededIf you get the message, "To create courses you need a MyLab and Mastering educator account," contact Pearson Support for assistance.
Next, pair your courses.
Pair your courses
Start from your LMS course to pair it with a new, copied, or existing MyLab or Mastering course.
Transitioning your course to Access Pearson and pairing it with a new edition? Most assignment and course tool links automatically migrate to the course paired using Access Pearson. To ensure this works when pairing a new edition of a Mastering platform update course, copy your previous paired course. Go to Diagnostics for your previous course and note the course ID. When you pair the new LMS course, enter the course ID you noted under Copy an existing course. Links to eText sections, Scheduled Reading, and Adaptive Followups in a new edition aren't included in the course copy or the link migration. You'll need to manually add these links to your LMS course.
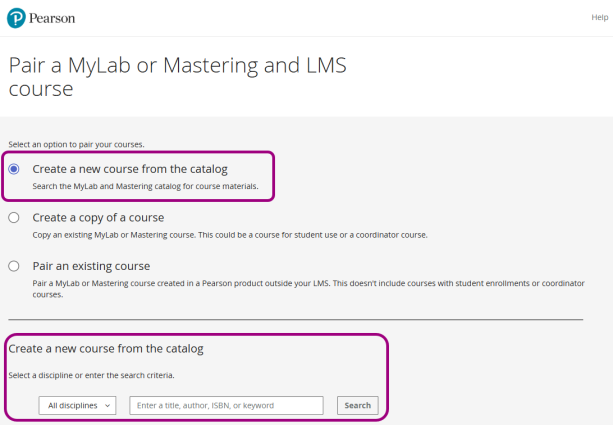
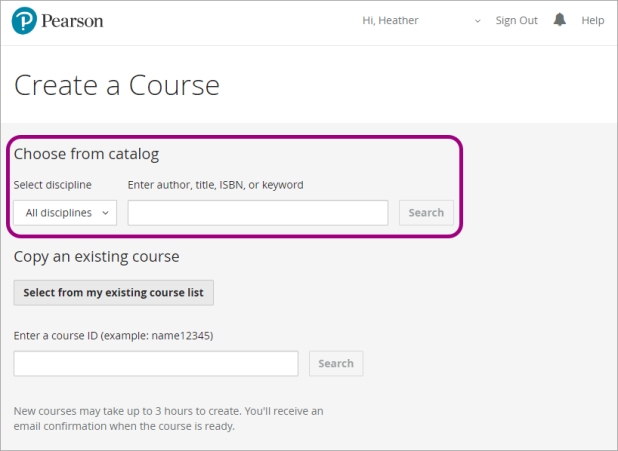
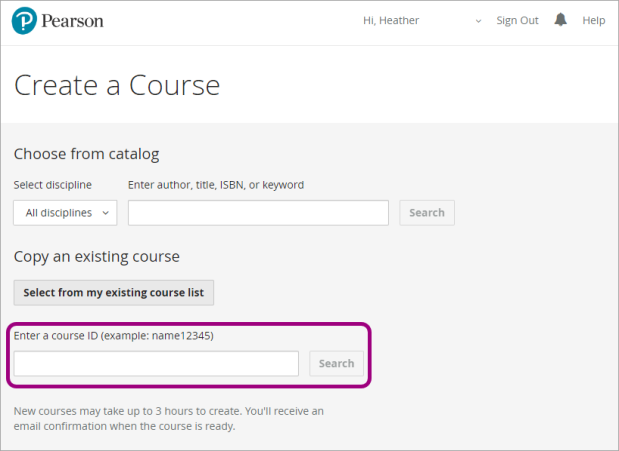
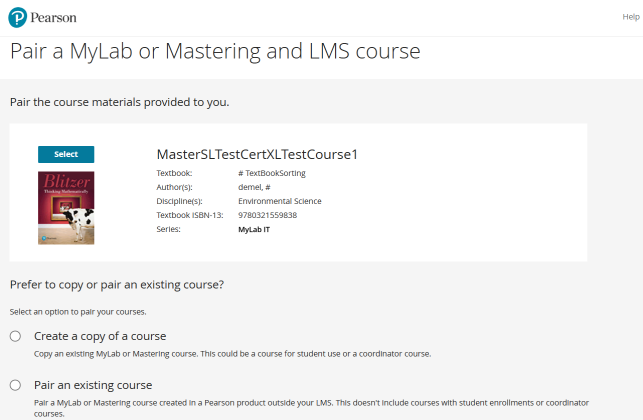
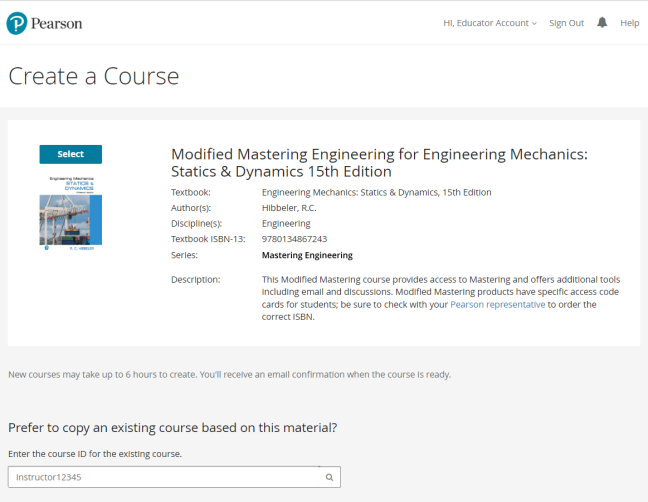
- To create or copy a MyLab or Mastering course, choose an option. Depending on your setup, you'll see different options.Search for new course materials
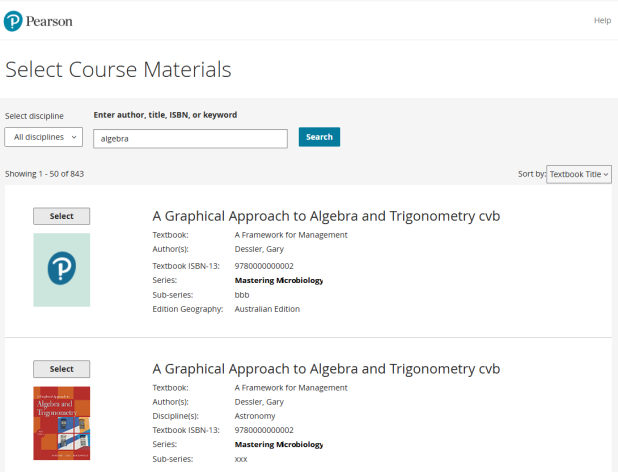
- If available, search the catalog for new course materials. Select a discipline and enter a title, author, ISBN, or keyword. Depending on your course setup, the options will look different.
Select the Create a new course from the catalog option. Enter your criteria and select Search.
or
Under Choose from catalog, enter your search criteria. Enter your criteria and select Search.
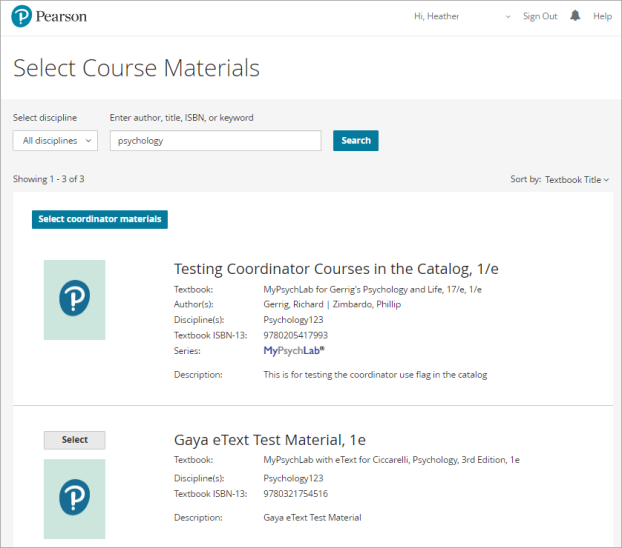
- Select the course materials you want.
Using an ad blocker? Your browser may have an ad blocking extension, such as AdBlock Plus or uBlock Origin. Temporarily disable the extension for this site. See your browser Help for instructions. Then open Pearson and resume pairing your courses.
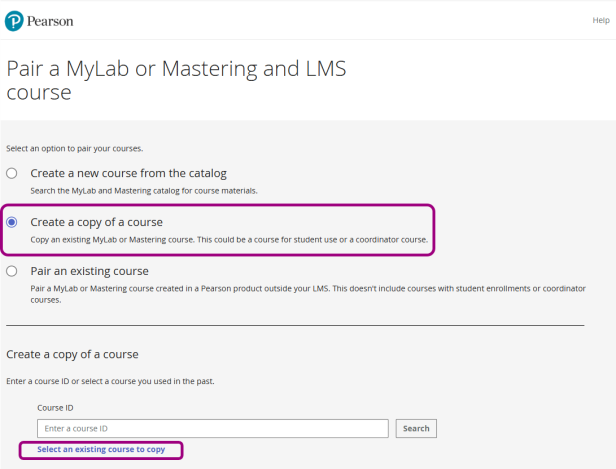
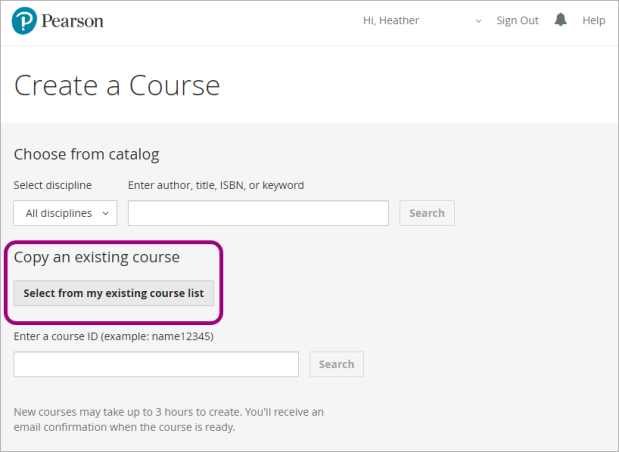
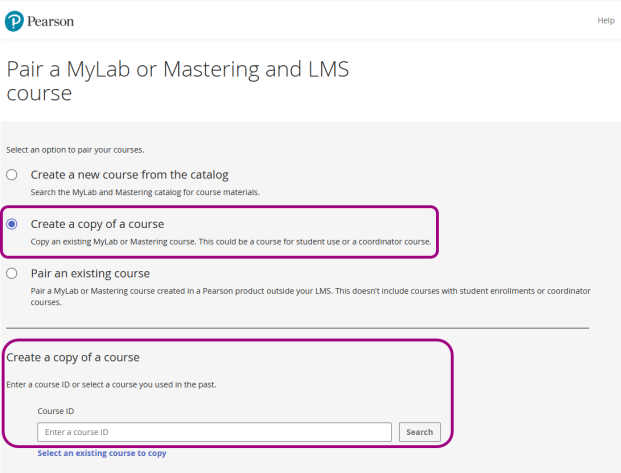
Copy a previous course- Copy a previous course you’ve taught with. Select from a list of courses you used in the past. (Learn what's included in the copy.) Depending on your course setup, the options will look different.
Choose Select an existing course to copy.
or
Choose Select from my existing course list.
- Select the course materials you want.
or
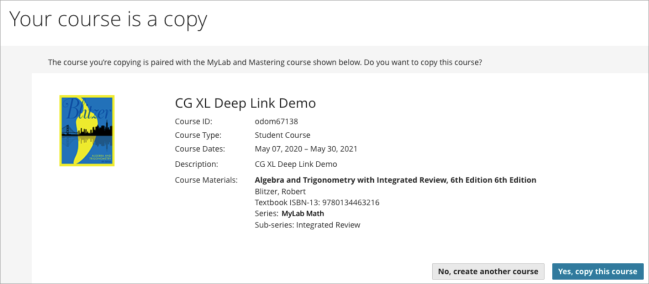
See a banner saying, "Your course is a copy?"You might be offered the option to copy a paired course. Select Yes, copy this course to copy the course and its assignment or course tool links.
If you select Yes, copy this course, you can't rename the MyLab or Mastering course or change due dates for assignments from the Enter Course Details page that appears later (see steps 4 and 5 below). Instead, after you finish pairing your courses, go to https://mlm.pearson.com/ to edit the course name and dates. See My Courses Help for instructions. If you select No, create another course, use the same course ID as the original to copy the assignment or course tool links and avoid duplicate grades.
Mastering platform update: If you're transitioning to Access Pearson and copying a new edition with the Mastering platform update, select No, create another course. To ensure assignment and course tool links automatically migrate to LTI 1.3, go to Diagnostics for your previous course and copy the course ID. When you pair your new course, enter the course ID under Copy an existing course.
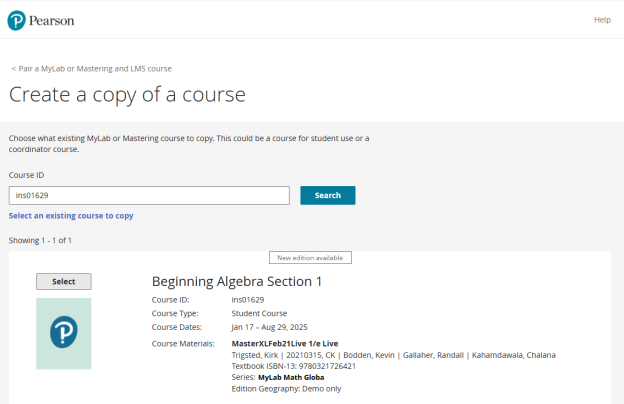
 Copy a course using a course ID
- Enter a course ID to copy another instructor's course. For a member section in a course group, enter the course ID of the MyLab coordinator course. Depending on your course setup, the options will look different.
or
- Then select the course materials you want.

or

Need to find the course ID? Sign in to mlm.pearson.com. Locate your existing course and note the course ID, which is your last name plus 5 digits. Ensure the course has been set to allow copies.
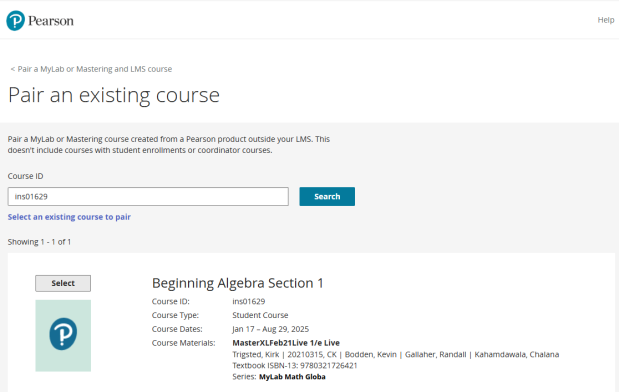
If available, pair an existing course created from a Pearson product outside the LMS- Enter a course ID to copy another instructor's course or select an existing course you used in the past. For a member section in a course group, enter the course ID of the MyLab coordinator course.

- Select your course materials.
Select suggested course materials (Pearson Seamless)Select the course materials provided to you such as from the bookstore. Depending on your course setup, the create a course options will look different.
or
 Don't see the option to search the catalog for a new course or using Pearson Seamless?
 For Access Pearson Codeless or Pearson Seamless, select the suggested course or enter a course ID to copy an existing course. You can't pair a new course or a course you created outside the LMS such as from the MyLab and Mastering website. However, you can make a copy.
- If available, search the catalog for new course materials. Select a discipline and enter a title, author, ISBN, or keyword. Depending on your course setup, the options will look different.
- Complete the course details.Course type
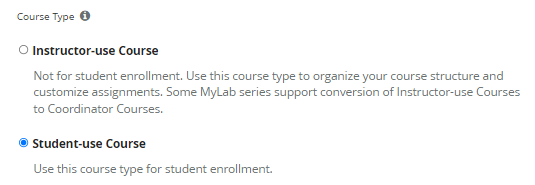
Choose any available course type.
- Student-use: To enable students to enroll in the course, select Student-use Course.
- Instructor-use: If you don't intend students to enroll in the course, select Instructor-use Course. For managing multiple sections for a MyLab course, consider using a MyLab coordinator course in a course group. For MyLab IT courses paired with your LMS, you must copy an existing coordinator course.
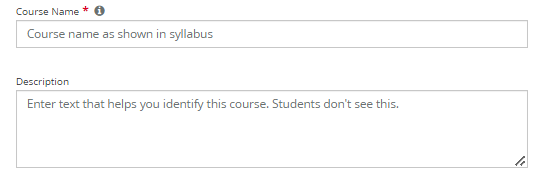
 Course name and description
Enter the course name and description. Use something specific for the name like your term and class section. This helps you quickly identify the course later.
 Course dates
Select the course start and end dates. Course Dates default to those selected when the course was originally created.
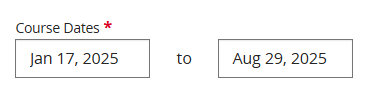
- Course2 error: Students who try to register before the start date get a course2 error.
- Course end dates: Students can no longer open the Pearson course on the course end date (Eastern Time, US). Set a date after the last re-take opportunity for the final exam.
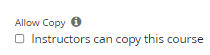
Allow other instructors to copy this courseSelect whether to allow other instructors to copy your course using your course ID. You can change this setting later.
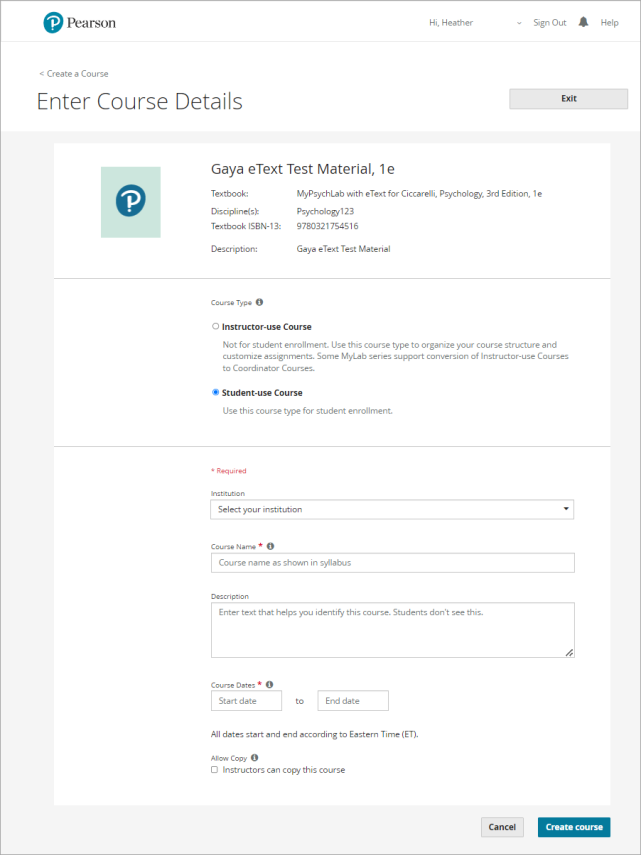
- Select Pair course or Create course. You'll see a confirmation message.
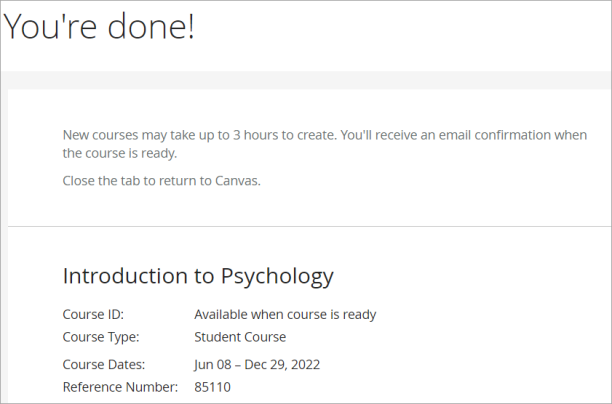
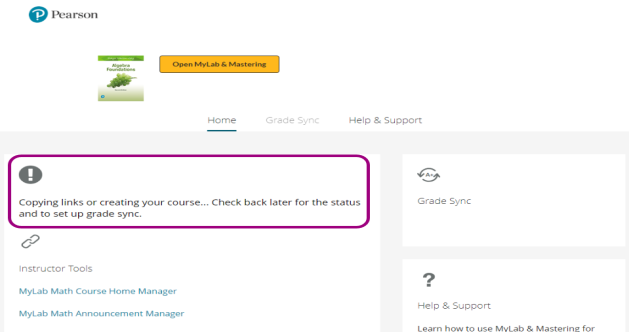
- Wait for an email confirming your course has been created. This might take up to 3 hours.
- Close the browser tab, and return to your LMS course
Next, set up assignments.
Set up assignments
You need to create assignments and add due dates before you can add assignment links and set up grade sync.
- From your LMS course, select the MyLab and Mastering or Access Pearson link. Don't see the link?
- Select Open MyLab & Mastering.
- Make sure assignments are set up in your MyLab or Mastering course. Assign due dates in your Mastering course. Manage due dates only from your MyLab or Mastering course, not your LMS course.
To successfully sync grades and open assignments, make sure assignment names are fewer than 128 characters. Avoid UTF-8 or these characters \ / " * < > + = | , % ! &
Using the Mastering platform update? Learn about differences in how assignments are handled.
- Return to your LMS course.
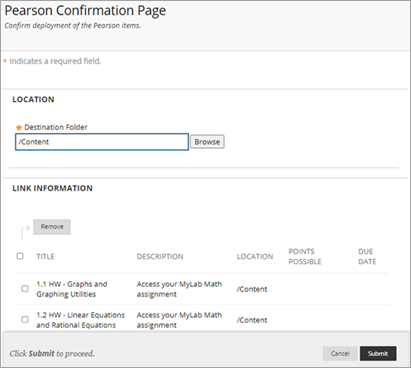
Open MyLab and Mastering or Access Pearson tools. Add links, including any assignment or course tool links to your course. Select Submit.
Choose the folder containing the links, and then select Submit.
Repeat these steps anytime to update links.
Next, add assignment or tool links or get students started.
Step 3: Add assignment, course tool, or eText links
Optionally, you can add links that students use to open MyLab or Mastering assignments, course tools, such as Grades, or eText (also called eTextbook) from your Blackboard course. Learn how assignment, course tool, or eText links function.
Prerequisites: First pair your MyLab or Mastering and Blackboard courses and set up assignments in your MyLab or Mastering course.
In most cases, assignment links will be automatically available in the copied LMS course after pairing. You'll have the option to see a status or list of links. Instructor course tool links aren't supported by the Access Pearson integration and aren't copied. You need to manually delete any instructor course tool links from your course. See Transition your course for details.
Watch how to add assignment links
- From your Blackboard course, select View course & institution tools under Books & Tools.
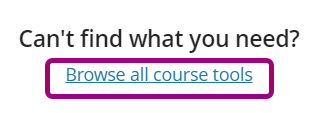
- Select Browse all course tools under Can't find what you need. You might need to scroll to find the link.
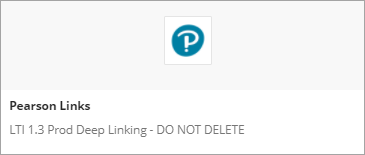
- Select Pearson Links or the name your admin chose under Institution tools.
-
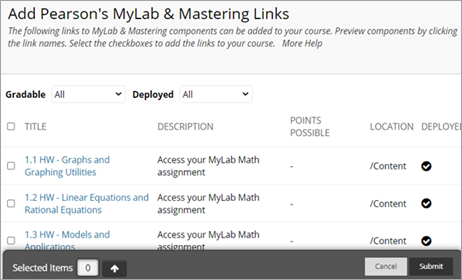
From the Add links from list, choose whether to see assignments, course tools, or eText. Then scroll to see all the links or search for a specific link. Choose a column heading to sort.
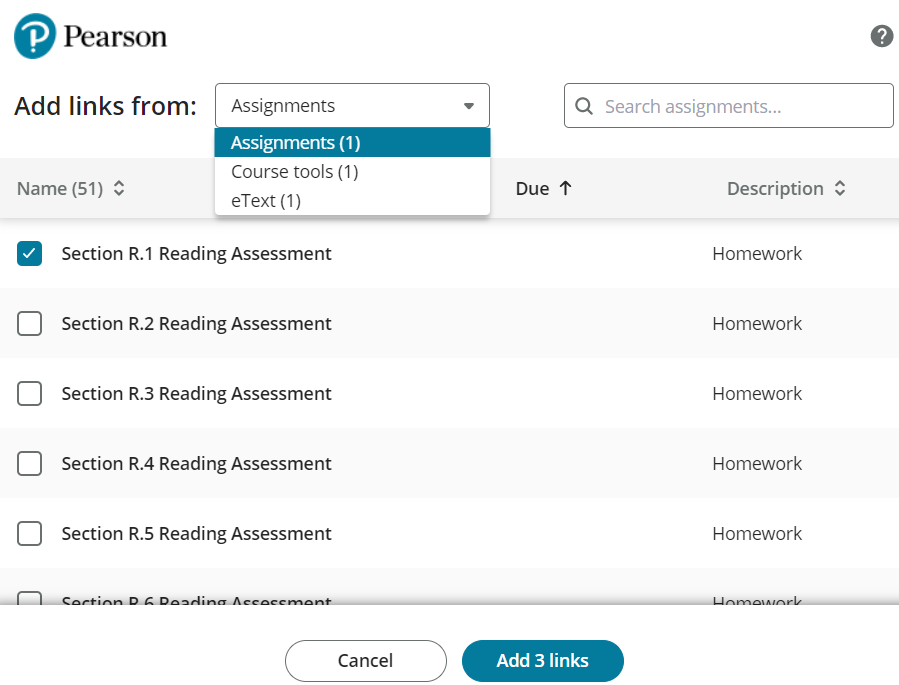
- Select one or more links and repeat for any option in Add links from.Adding eText links?
Select a Chapter to see its associated links.

- Select Add links at the bottom of the page.
You'll see the new links under Course Content. Select a link and then Open Pearson to open the link in a new browser tab or window.
Next, get students started.
Step 4: Get students started
Learn how to get students started with your MyLab or Mastering course.
After you pair your LMS course with a MyLab or Mastering course, it’s simple for your students to open MyLab and Mastering. They need to link their LMS and Pearson accounts. They might be prompted for a username and password or to create an account. Depending on the course setup, we might automatically create a new account for them if it's their first time opening a Pearson product from your LMS. The username is the institution email address. We recommend students create the optional password to use the account to access other Pearson products, including mobile apps. Students can create the password later on from Forgot username or password or by selecting the link in their account confirmation email.
Depending on the course setup, students might need to purchase access. Options include pre-purchased access code or credit card. If available, they can also use Apple Pay or PayPal. Temporary access without payment for a limited time is an option for some courses but isn't supported for Access Pearson Codeless. Students may need to acquire an access code from a bookstore (sometimes called code reveal) to register for your MyLab or Mastering course.
Access Pearson Codeless: To give students the option to access your MyLab or Mastering course from a bookstore without a Pearson access code, enable Access Pearson Codeless. For instructions, see Step 6. If the bookstore link isn't available and Access Pearson is set up in your LMS course, have students select Access Pearson from your LMS course to open their MyLab or Mastering course. Then advise students to select temporary access as the access option when they register. This gives students access to the course without payment until the bookstore link is available for them to manage their opt status via Access Pearson Codeless.
For the second half of a multi-semester course, students might be prompted to link their LMS and Pearson accounts the first time they access the MyLab or Mastering course. Students must use the same Pearson username and password as the first part of the course. Otherwise, they might be prompted for payment again.
You don't need to give students course IDs or invite links. Communicate your course activity expectations and grade weighting with students. Let them know what's required for your course, including purchase options. Like instructors, students can download diagnostics for Pearson support.
To access the student view of the MyLab or Mastering course as an instructor, remove the LMS Student View filter, and then select a student assignment, course tool, or eText link. If you select the Access Pearson link from the Student View, you’ll get error code SOCKET_LS_T_03 for all LMSs except Canvas.
Student resources
Share registration instructions and other resources with your students early, so they can immediately engage with course materials. We suggest copying and pasting these URLs into an email to students before classes start or your syllabus. Another option is to add these URLs as web links in a getting started section of your Blackboard course. See Blackboard Help for how to add links.
- Student Help: Get started with MyLab and Mastering for your LMS
Step 5: Sync grades
Sync grades one-way from your MyLab or Mastering course to your Blackboard course. Learn how grade sync works.
Calendar: You need to sync grades to see assignment due dates in the Blackboard calendar.
Watch how to sync grades (1:01)
- Access the Pearson Home page and select Open Pearson.
- Select Open MyLab & Mastering.
- In your MyLab and Mastering course, turn on any grade settings and create assignments that meet the guidelines below. If needed, set availability/due dates and choose grade sync settings.
Guidelines: To avoid problems opening MyLab and Mastering courses and syncing grades, make sure names, including course and assignment names, and settings don't have UTF-8 and these special characters: \ / " * < > + = | , % ! &
Depending on your MyLab and Mastering platform, there are different ways to prepare for grade sync.
MasteringSee Mastering Help for grade sync considerations.
Using the Mastering platform update? Learn about differences in how assignments and grade settings are handled.
MyLabSee MyLab Help for how to set up grade sync from your MyLab course and choose how to sync scores.
Next, return to your LMS course to set up grade sync.
Set up grade sync from your Blackboard course
Prerequisite: To avoid problems opening your MyLab or Mastering course and syncing grades, make sure names and settings in your LMS course don't have UTF-8 and these special characters: \ / " * < > + = | , % ! &
- Access the Pearson Home page and select Open Pearson.
- Select Grade Sync.
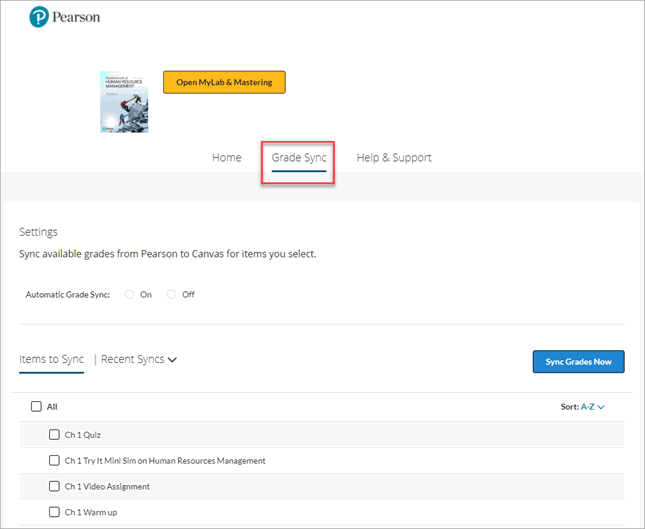
- To automatically sync grades as they become available, select On for Automatic Grade Sync.
This doesn't sync past grades. (If Off is selected, MyLab and Mastering grades only sync to your LMS when you select Sync Grades Now.)

Regardless of whether automatic grade sync is turned on, use Sync Grades Now anytime to manually sync all existing grades, including grades available before you turned auto sync on.
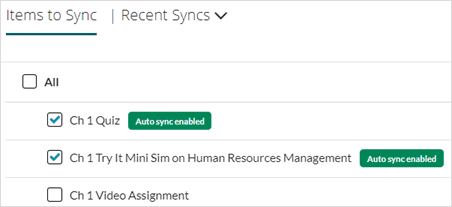
- Make selections in the Items to Sync list. You might need to wait up to 15 minutes after you set up grade sync to see these items.
- Select Sync Grades Now to create links for any assignments and to initially populate the LMS gradebook.
See also: Get diagnostics
Step 6: Enable Access Pearson Codeless
Your institution may offer students the option to opt in to add the cost of MyLab or Mastering course materials to their tuition or fees. This is available from your bookstore through Access Pearson Codeless as part of your Inclusive Access or institutional-bill program. Bookstores include Barnes & Noble, Follett-Willo, RedShelf, or VitalSource. When students opt out, they can buy access through Pearson using a credit card or, if available, PayPal or Apple Pay.
Your LMS administrator usually works with the bookstore to integrate Access Pearson Codeless with your LMS course. To enable Access Pearson Codeless, select the bookstore link and access your MyLab or Mastering course. For instructions, select your bookstore below. The name and location of the bookstore link depends on the course setup. The link is sometimes named Course Materials and may include your bookstore name.
Student access to MyLab and Mastering via Barnes & Noble, Follett-Willo, RedShelf, or VitalSource: Select the bookstore link to ensure Access Pearson Codeless is enabled. Make the link visible to students to allow them to manage the opt status by following your institution's process. This prevents issues with student access.
Not sure how to find the bookstore link or don't see the right Pearson content? Check the instructions below. If you still have trouble, contact your bookstore or LMS administrator.
Select your bookstore
- Open your LMS course.
- Select the Course Materials link to access Barnes & Noble. The name and location of the link depends on the course setup.
You may need to add the link. See Barnes & Noble Help for instructions.
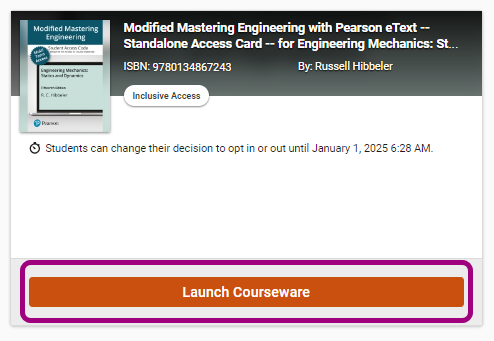
- Select Launch Courseware.
- Open your LMS course.
- Add Follett-Willo to your course. Select your LMS for instructions:Blackboard Original
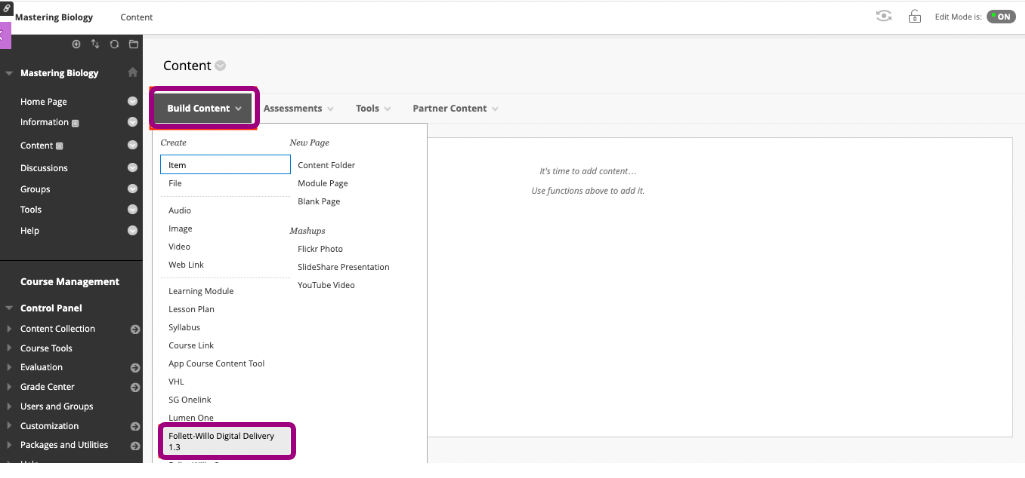
From a content area, select Build Content. Then select Follett-Willo Digital Delivery 1.3 or whatever your institution named the tool.
 Blackboard Ultra
- From your Blackboard course, select View course & institution tools under Books & Tools.
- Select Browse all course tools under Can't find what you need. You might need to scroll to find the link.
- Select Follett-Willo Digital Delivery 1.3 or whatever your institution named the tool.
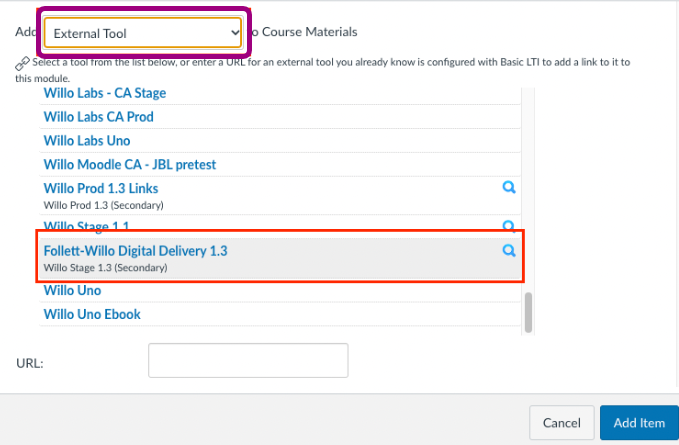
Canvas- Select the + button in a module.
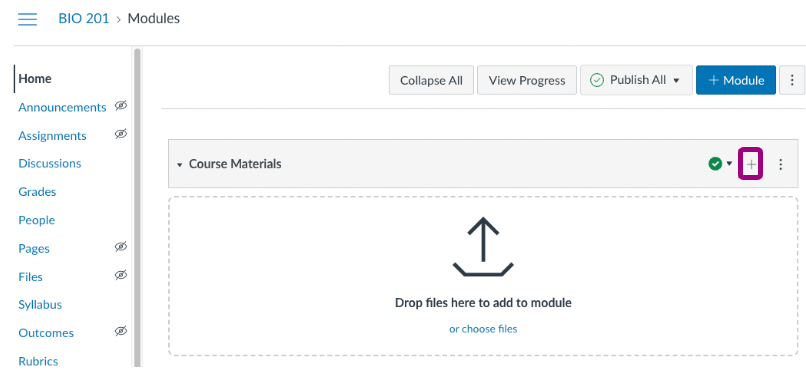
- From the Add list, select External Tool. Then select Follett-Willo Digital Delivery 1.3 or whatever your institution named the tool.
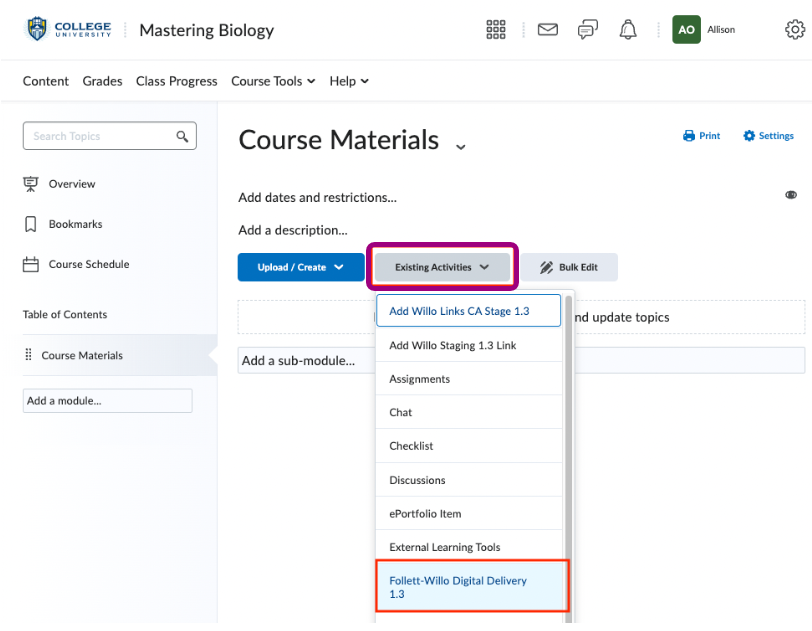
D2L BrightspaceFrom a module, select Existing Activities. Then select Follett-Willo Digital Delivery 1.3 or whatever your institution named the tool.
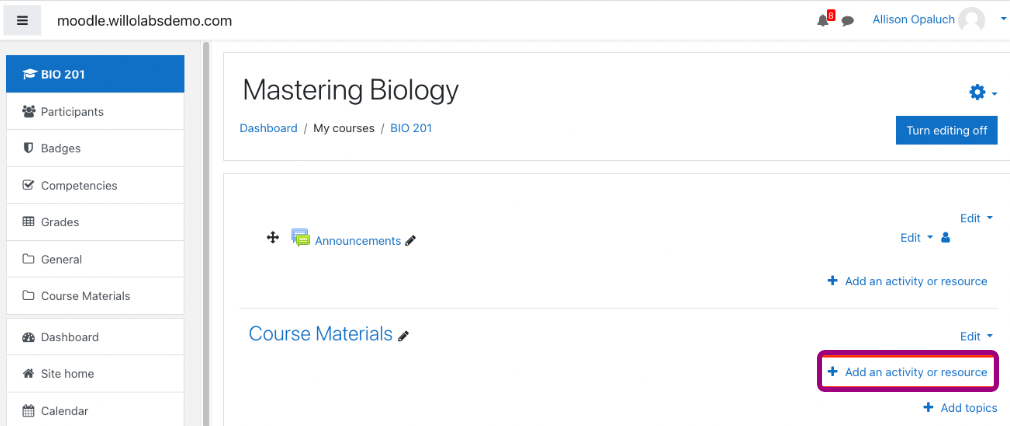
 Moodle
- Select Turn Editing On.
- From a topic, select + Add an Activity or Resource.
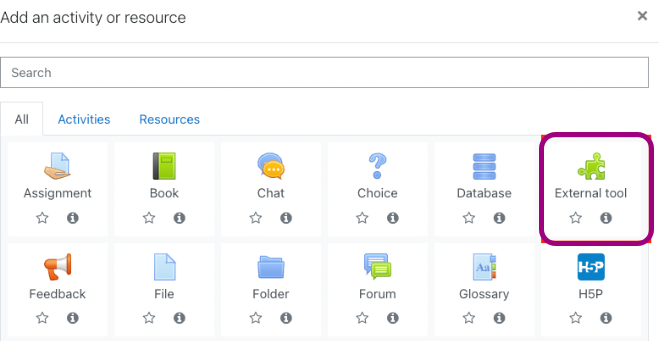
- Select the External tool tile.
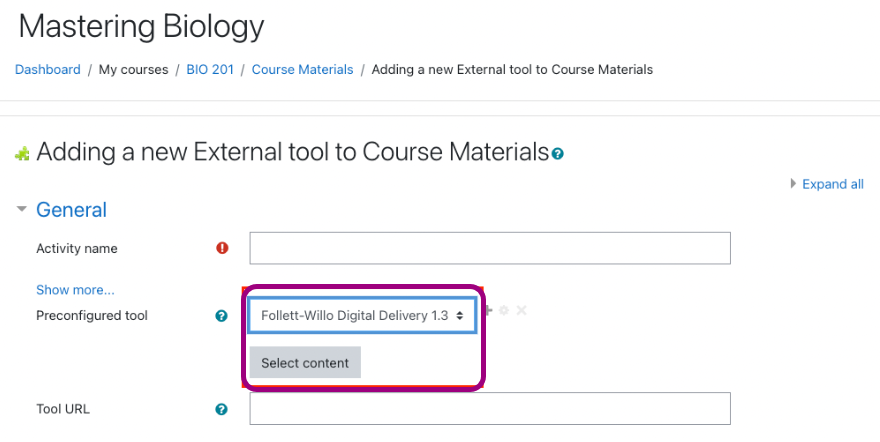
- From the Preconfigured tool list, select Follett-Willo Digital Delivery 1.3 or whatever your institution named the tool. Next, choose Select Content.
- From your Blackboard course, select View course & institution tools under Books & Tools.
- Select Continue in a new window.

- Depending on your course setup, do one of the following:
- If you see the Course Pairing page, choose Select to use the suggested course materials and then Review Details. Otherwise, select Search Course Materials or I have a Product Token.
- If you don't see the Course Pairing page, skip to step 8.
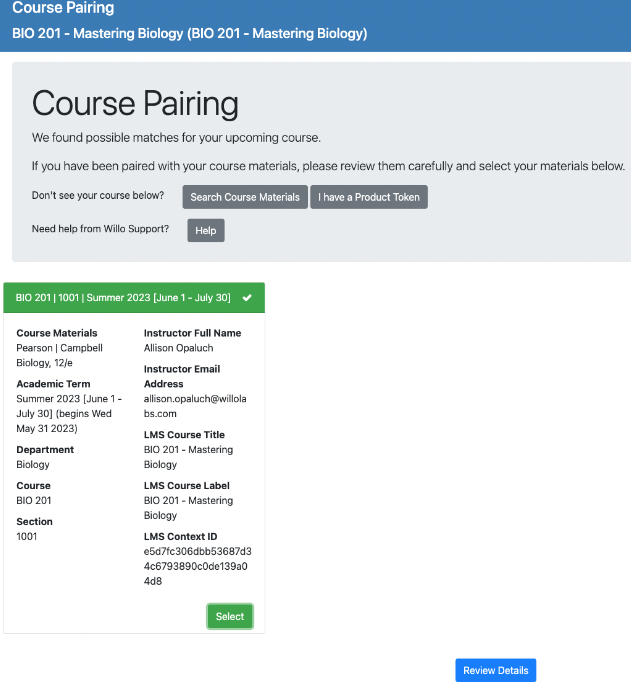
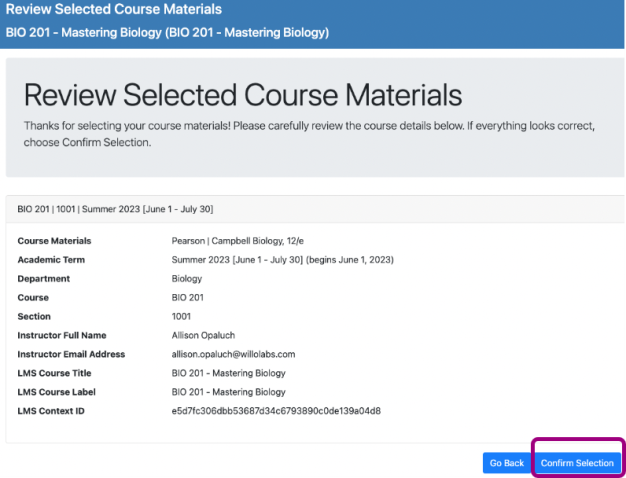
- Look over the details for the course materials and then select Confirm Selection.
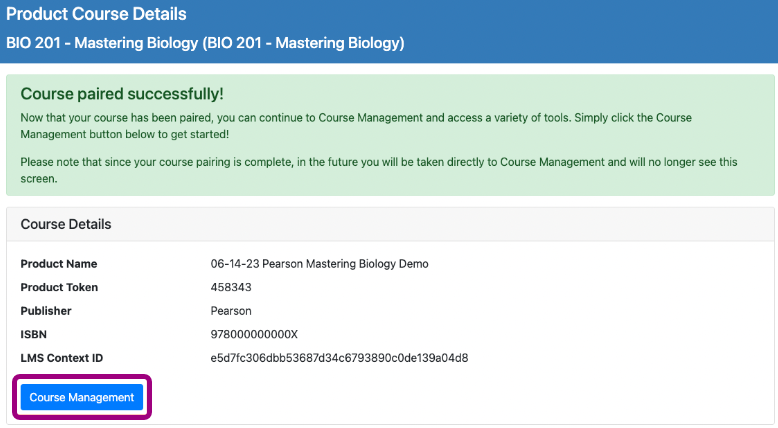
-
Select Course Management to add links to your LMS course.
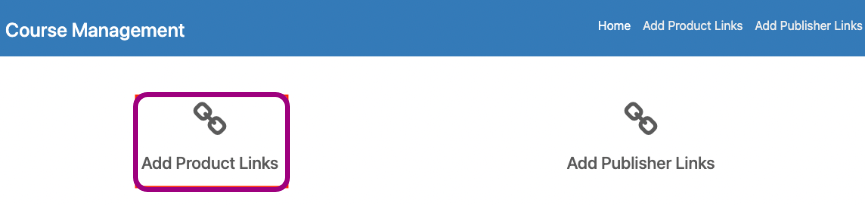
- Select Add Product Links.
- Depending on your course setup, do one of the following:
- If you see the Add Links To My Course page, select the check boxes for the Integration Support and Pearson Course Materials links. Then select Return link(s) to LMS.
- If you don't see the Add Links To My Course page, select Continue in a new window and go to step 10.
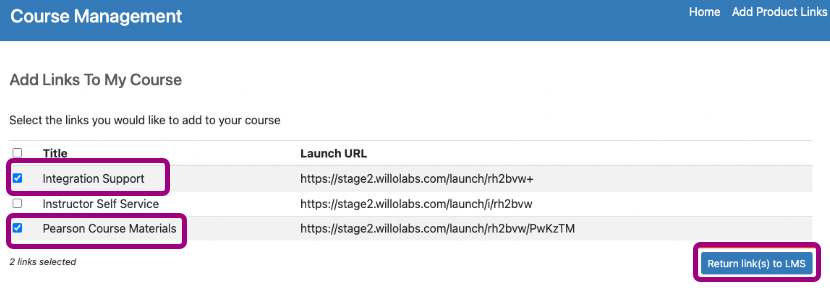
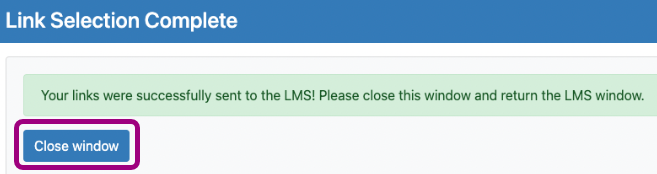
- Select Close Window.
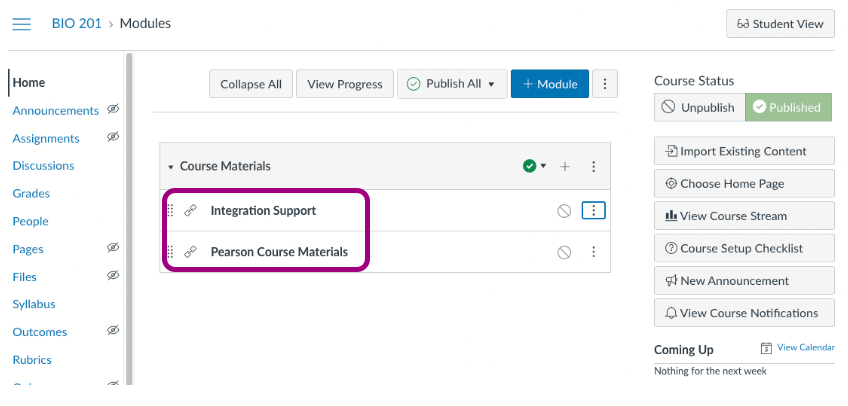
- Select Pearson Course Materials to open Pearson.
- Open your LMS course.
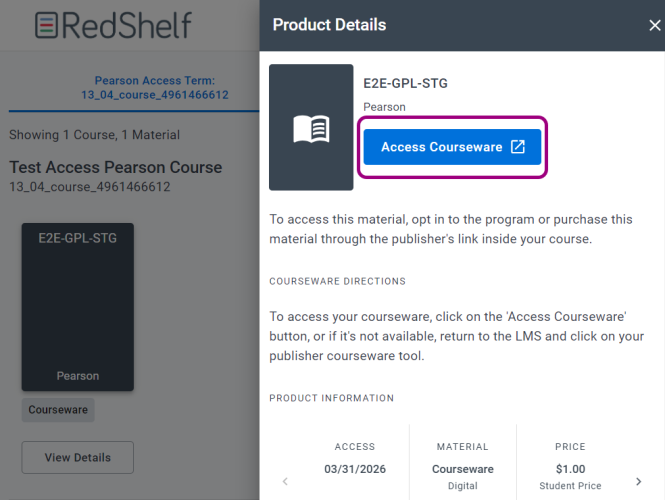
- Select the Course Materials link to access RedShelf. The name and location of the link depends on the course setup.
- Select your course or View Details.
- Select Access Courseware.
- Open your LMS course.
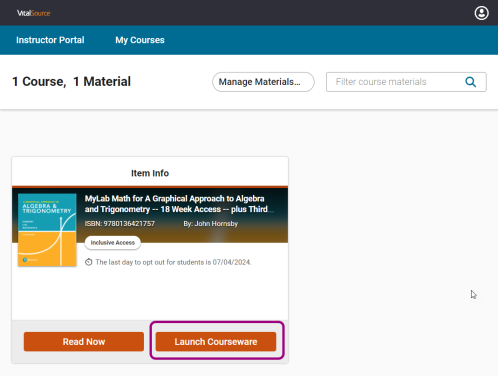
- Select the Course Materials link to access VitalSource. The name and location of the link depends on the course setup.
- Select Launch Courseware.
For additional details, see VitalSource Help.
Link accounts and pair courses
Depending on whether you're using Access Pearson or a bookstore alone or in combination, your next step is:
- Access Pearson and bookstore: If you linked accounts and paired courses using Access Pearson, you don't have to repeat these steps after enabling Access Pearson Codeless. You can access your MyLab or Mastering course from the Access Pearson or bookstore link.
- Bookstore only: If you're using a bookstore but not Access Pearson, you need to link accounts and finish setting up your integration after you enable Access Pearson Codeless.
How to identify your integration: Check the Launch Type in Diagnostics if you're unsure which integration you're using. The Launch Type for Access Pearson Codeless is Channel partner integration LTI 1.3. The Launch Type for Access Pearson is Standard integration LTI 1.3.
Updated 17 Apr 2025