Quick start: MyLab IT NextGen instructor
Get started with MyLab IT NextGen. Teach courses that give students the tools to master Microsoft® 365, Office 2021, and other essential career skills.
![]() Using an LMS? Start your course from your learning management system if you work in Blackboard, Canvas, D2L Brightspace, Moodle, Sakai, or Schoology.
Using an LMS? Start your course from your learning management system if you work in Blackboard, Canvas, D2L Brightspace, Moodle, Sakai, or Schoology.
- First steps
- Prepare your course
- Prepare your assignments
- Work with assignments
- Report performance and grades
- Manage enrollment
- How do I? videos
First steps
Create an instructor account
Register as an instructor to sign in to MyLab IT NextGen Pearson products. Use the same account for any Pearson course.
 Read how to create an account
 Watch how to create an account (1:17)
Prepare your course
Set up your course
Create your course and set up course details, including:
- The course type and name.
- The course enrollment and assignment dates.
- Access privileges for section instructors.
- The parts of the textbook covered in the course.
- Learning aid and test options.
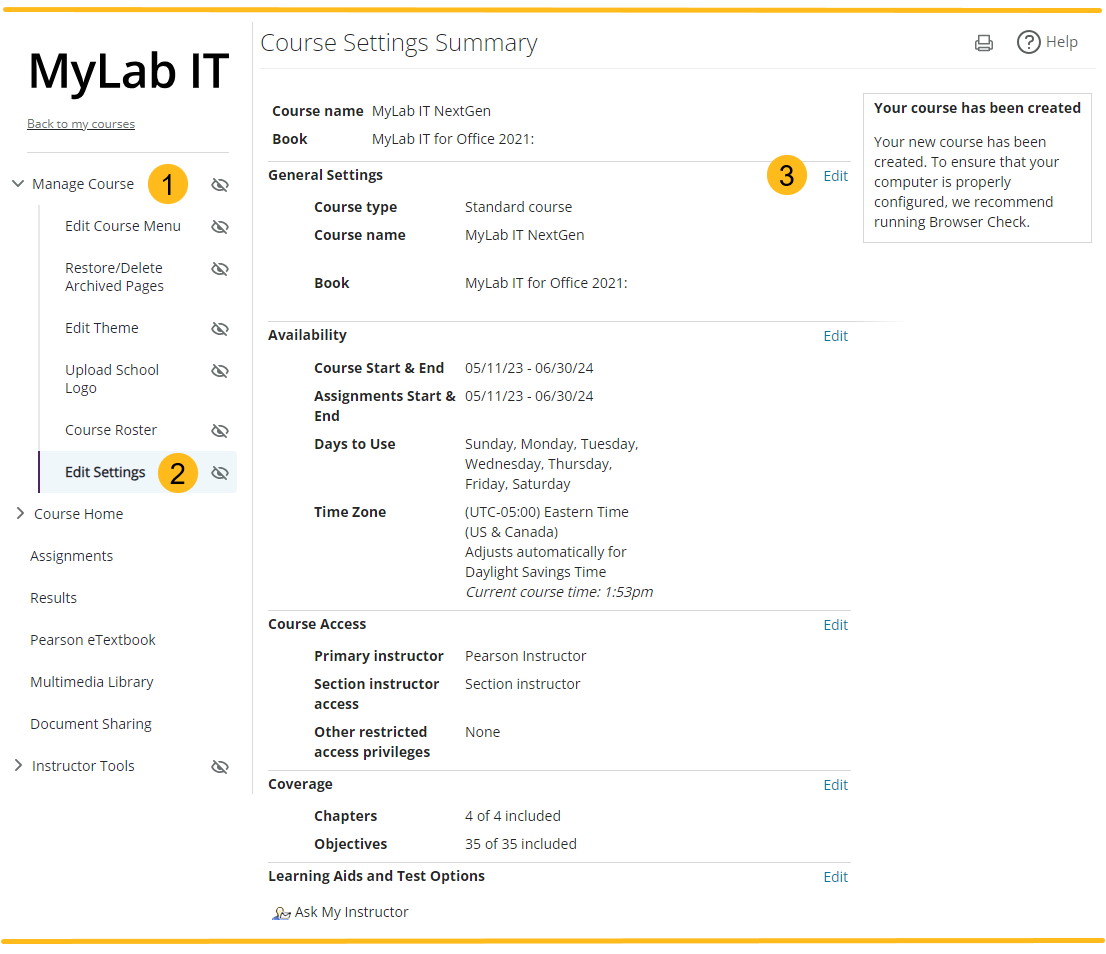
- Select Manage Course in the left menu.
- Choose Edit Settings.
- On the Course Settings Summary page, select Edit to use the course wizard and choose settings for your course.
Manage course groups
Use course groups to manage multiple sections of the same course. A course group contains a coordinator course and member courses.
The instructor who creates the course group is the coordinating instructor. They own all member sections. Coordinating instructors can enroll a section instructor and choose a teaching assistant.
A section instructor's role and capabilities are determined by the access granted by the coordinator instructor.

- Select Manage Course in the left menu.
- Choose Edit Settings.
- On the Course Settings Summary page, select Edit next to General Settings.
- Follow the steps in the Edit Course wizard.
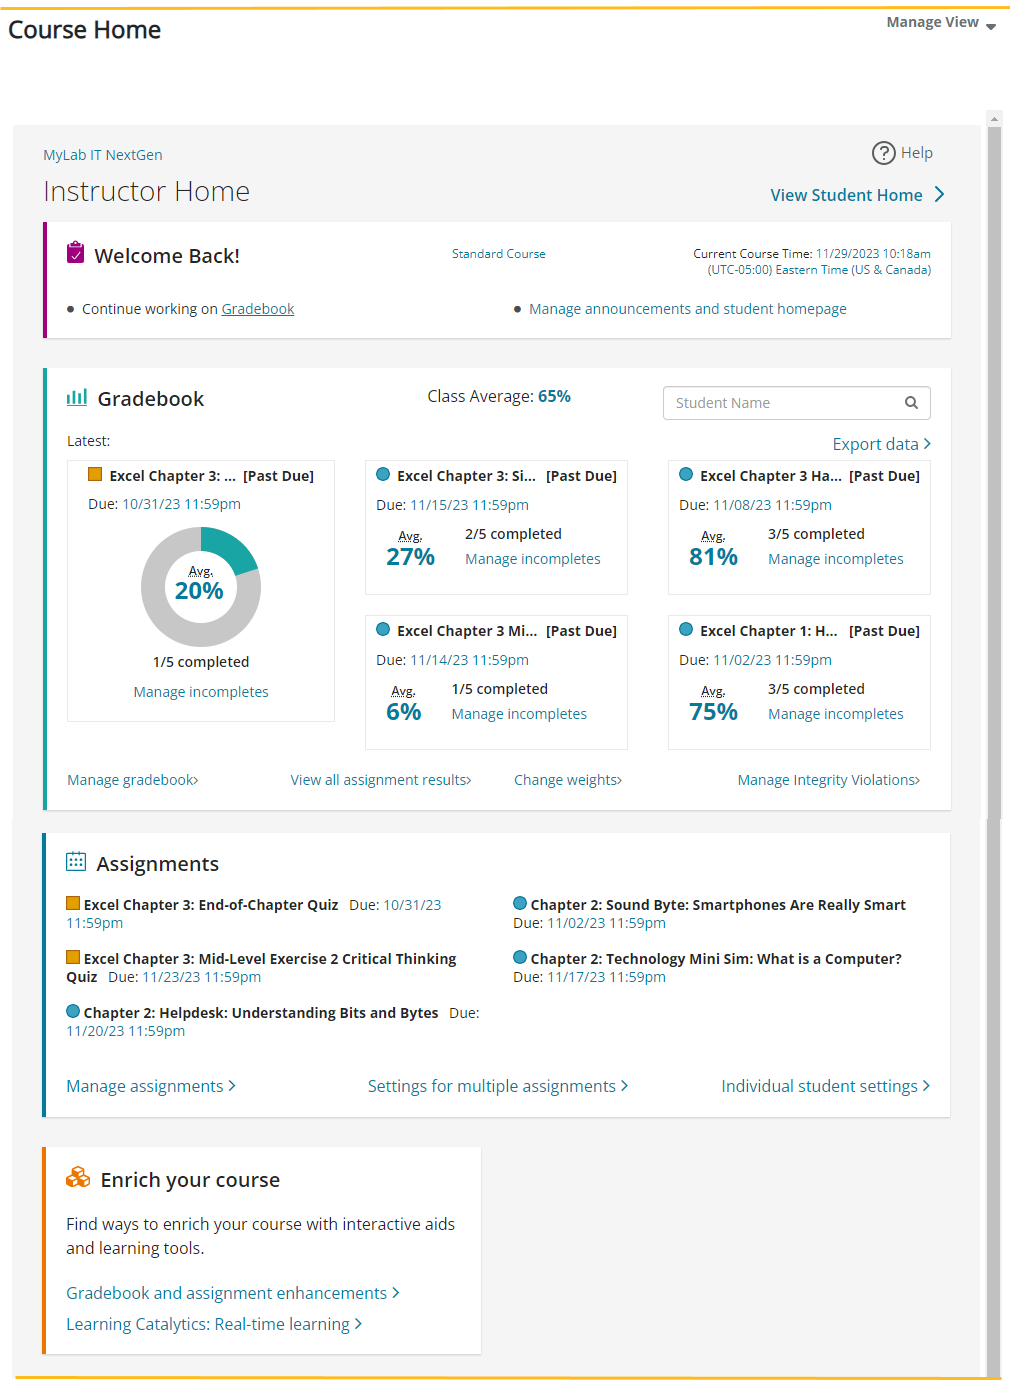
Use your instructor home page
Your Instructor Home gives you quick access to the tools you need to conduct your course. As your course progresses, the options available change to reflect your most recently used tasks. You can use the student view to experience the course as your students will and complete assignments as a student.
Customize the student home page
Choose student home page settings to customize what students see on their home page.
When choosing home page settings you can:
- Select the time period for which to view the calendar.
- Show or hide the student's overall score.
- Set a minimum completion score for moving assignments from the Current Assignments section to the Completed Assignments section.
- Show or hide announcements from Pearson.
- Optionally use the student home as the default instructor home page.
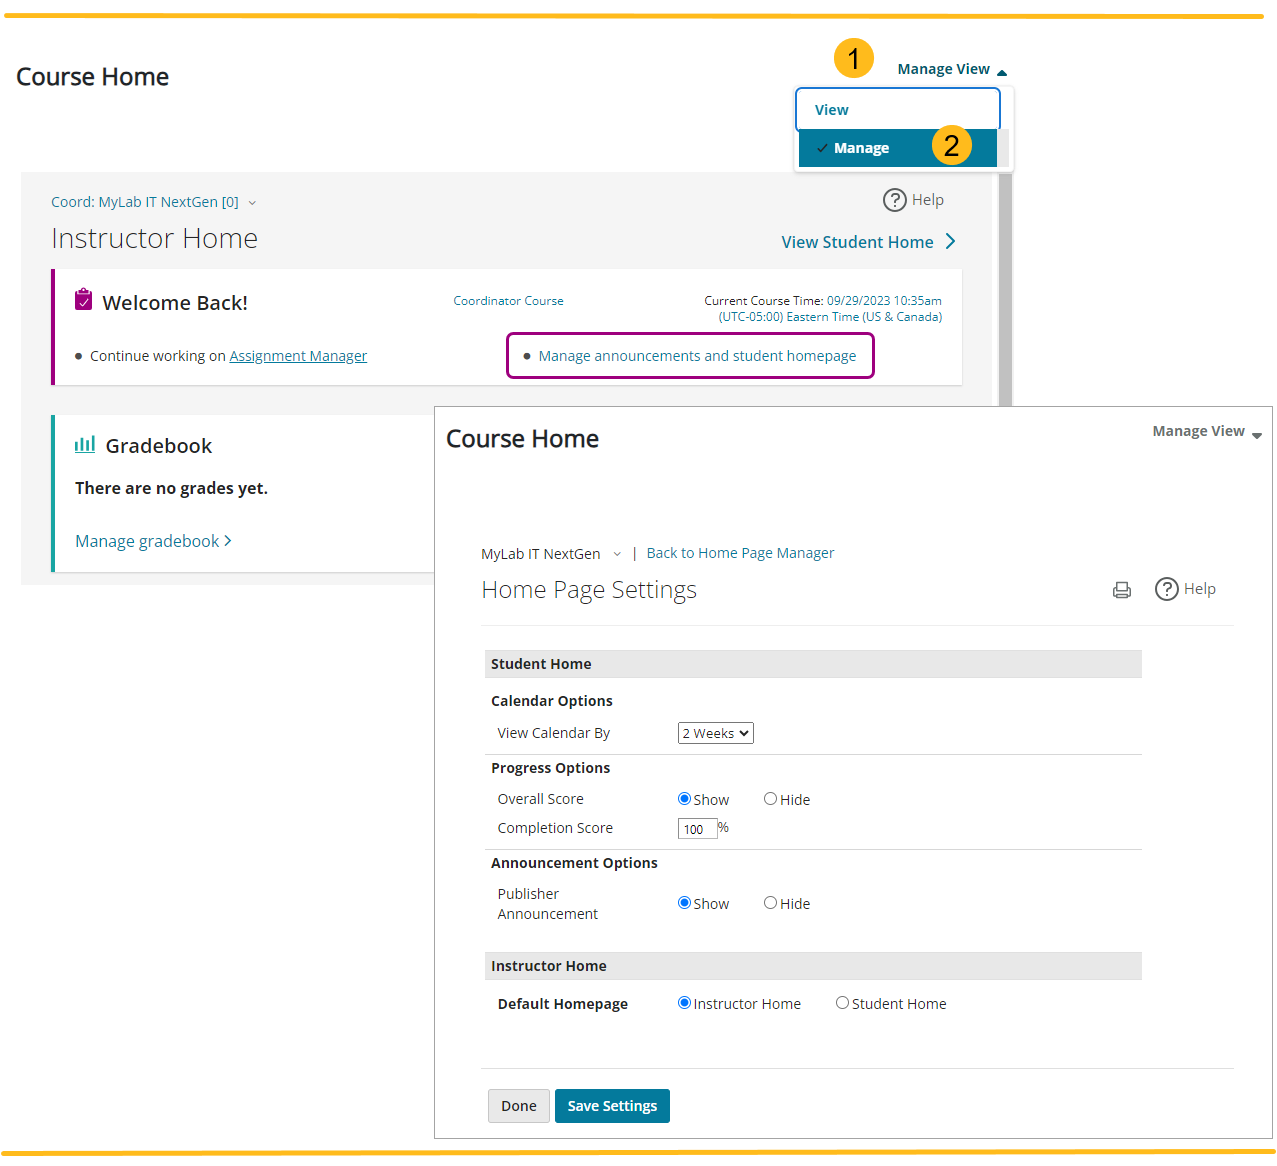
- In the top-right corner of your Course Home, select Manage View.
- From the list, select Manage. Or, on the Course Home > Welcome section, select Manage announcements and student homepage.
The Home Page Settings page opens.
Prepare your assignments
Import pre-built assignments
Before you create any assignments, first copy and assign one or more sample assignments into your course.
Sample homework is available to students only if you copy and assign it.
- In the Assignment Manager, select Create.
- From the list, choose Import pre-built assignments.
- Follow the steps in the Copy and Assign Sample Assignments wizard.
Some MyLab IT pre-built assignments include Credly badges.
Use the assignment manager
Use the Assignment Manager to view, create, and manage assignments.
When working in the Assignment Manager you can:
- Create or import assignments from the Create menu.
- Manage assignments from the Manage menu.
- Filter the assignment list.
- Edit, copy, or view the assignment from the Options menu.
- Change assigned status of an assignment.
- Use the list view.
- Use the calendar view.
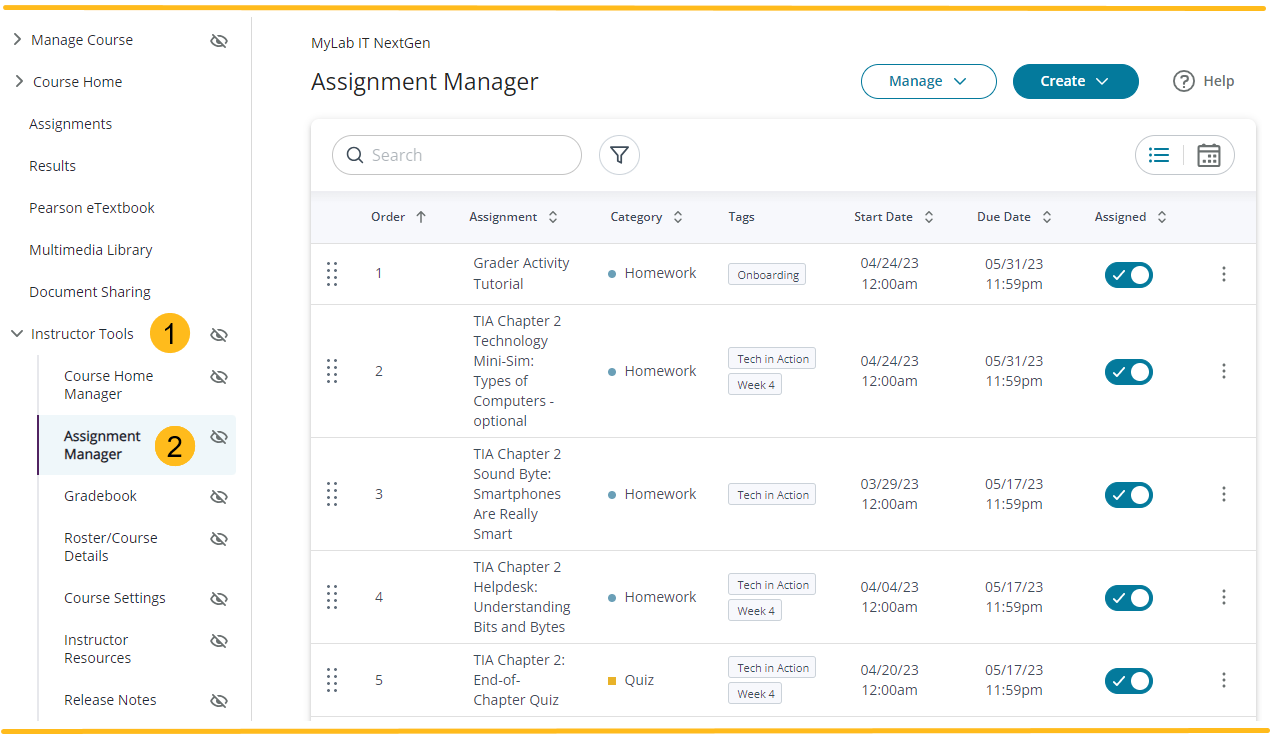
- Select Instructor Tools in the left menu.
- Choose Assignment Manager.
Create office simulation assignments
Create office simulation assignments to train and assess your students on Microsoft® Office content. Student results are automatically scored and saved to the gradebook.
All standard chapter simulation training and exam activities are available as pre-built assignments. Only follow the steps below to assemble your own custom simulation activity.
- In the Assignment Manager, select Create.
- From the list, choose Create Office Simulation.
- Follow the steps in the Office Simulation wizard.
Create office grader assignments
Create office grader homework, tests, or quizzes using the assignment creation wizard. Office Grader assignments are real tasks in a Microsoft® application instead of a simulated environment.
Students download a Microsoft file to complete an assignment. They upload the completed assignment and submit it for automatic evaluation by the MyLab Office Grader application.
All standard grader projects are available as pre-built assignments. Only follow the steps below to assemble your own grader project in the Project Creation tool.
- In the Assignment Manager, select Create.
- From the list, choose Create Office Grader.
- Follow the steps in the Office Grader wizard.
With work assignments
Edit assignments
Edit either a single assignment or groups of assignments if no student has worked on them.
When working with assignments you can:
- Edit assigned status, start and due dates, late submission settings, and password settings.
- Remove or replace questions in an assignment after students have worked on it.
- Change the order of assignments.
- Delete individual assignments or multiple assignments at one time. You cannot delete assignments with results.
- Select Instructor Tools in the left menu.
- Choose Assignment Manager.
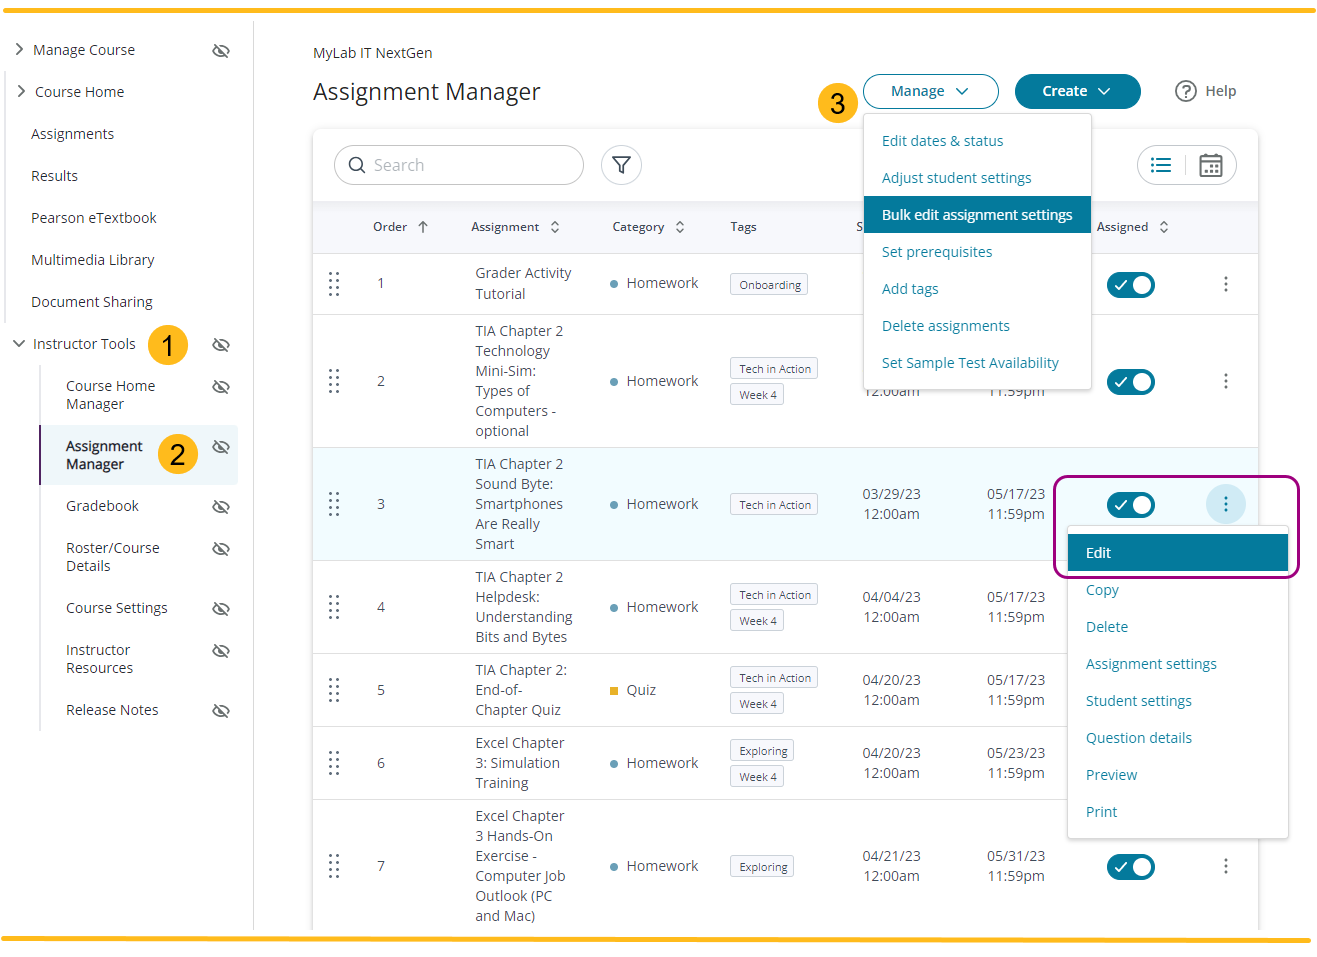
- In the Assignment Manager, select Manage > Bulk edit assignment settings. Or, select the 3-dot Options menu, and choose Edit.
Tag assignments
Tag assignments to group them, assign tagged assignments to specific students, or omit their results from score calculations.
Your tags show in assignment lists, but students do not see assignment tags.
Assignment tags are not sent to your LMS gradebook.
Tag names must be unique. You cannot create a tag in a coordinator course when it is used in a member section and vice versa.
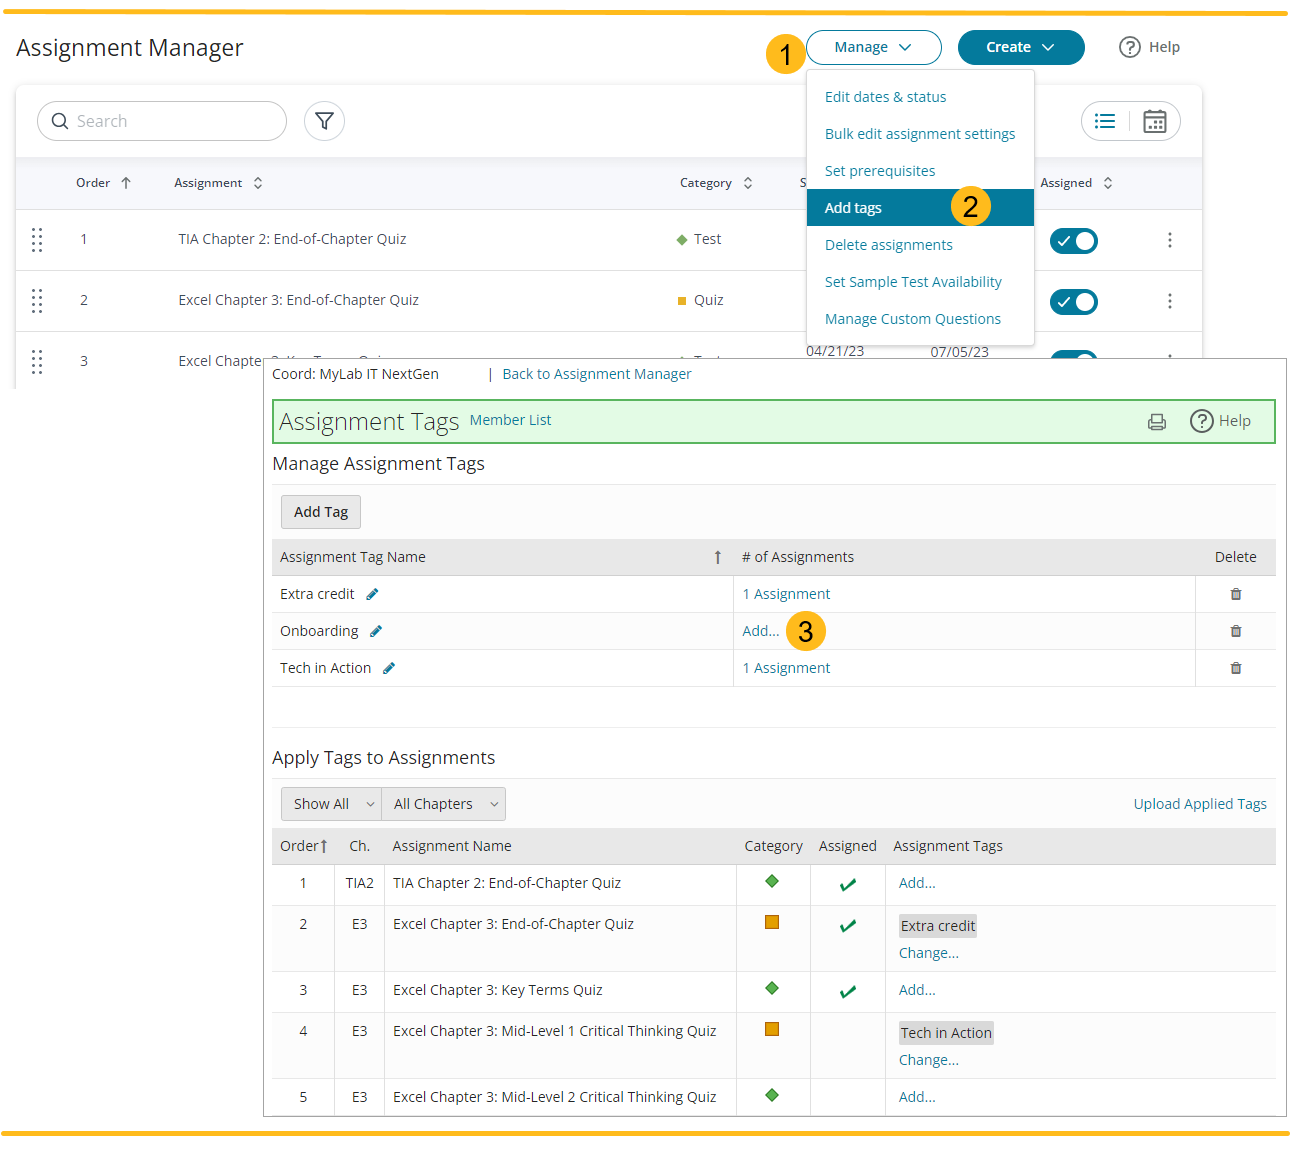
- Open the Assignment Manager and select Manage.
- From the list, choose Add tags.
After you create tags, you can apply them to one or more assignments.
- To apply tags manually, select Add in the list of tags and choose the assignments.
Import assignments
Import assignments from your own course or from courses taught by other instructors.
- In the Assignment Manager (for the course you want to import into), select Create.
- From the list, choose Import from another course.
- Follow the steps in the Import Assignments wizard.
Report performance and grades
Use the gradebook
Use the gradebook to view student results, manage scores, generate reports, and organize your student list.
When working in your gradebook you can:
- Manage scores and incompletes.
- Change weights.
- Apply grade sync settings.
- Create offline assignments.
- View student results and work.
- Import or export results.
- View alerts.
- View integrity violation warnings.
- View overall class performance.
- View your roster.
- Access student management and reporting options.
- Analyze results.
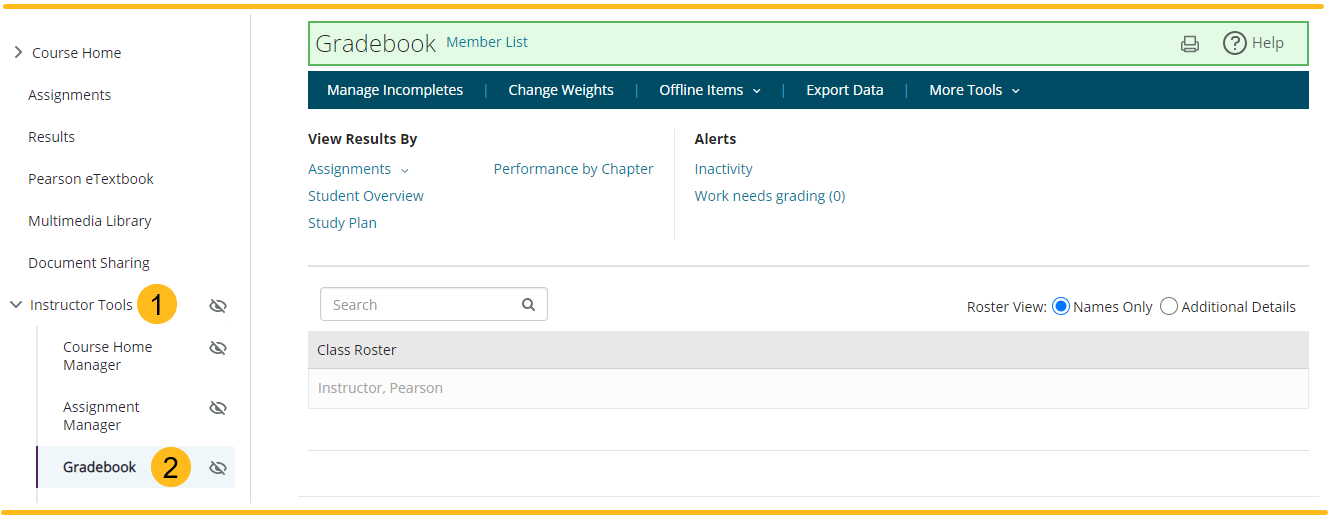
- Select Instructor Tools in the left menu.
- Choose Gradebook.
Review student work
Review students’ assignments and Study Plan work.
The Assignments view of the gradebook shows you class average and median scores, the number of results, the assignments, individual student assignment results.
The instructor view of a student's Results page lets you review the student's work, change assignment scores, and email the student.
When you use proctoring with Respondus Monitor Proctoring, you can review recorded sessions.
Alerts automatically post in your gradebook to warn you about inactive students and work that needs manual grading.
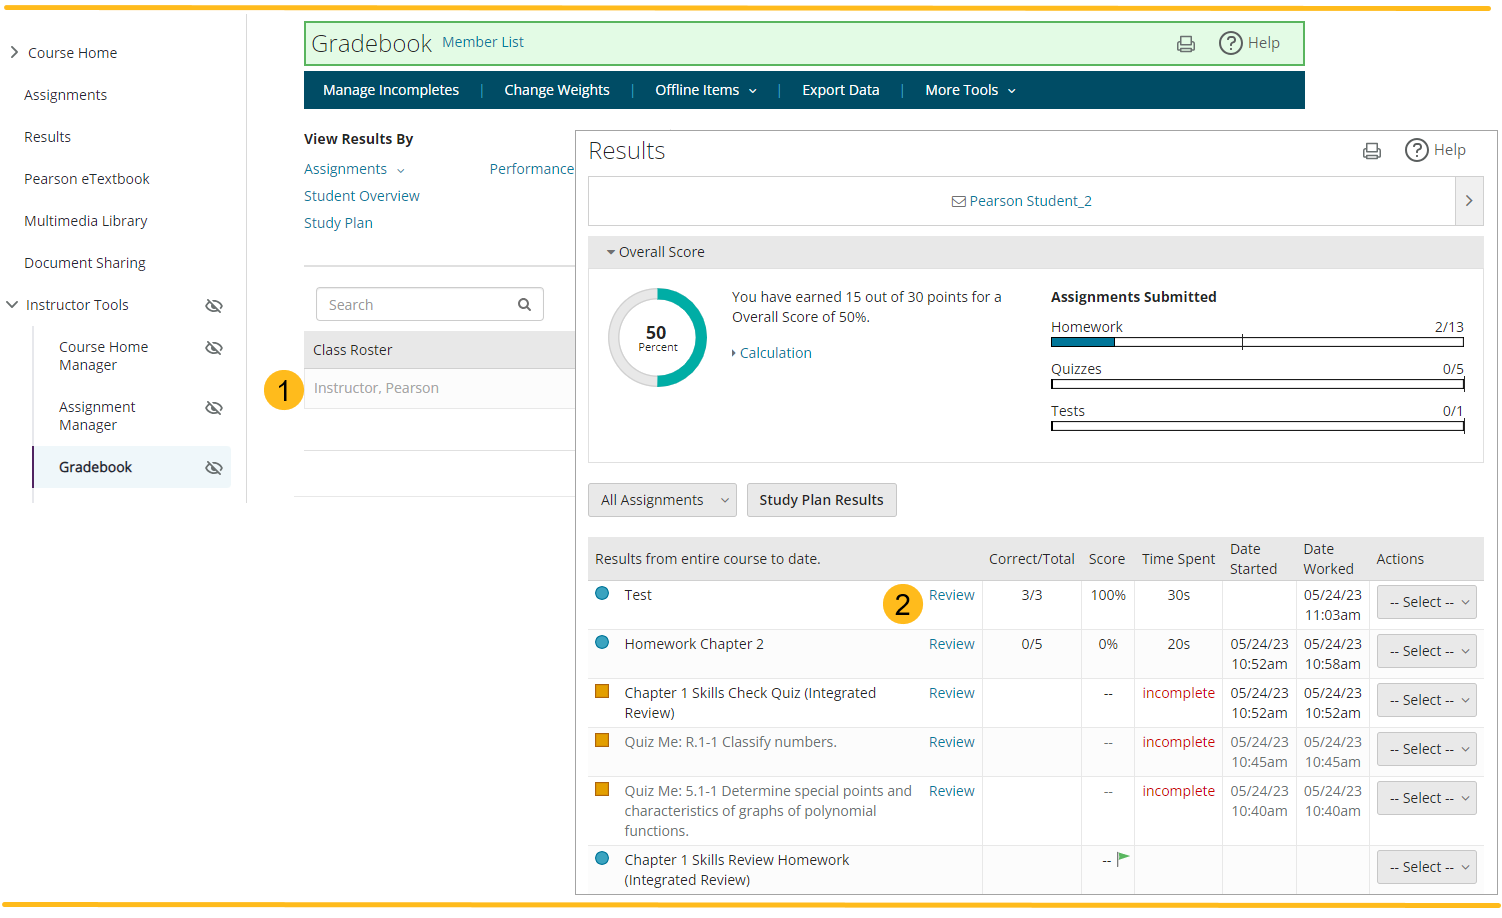
- In the gradebook, select the name of a student.
- On the student's Results page, select Review for the assignment.
Manage scores
Change assignment scores for an individual student or multiple students at one time.
When you enter a non-zero score on a homework, the student can no longer open the assignment, even if the due date has not yet passed.
When managing scores you can:
- Give students full credit for a question on a test or quiz.
- Set scoring options.
- Omit or delete results.
- Submit scores for incomplete assignments.
- Change assignment weighting.
- Drop lowest scores.
- Score offline work.
- Use custom categories.
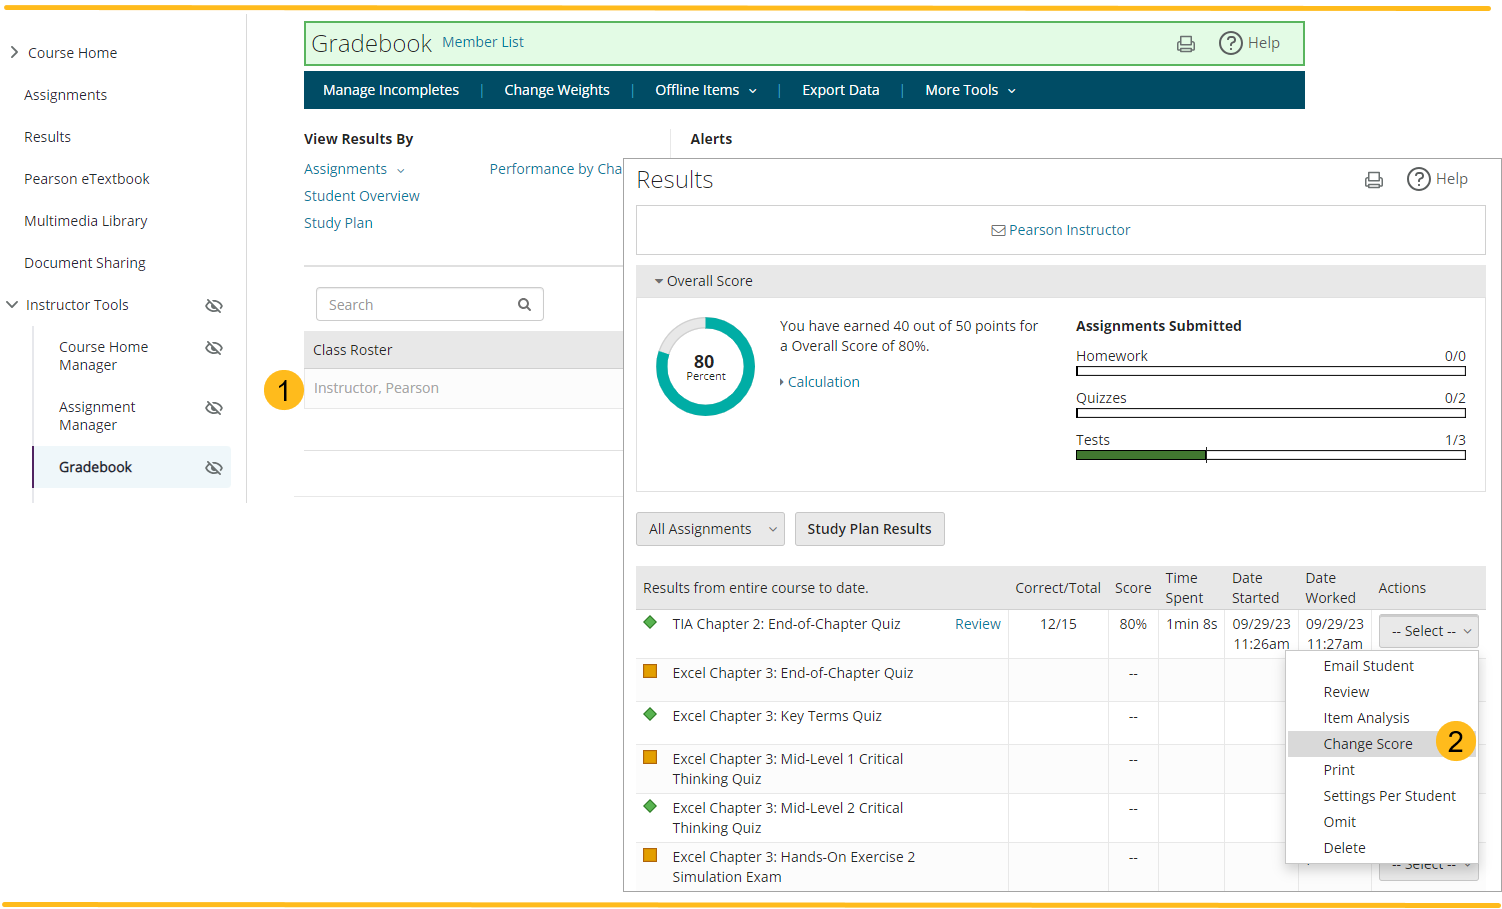
- To change scores from the gradebook, select a student’s name to see their Results page.
- For an assignment, use to Actions menu to select Change Score.
The Change Scores page opens.
Sync grades to your LMS
Sync grades from your course to your learning management system (LMS) gradebook when you work in Blackboard, Canvas, D2L Brightspace, Moodle, Sakai, or Schoology.
Grades automatically sync when students complete assignments, but there might be a brief delay.
Syncing is one-way, from your MyLab IT gradebook to your LMS gradebook.
When setting up grade sync you can:
- Sync assignment raw scores.
- Sync assignment weighted scores.
- Sync only overall scores.
Before you begin: From your LMS course, select the MyLab or Pearson link and, if needed, link your accounts. Then pair your LMS course.
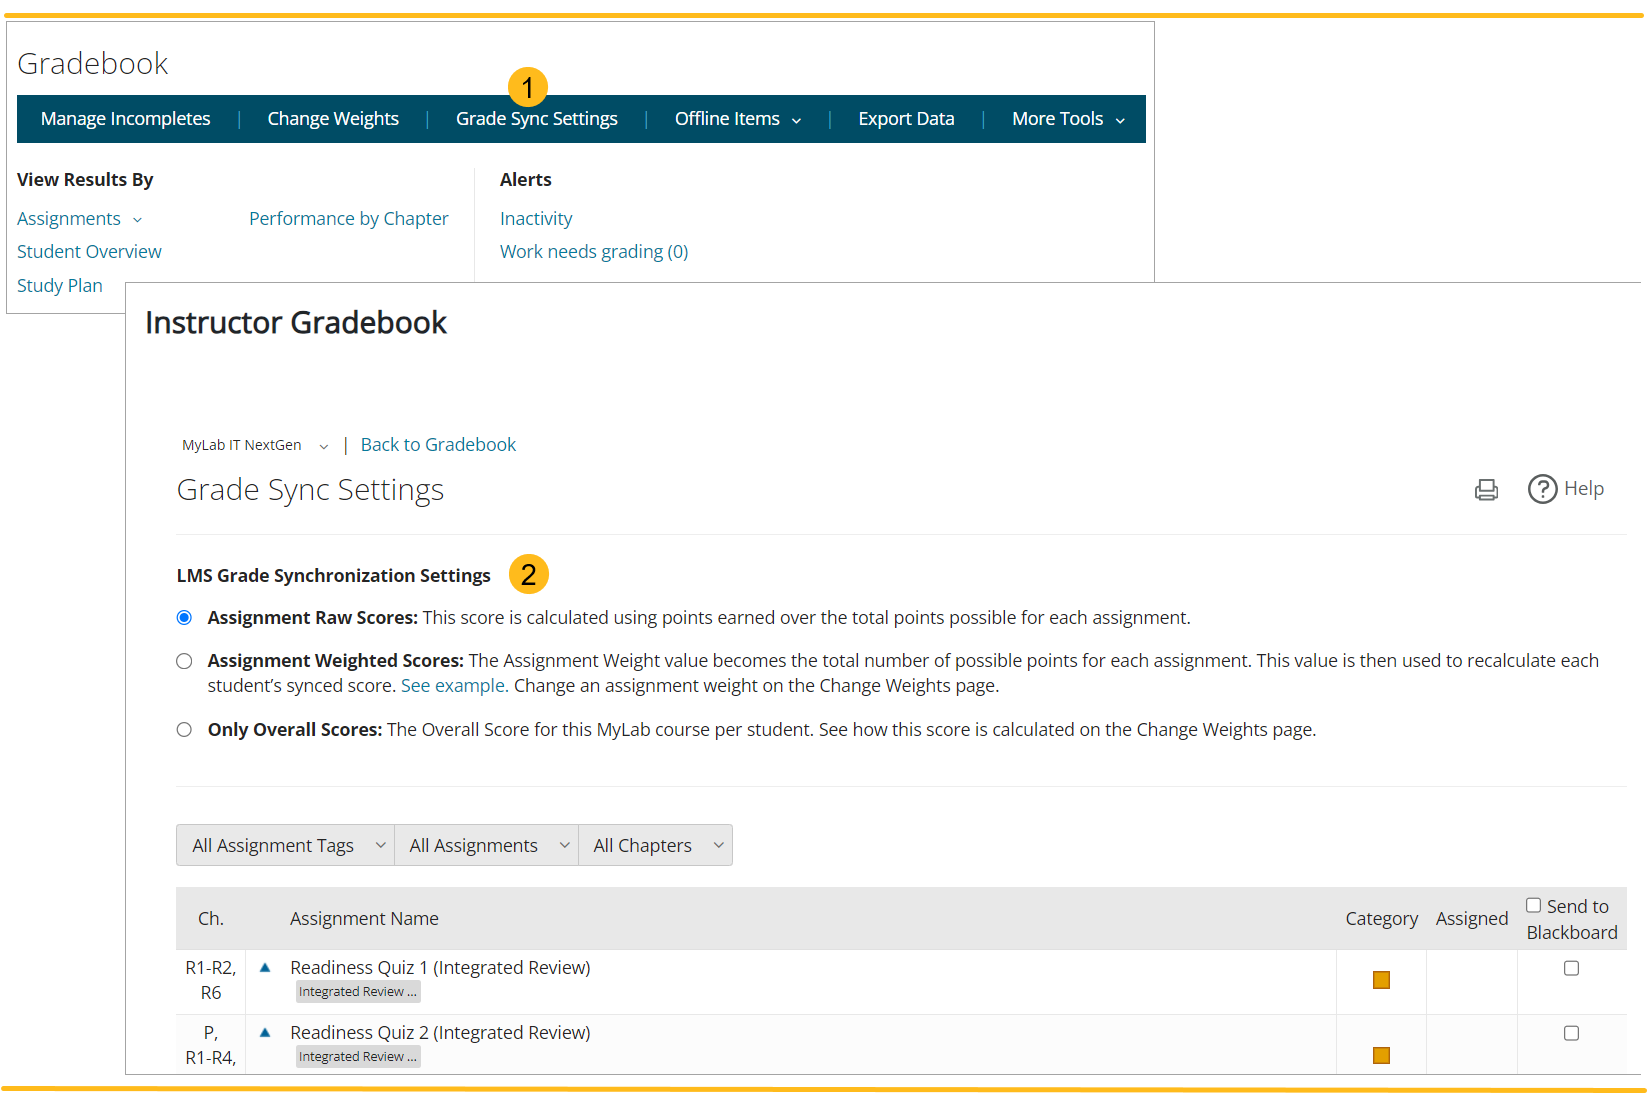
- In your MyLab IT gradebook, select Grade Sync Settings from the toolbar to open the Grade Sync Settings page.
- On the Grade Sync Settings page, choose how to sync grades.
Manage enrollment
Enroll students
Invite students to enroll in your course. Students need a valid email address and either a course invitation or the course ID.
Students can also register at mlm.pearson.com using:
- The course ID.
- The invitation link.
- A valid email address.
- A student access code.
- A valid credit card or, if available, PayPal or Apple Pay.
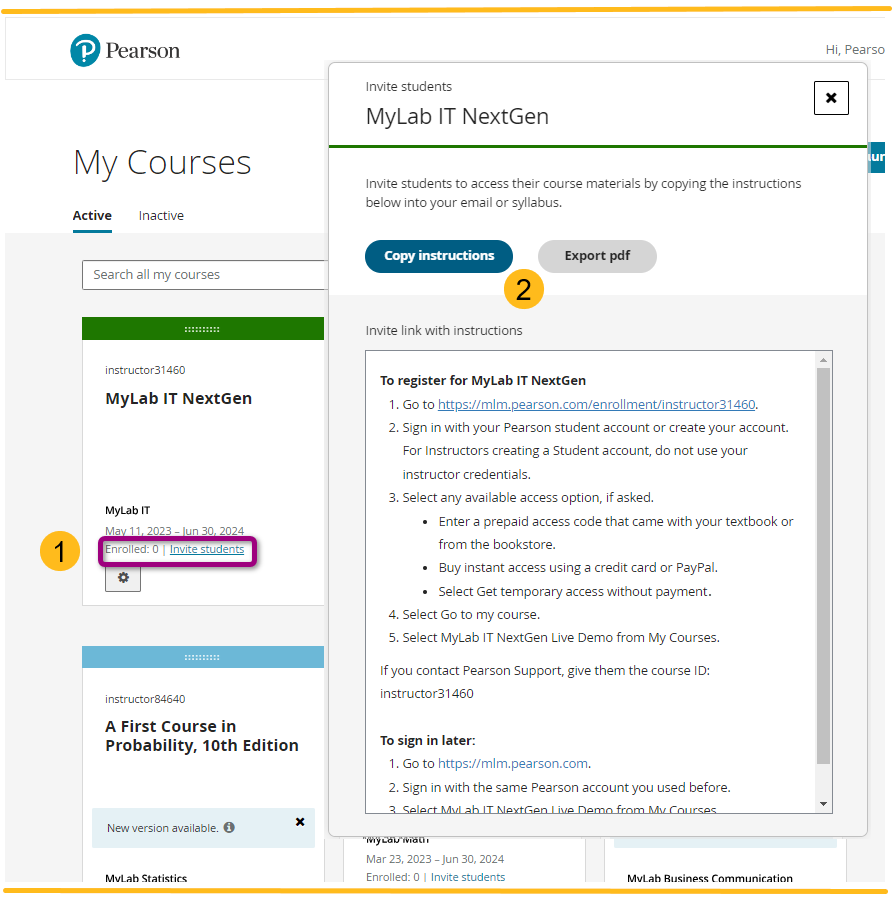
- Select Invite students on your course card.
- Copy or print the instructions to share with students. Students use the course URL to go directly to the registration page.
Manage announcements
Create and edit announcements to post on student home pages and email them to students.
When working with announcements you can:
- Choose when to display the announcement.
- Send the announcement to students with a selected tag.
- Use hyperlinks in announcements.
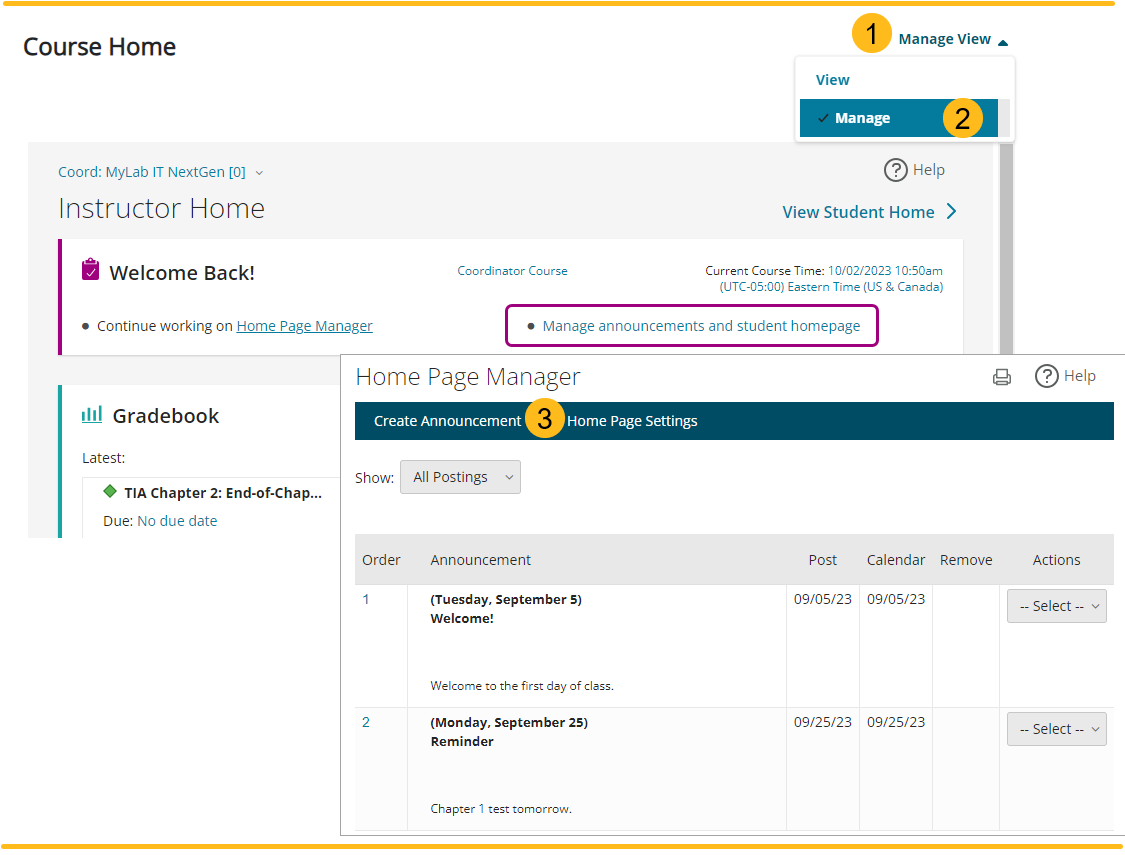
- In the top-right corner of your Course Home, select Manage View.
- From the list, select Manage. Or, on the Course Home > Welcome section, select Manage announcements and student homepage.
The Home Page Settings page opens.
- Select Create Announcement.
Or, select Actions > Edit to update an existing announcement.
Email students
Contact students by email to let them know course information. When you email students, you are automatically cc'ed. Students see only their own email address, but your copy shows the full list of recipients.
When emailing students you can:
- Search for students based on performance criteria and email only these students.
- Email announcements.
- Email individual students from their Results page.
- Email students using alerts in the gradebook.
- Attach up to five files to an email.
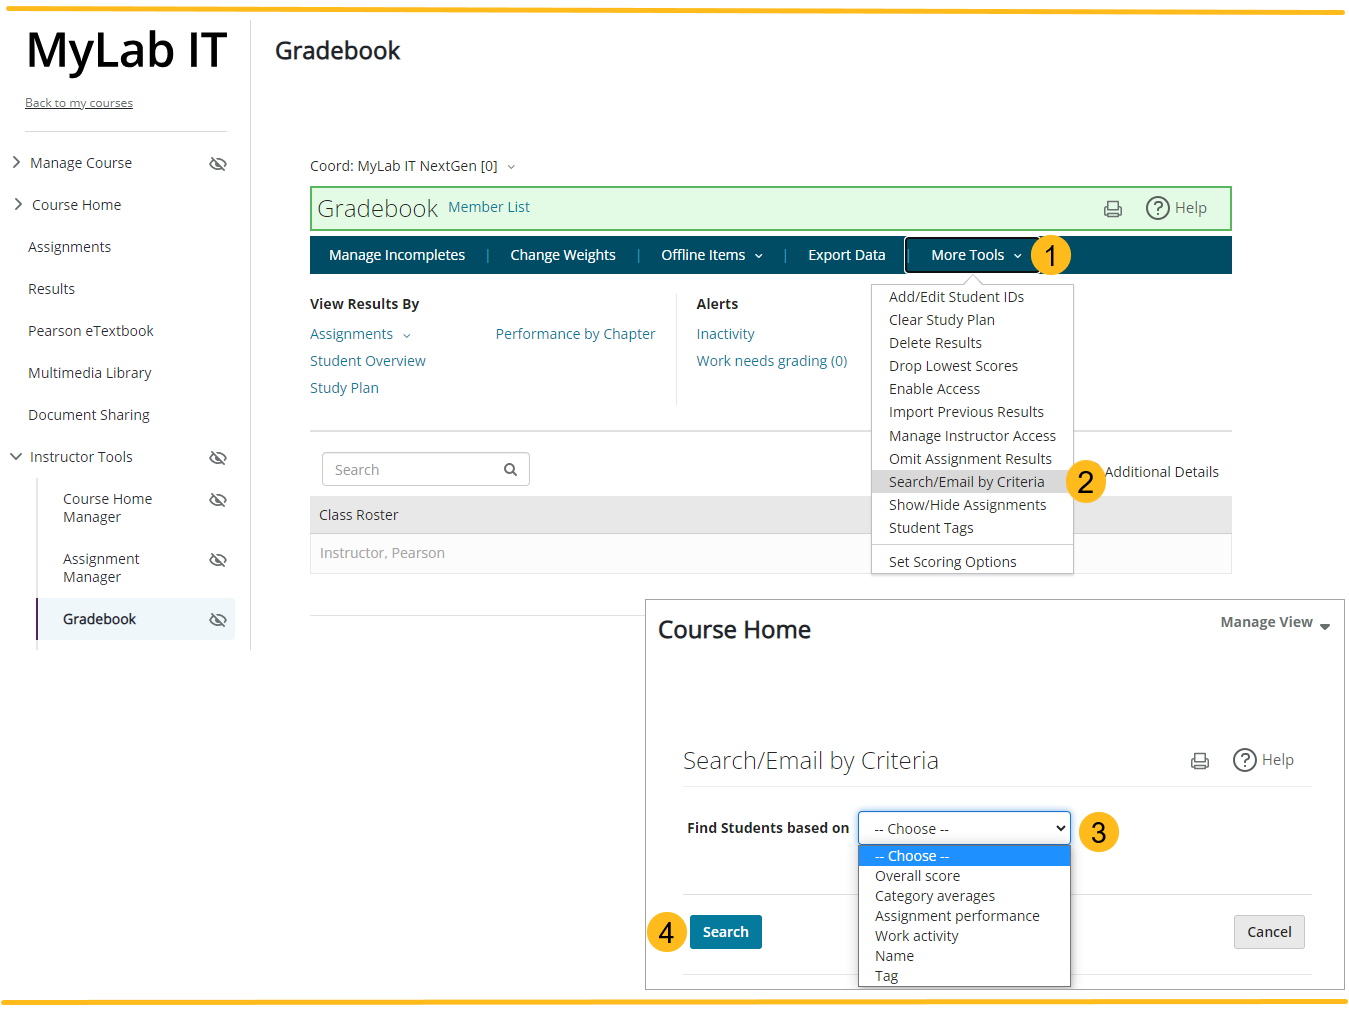
- Open the gradebook and select More Tools.
- From the list choose Search/Email by Criteria.
- On the Search/Email by Criteria page, choose your search criteria from the menu.
- Select Search.
Tag students
Tag students to group them. Use tags to identify students with specific needs, email only tagged students, send announcements only to tagged students, and so on. Students do not see their tags.
Student tags are not shared with a learning management system.

- Open the gradebook and select More Tools.
- From the list choose Student Tags.
- On the Student Tags page, select Add Tag and enter the name for each tag you want to create.
How do I? videos
Refer to short How do I? videos to get started.
MyLab IT NextGen Walkthrough (24:36)
MyLab IT NextGen Initial Course Set Up (6:09)
MyLab IT NextGen Customizing Grader Projects (5:55)
MyLab IT NextGen Learning Aids (5:30)